1. Einleitung
This manual provides comprehensive instructions for the installation, operation, and maintenance of the Genius PROCODER GENIUS 6100335. The PROCODER GENIUS 6100335 is an advanced electronic module designed for model railway systems, specifically for programming and controlling signals, lighting, and other accessories within a digital command control (DCC) environment. It enhances the functionality and realism of your model railway layout by allowing precise configuration of various components.
2. Sicherheitshinweise
Please read and understand all safety instructions before installing or operating the PROCODER GENIUS 6100335. Failure to follow these instructions may result in damage to the device, your model railway system, or personal injury.
- Elektrische Sicherheit: Always disconnect power from your model railway system before making any electrical connections. Ensure all wiring is correctly polarized and insulated.
- Nur zur Verwendung im Innenbereich: This device is designed for indoor use in a dry environment. Avoid exposure to moisture, extreme temperatures, or direct sunlight.
- Belüftung: Sorgen Sie für ausreichende Belüftung rund um das Modul, um eine Überhitzung zu vermeiden.
- Kinder: This product is not a toy. Keep out of reach of small children due to small parts and electrical components.
- Qualifiziertes Personal: Installation and maintenance should ideally be performed by individuals familiar with model railway electronics.
3. Packungsinhalt
Carefully unpack the box and verify that all items are present and undamaged. If any items are missing or damaged, please contact your retailer.
- 1x PROCODER GENIUS 6100335 Main Module
- 1x Sensor/Probe Unit
- 1x Anschlusskabel
- 1x Mounting Hardware (e.g., screw, nut)
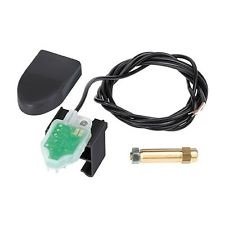
Figure 1: Contents of the PROCODER GENIUS 6100335 package. This image displays the main electronic module with its green circuit board visible, a black plastic cover, a coiled black connection cable, a separate sensor or probe unit, and a small piece of mounting hardware (a screw and nut).
4. Einrichtung und Installation
Follow these steps to correctly install your PROCODER GENIUS 6100335 module into your model railway system.
4.1. Physische Platzierung
Choose a dry, accessible location under your model railway layout, away from direct heat sources or excessive dust. The module should be mounted securely using the provided mounting hardware. Ensure there is sufficient space for cable routing and ventilation.
4.2. Electrical Connection to DCC Bus
- Stromversorgung trennen: Ensure your DCC central unit and all power supplies to the layout are switched off.
- Identify DCC Bus: Locate the main DCC bus wires (typically red and black, or as specified by your DCC system) that carry the digital signal and power to your layout accessories.
- Verbindungsmodul: Connect the two main power/DCC input wires from the PROCODER GENIUS 6100335 module to the DCC bus. Observe correct polarity if indicated on the module or in your DCC system's documentation. Secure connections firmly.
- Einschalten: Once all connections are secure, you may reapply power to your DCC system. The module's indicator LED (if present) should illuminate, indicating power.
4.3. Sensor/Probe Connection
The included sensor/probe unit connects to the PROCODER GENIUS 6100335 module via the provided connection cable. This sensor is typically used for detection, feedback, or specific programming tasks.
- Kabel anschließen: Plug one end of the connection cable into the designated port on the main PROCODER GENIUS module.
- Sensor anschließen: Plug the other end of the cable into the sensor/probe unit.
- Positionssensor: Position the sensor according to its intended function (e.g., track occupancy detection, programming track feedback). Refer to specific application guides for optimal sensor placement.
5. Bedienung
The PROCODER GENIUS 6100335 is primarily a programming and control interface for DCC-compatible devices. Its operation involves using your DCC central unit or a dedicated programming software to interact with the module.
5.1. Initializing the Module
Upon first power-up, the module may require initialization. Consult your DCC system's manual for how to detect and address new accessory decoders or programming interfaces. The PROCODER GENIUS 6100335 typically operates as a DCC accessory decoder or a programming station.
5.2. Programming Functions
The "PROCODER" designation suggests advanced programming capabilities. This module allows you to:
- Configure Accessory Decoders: Program CVs (Configuration Variables) of connected accessory decoders for signals, turnouts, and lighting effects.
- Read Decoder Status: Read current CV values from decoders to verify settings.
- Automate Functions: Potentially integrate with layout automation software to trigger events based on sensor input.
- Firmware aktualisieren: Some advanced modules allow for firmware updates via the DCC bus or a dedicated port. Refer to the Genius webWebsite für verfügbare Updates.
Specific programming procedures will depend on your DCC central unit and the type of decoders you are programming. Always refer to the documentation for those devices in conjunction with this manual.
5.3. Using the Sensor/Probe
The sensor/probe can be configured for various tasks, such as:
- Belegungserkennung: Detecting the presence of trains on a specific track section.
- Rückmeldung: Providing feedback to your DCC system or control software about the state of a physical element.
- Programming Track Feedback: Assisting in programming decoders by confirming successful writes.
Configuration of the sensor's function is typically done through CV programming on the PROCODER GENIUS module itself or through associated software.
6. Wartung
The PROCODER GENIUS 6100335 is designed for reliable, long-term operation with minimal maintenance.
- Reinigung: Keep the module free from dust and debris. Use a soft, dry cloth for cleaning. Do not use liquid cleaners or solvents.
- Verbindungen: Periodically check all electrical connections to ensure they remain secure.
- Umfeld: Ensure the operating environment remains within recommended conditions (dry, moderate temperature).
7. Fehlerbehebung
If you encounter issues with your PROCODER GENIUS 6100335, refer to the following common problems and solutions:
| Problem | Mögliche Ursache | Lösung |
|---|---|---|
| Module not powering on (no LED indicator) | No power from DCC bus; incorrect wiring; faulty module. | Check DCC bus power; verify wiring connections and polarity; test module on a different DCC bus if possible. |
| Cannot program decoders | Incorrect connection to programming track/bus; decoder not in programming mode; incorrect CV values. | Ensure correct wiring for programming; verify decoder is ready for programming; consult decoder manual for CV ranges. |
| Sensor not detecting/providing feedback | Sensor incorrectly positioned; faulty sensor cable; incorrect module configuration. | Adjust sensor position; check sensor cable for damage; verify module's CV settings for sensor input. |
| Intermittierender Betrieb | Loose connections; electrical interference; power fluctuations. | Secure all connections; ensure proper grounding; check power supply stability. |
If the problem persists after attempting these solutions, please contact Genius customer support.
8. Spezifikationen
The following are the general technical specifications for the PROCODER GENIUS 6100335. Note: Specific values may vary slightly.
- Modell: 6100335
- Marke: Genius
- Eingangslautstärketage: 12-24V AC/DC (DCC Bus Voltage)
- Stromverbrauch: Approx. 20-50mA (idle, without external loads)
- Betriebstemperatur: 0 °C bis 40 °C (32 °F bis 104 °F)
- Dimensions (Module): Ca. 40 mm x 25 mm x 15 mm (L x B x H)
- Konnektivität: DCC Bus, Sensor Input
- Kompatibilität: NMRA DCC compliant systems
9. Garantie und Support
Genius products are manufactured to high-quality standards. For warranty information, please refer to the warranty card included with your purchase or visit the official Genius website. For technical support, troubleshooting assistance, or to inquire about replacement parts, please contact Genius customer service through their official channels.
Bitte bewahren Sie Ihren Kaufbeleg für Garantieansprüche auf.


