1. Einleitung
This manual provides essential information for the safe and effective operation, installation, and maintenance of your AL-KO Type 501 Plus Braked Winch. Please read these instructions carefully before using the winch to ensure proper function and to prevent injury or damage. The AL-KO Type 501 Plus is a robust hand winch designed for various lifting and pulling applications, featuring a reliable braking mechanism for controlled load handling.
2. Sicherheitshinweise
Always prioritize safety when operating the winch. Failure to follow these instructions can result in serious injury or equipment damage.
- Lesen Sie das Handbuch: Ensure all operators have read and understood this instruction manual before use.
- Tragfähigkeit: Never exceed the maximum rated load capacity of 500 kg. Overloading can cause winch failure and serious injury.
- Sichere Montage: Ensure the winch is securely mounted to a stable and appropriate structure capable of withstanding the maximum load.
- Vor Gebrauch prüfen: Before each use, inspect the winch, rope/strap, and all connections for signs of wear, damage, or corrosion. Do not use if any components are compromised.
- Behalten Sie die Kontrolle: Always maintain a firm grip on the handle during operation. The braking mechanism is designed for controlled lowering, but sudden release can be dangerous.
- Abstand halten: Keep hands, clothing, and body parts clear of moving parts, especially the drum, rope/strap, and gears.
- Proper Rope/Strap: Use only ropes or straps suitable for the winch's capacity and application. Ensure the rope/strap is correctly wound onto the drum.
- Avoid Shock Loads: Do not allow loads to drop or create sudden impacts on the winch. Apply tension smoothly.
- Children and Unauthorized Persons: Halten Sie Kinder und Unbefugte während des Betriebs von der Winde fern.
- Umgebungsbedingungen: Be aware of environmental factors such as slippery surfaces, poor lighting, or extreme weather that could affect safe operation.
3. Produktüberschreitungview und Komponenten
The AL-KO Type 501 Plus winch consists of several key components working together to provide reliable lifting and pulling. Familiarize yourself with these parts for safe operation.

Abbildung 3.1: The AL-KO Type 501 Plus Braked Winch, showing the main body, drum, and detachable handle.
- Winch Body: The main frame that houses the internal mechanisms and provides mounting points.
- Trommel: The cylindrical part around which the rope or strap is wound.
- Handhaben: Detachable crank handle used to operate the winch.
- Braking Mechanism: An internal system that automatically holds the load when the handle is released and allows for controlled lowering.
- Der Reglerknopf: A rotating knob or lever (depending on model) to switch between lifting and lowering modes, or to engage/disengage the brake for controlled descent.

Abbildung 3.2: Seite view illustrating the robust gear mechanism within the winch body, responsible for transmitting power from the handle to the drum.
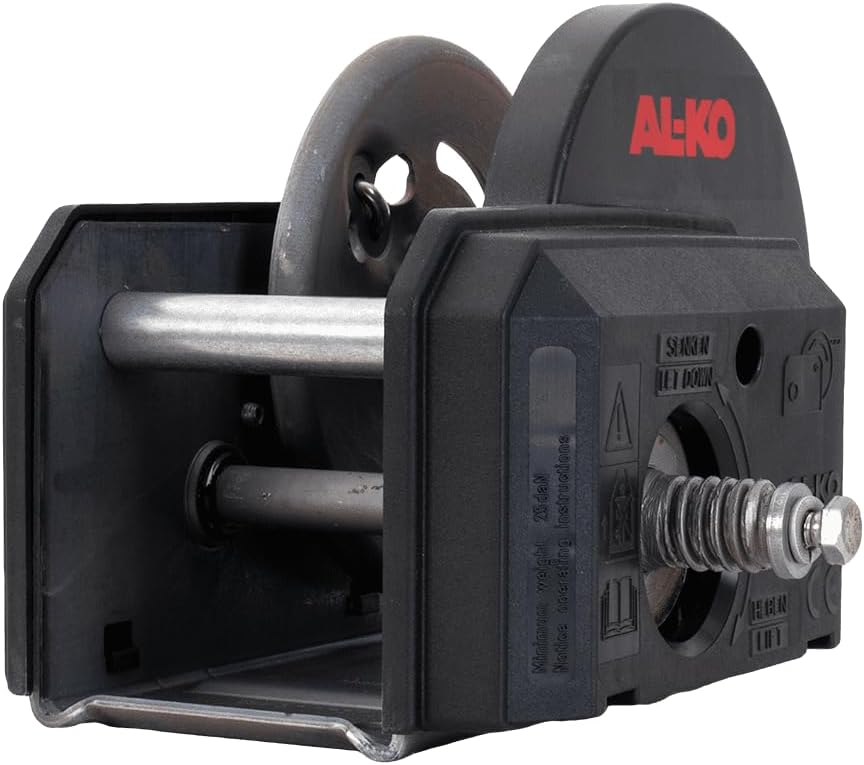
Abbildung 3.3: Eine andere Seite view highlighting the integrated automatic braking system, which ensures the load is held securely when the handle is not actively turned.
4. Einrichtung und Installation
Proper installation is critical for the safe and reliable operation of your AL-KO winch.
4.1 Montage der Winde
- Wählen Sie einen Standort: Select a mounting location that is structurally sound and can support the maximum load capacity of the winch. Ensure there is sufficient clearance for operating the handle and for the rope/strap path.
- Sichere Befestigungselemente: Use appropriate high-strength bolts, nuts, and washers to securely fasten the winch to the mounting surface. Ensure all fasteners are tightened to the manufacturer's recommended torque specifications (if available) or to a secure, firm tightness.
- Stabilität prüfen: After mounting, test the stability of the winch by applying a small load and checking for any movement or flexing of the mounting structure.
4.2 Attaching the Rope or Strap
The winch is designed to be used with a suitable rope or strap (not included with this model). Ensure the rope/strap is correctly attached to the drum.
- Select Appropriate Rope/Strap: Use a rope or strap with a breaking strength significantly higher than the winch's maximum load capacity (e.g., a safety factor of 3:1 or 4:1). For this winch, a rope with a diameter of approximately 5 mm or a suitable towing strap is recommended.
- Secure to Drum: Feed the end of the rope/strap through the designated attachment point on the winch drum. Secure it firmly using a knot or fastener appropriate for the rope/strap type. Ensure at least 3-5 wraps of rope/strap remain on the drum when the load is fully extended.
- Wind Neatly: Manually wind the first few layers of rope/strap onto the drum neatly and tightly to prevent tangling and ensure even distribution.
5. Bedienungsanleitung
Follow these steps for safe and effective operation of your AL-KO Type 501 Plus winch.
5.1 Anbringen des Griffs
Insert the winch handle into the drive shaft. Ensure it is fully seated and secure before operation.
5.2 Heben einer Last
- Last anschließen: Securely attach the hook or end of the rope/strap to the item you wish to lift or pull. Ensure the connection is robust and cannot accidentally detach.
- Engage Winch: Turn the control knob to the 'HEBEN' (LIFT) position if applicable, or simply begin cranking the handle clockwise.
- Kurbel: Turn the handle clockwise to wind the rope/strap onto the drum, thereby lifting or pulling the load. Apply steady, even pressure.
- Automatic Brake: The automatic braking system will engage when you stop turning the handle, holding the load in position.
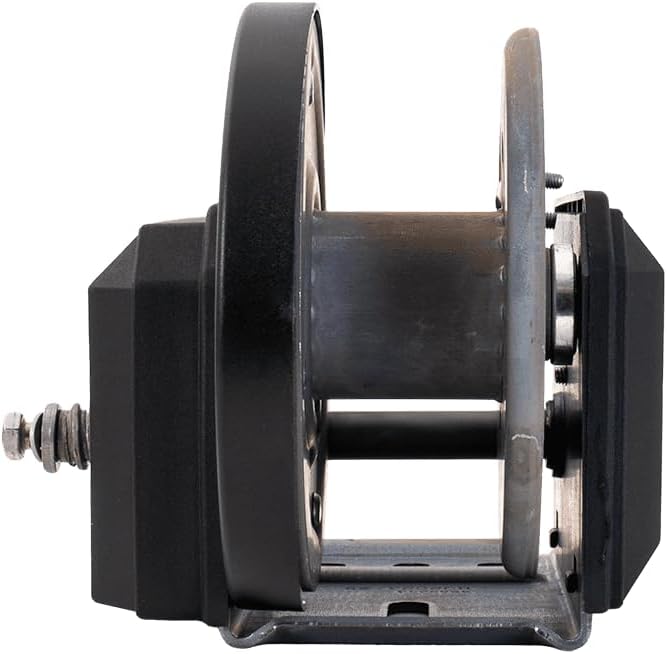
Abbildung 5.1: The winch with the handle attached, ready for winding the rope or strap to lift a load.
5.3 Absenken einer Last
- Engage Lowering: Turn the control knob to the 'SENKEN' (LET DOWN) position. This disengages the full brake and allows for controlled lowering.
- Control Descent: Slowly turn the handle counter-clockwise to unwind the rope/strap and lower the load. Maintain control of the handle at all times. The braking mechanism will still provide resistance for a controlled descent.
- Release Load: Once the load is fully lowered and stable, detach the hook or rope/strap.

Abbildung 5.2: Detail of the control knob, indicating the 'SENKEN' (Let Down) and 'HEBEN' (Lift) positions for managing load movement.
6. Wartung
Regular maintenance ensures the longevity and safe operation of your AL-KO winch.
- Reinigung: Keep the winch clean and free from dirt, debris, and corrosive substances. Wipe down the exterior with a damp Tuch.
- Schmierung: Periodically apply a light coat of grease or appropriate lubricant to moving parts such as gears and bearings. Avoid over-lubrication, which can attract dirt.
- Inspektion: Regularly inspect the winch for any signs of wear, damage, loose fasteners, or corrosion. Pay close attention to the drum, gears, handle attachment, and mounting points.
- Rope/Strap Condition: Inspect the rope or strap for fraying, cuts, kinks, or other damage. Replace immediately if any damage is found.
- Lagerung: When not in use, store the winch in a clean, dry environment, protected from extreme temperatures and direct sunlight.
7. Fehlerbehebung
If you encounter issues with your AL-KO Type 501 Plus winch, refer to the following common problems and solutions.
- Die Winde lässt sich schwer kurbeln:
- Check if the load exceeds the maximum capacity.
- Inspect for obstructions in the gear mechanism or drum.
- Lubricate moving parts as per maintenance instructions.
- Load slips or does not hold:
- Ensure the control knob is correctly set for lifting/holding.
- Inspect the braking mechanism for wear or damage. Do not use if the brake is faulty.
- Ensure the rope/strap is properly wound and not slipping on the drum.
- Rope/Strap tangles on drum:
- Ensure the rope/strap is wound neatly and under tension.
- Avoid sudden jerks or slack in the line during operation.
If problems persist, contact AL-KO customer support or a qualified service technician.
8. Spezifikationen
Key technical specifications for the AL-KO Type 501 Plus Braked Winch.

Abbildung 8.1: The AL-KO Type 501 Plus Winch alongside a technical data sheet, providing detailed specifications and dimensions.
| Spezifikation | Wert |
|---|---|
| Modellnummer | 1730003 |
| Marke | AL-KO |
| Maximale Tragfähigkeit | 500 kg |
| Hand Force | 200 N |
| Mindestlast | 25 kg |
| Übersetzungsverhältnis | 3.75:1 |
| Drum Capacity (Rope Ø 5 mm) | 20 m |
| Drum Capacity (Towing Strap) | 7 m |
| Artikelgewicht | 4 kg |
| Material (Fasteners) | Kohlenstoffstahl |
| Ursprungsland | Deutschland |
9. Garantie und Support
AL-KO products are manufactured to high quality standards. This product is covered by the manufacturer's warranty, details of which can be found on the official AL-KO webWebsite oder durch Kontaktaufnahme mit dem Kundendienst.
For further technical support, spare parts, or to download additional manuals, please visit the official AL-KO webWebsite:
Bitte halten Sie bei Kontaktaufnahme mit dem Support Ihre Modellnummer (1730003) und die Kaufinformationen bereit.


