1. Einleitung
The CONTEC CMS50M Fingertip Pulse Oximeter is a portable, non-invasive device designed for spot-checking of arterial hemoglobin oxygen saturation (SpO2) and pulse rate (PR) through the finger. It is suitable for use in home environments and for sporting and aviation activities. This device is not intended for continuous monitoring or as a medical device for diagnosis or treatment.
It features a small volume, light weight, and is convenient for carrying. The device displays pulse rate value and a bar graph for easy reading.

Abbildung 1: Vorderseite view of the CONTEC CMS50M Fingertip Pulse Oximeter showing the display with SpO2 and PR readings.
2. Packungsinhalt
Prüfen Sie nach dem Öffnen der Verpackung, ob alle Artikel vorhanden und in einwandfreiem Zustand sind:
- Main unit (CONTEC CMS50M Fingertip Pulse Oximeter)
- Schlüsselband
- Bedienungsanleitung
Note: Batteries are not included in the package and must be purchased separately.

Figure 2: The CONTEC CMS50M Pulse Oximeter shown with its included lanyard.
3. Einrichtung
3.1 Einlegen der Batterie
The device requires two AAA batteries (not included). Follow these steps to install them:
- Suchen Sie die Abdeckung des Batteriefachs auf der Rückseite des Geräts.
- Schieben Sie die Abdeckung in Pfeilrichtung ab.
- Insert two AAA batteries, ensuring the polarity (+ and -) matches the diagrams inside the compartment. Note that one positive terminal may align with a spring, which is an uncommon but correct orientation for this device.
- Setzen Sie die Abdeckung des Batteriefachs wieder ein, indem Sie sie zurückschieben, bis sie einrastet.
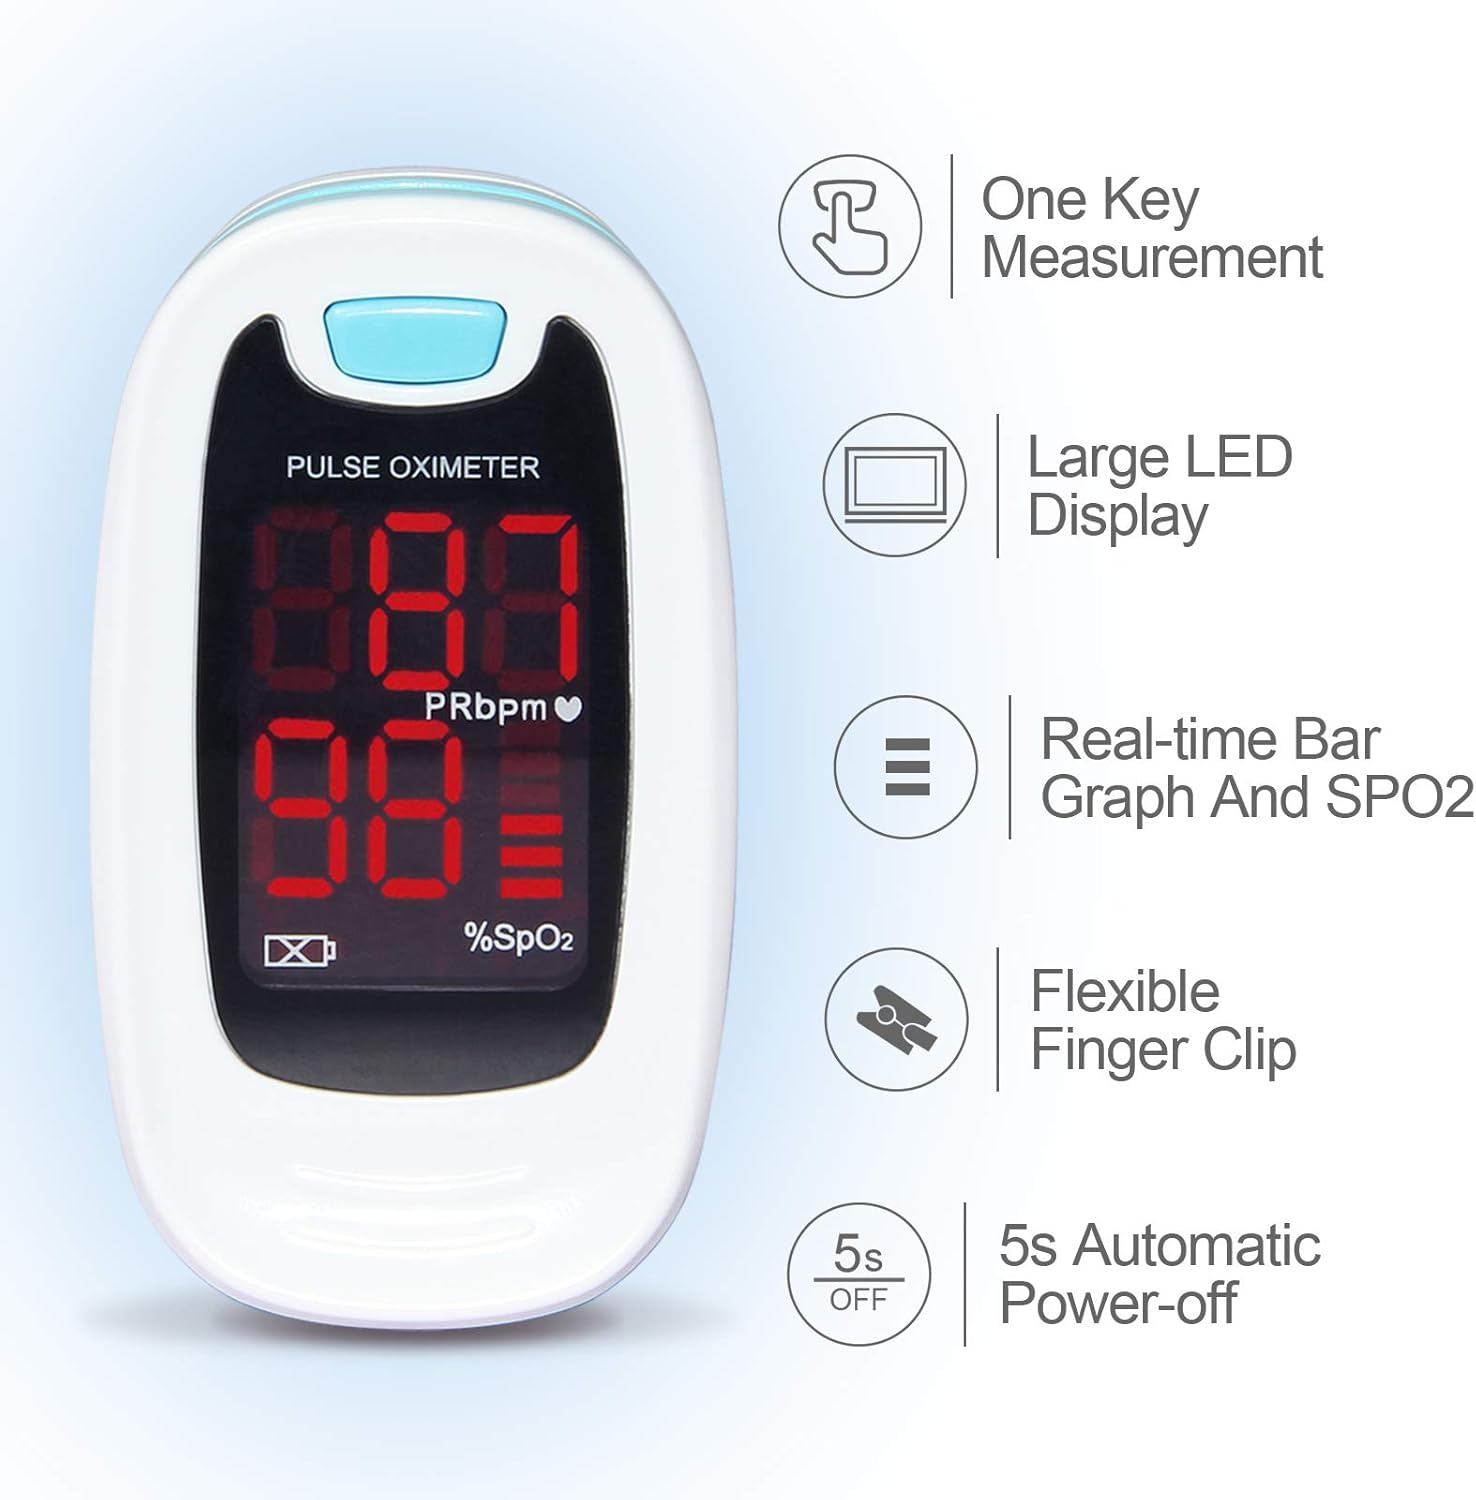
Abbildung 3: Rückseite view of the pulse oximeter showing the battery compartment. Ensure correct battery polarity during installation.
3.2 Anbringen des Schlüsselbandes
To attach the lanyard:
- Thread the thin loop end of the lanyard through the lanyard hole on the device.
- Pass the larger end of the lanyard through the small loop you just created and pull it tight to secure.
- The lanyard features a quick-release buckle for easy detachment if not needed.
4. Bedienungsanleitung
4.1 Messung durchführen
- Öffne dieamp des Oximeters.
- Insert one of your fingers (preferably the index or middle finger) into the rubber opening of the oximeter with the nail surface upward. Ensure the finger is fully inserted and rests on the sensor.
- Lassen Sie die clamp.
- Press the power button on the front panel once to turn on the oximeter.
- Keep your hand still during the measurement. Do not shake your finger.
- The SpO2 and Pulse Rate values will appear on the display within a few seconds.

Figure 4: Proper finger placement in the pulse oximeter for accurate readings.
4.2 Das Display verstehen
The bright LED display shows the following information:
- SpO2 (%): Blood Oxygen Saturation Level.
- PRbpm: Pulsfrequenz (Schläge pro Minute).
- Balkendiagramm: Indicates pulse intensity.
- Batterieanzeige: Zeigt die verbleibende Akkulaufzeit an.
Abbildung 5: Ausführlich view of the pulse oximeter display, highlighting SpO2, PRbpm, and the pulse intensity bar graph.
4.3 Automatische Abschaltung
The device will automatically power off after approximately 5 seconds of inactivity or when the finger is removed from the sensor.
5. Wartung
5.1 Gerät reinigen
To ensure longevity and hygiene, clean the oximeter regularly:
- Wipe the surface of the device with a soft cloth dampened with medical alcohol (75% ethanol) or isopropyl alcohol.
- Clean the inside of the finger clip with the same method.
- Allow the device to air dry completely before use.
- Das Gerät darf nicht in Wasser oder Reinigungslösungen eingetaucht werden.
5.2 Batteriewechsel und -lagerung
When the low battery indicator appears on the display, replace the batteries promptly. If the device will not be used for an extended period, remove the batteries to prevent leakage and damage.
Bewahren Sie das Oximeter an einem kühlen, trockenen Ort, fern von direkter Sonneneinstrahlung und extremen Temperaturen auf.
6. Fehlerbehebung
| Problem | Mögliche Ursache | Lösung |
|---|---|---|
| Keine Anzeige nach dem Einschalten | Die Batterien sind leer oder falsch eingelegt. | Tauschen Sie die Batterien aus oder setzen Sie sie mit der richtigen Polarität wieder ein. |
| Display unstable or inaccurate readings | Finger not properly inserted; finger shaking; ambient light interference; cold fingers. | Re-insert finger correctly and keep still. Avoid strong light. Warm hands if cold. |
| "Finger Out" message displayed | Finger not detected or removed. | Ensure finger is fully inserted into the sensor. |
7. Spezifikationen
- Modell: CMS50M
- Marke: CONTEC
- Measuring Range (SpO2): 35 % bis 100 %
- Produktabmessungen: 2.24 x 1.34 x 1.22 Zoll
- Gewicht: 1.76 Unzen (ohne Batterien)
- Stromversorgung: 2 x AAA-Batterien (nicht im Lieferumfang enthalten)
- Betriebsumgebung: Temperature: +10°C ~ +40°C, Relative humidity: ≤75%, Atmospheric Pressure: 700 hPa ~ 1060 hPa

Figure 6: Dimensions of the CONTEC CMS50M Pulse Oximeter.
8. Important Information and Disclaimers
This product is intended for sports and aviation use only and is not a medical device. It is not intended for continuous monitoring. Solely for use with sporting and aviation activities. Intended to monitor heart rate during exercise.
Aussagen zu Nahrungsergänzungsmitteln wurden von der FDA nicht geprüft und sind nicht zur Diagnose, Behandlung, Heilung oder Vorbeugung von Krankheiten oder Gesundheitszuständen bestimmt.
9. Garantie und Support
For warranty information and customer support, please refer to the official CONTEC webBesuchen Sie die Website oder kontaktieren Sie den Verkäufer direkt. Bewahren Sie Ihren Kaufbeleg für Garantieansprüche auf.
Manufacturer: CONTEC
Verfügbar ab: 27. Mai 2017


