1. Einleitung
Thank you for choosing the PatrolEyes PE-DV5-2 Body Camera. This device is designed for professional use, offering high-definition video recording, advanced night vision capabilities, and integrated GPS for reliable evidence collection. This manual will guide you through the setup, operation, and maintenance of your new body camera to ensure optimal performance and longevity.
2. Packungsinhalt
Bitte überprüfen Sie, ob alle Artikel in Ihrem Paket vorhanden sind:
- PatrolEyes PE-DV5-2 Body Camera
- Battery (Included Components)
- USB-Lade- / Datenkabel
- Ladegerät
- Montageclip
- Benutzerhandbuch (dieses Dokument)
3. Teile und Bedienelemente
Familiarize yourself with the various parts and controls of your PatrolEyes PE-DV5-2 body camera.

Abbildung 3.1: Front view of the PatrolEyes PE-DV5-2 body camera, highlighting the central camera lens, surrounding infrared (IR) lights for night vision, and the PatrolEyes logo at the bottom. The device has a rugged, black casing.

Abbildung 3.2: Front-side perspective of the PatrolEyes PE-DV5-2 body camera, providing a clearer view of the camera lens and the array of control buttons located on the side panel, including the yellow button at the top.

Abbildung 3.3: Seite view of the PatrolEyes PE-DV5-2 body camera, prominently featuring the red record button and the covered USB port for charging and data transfer.
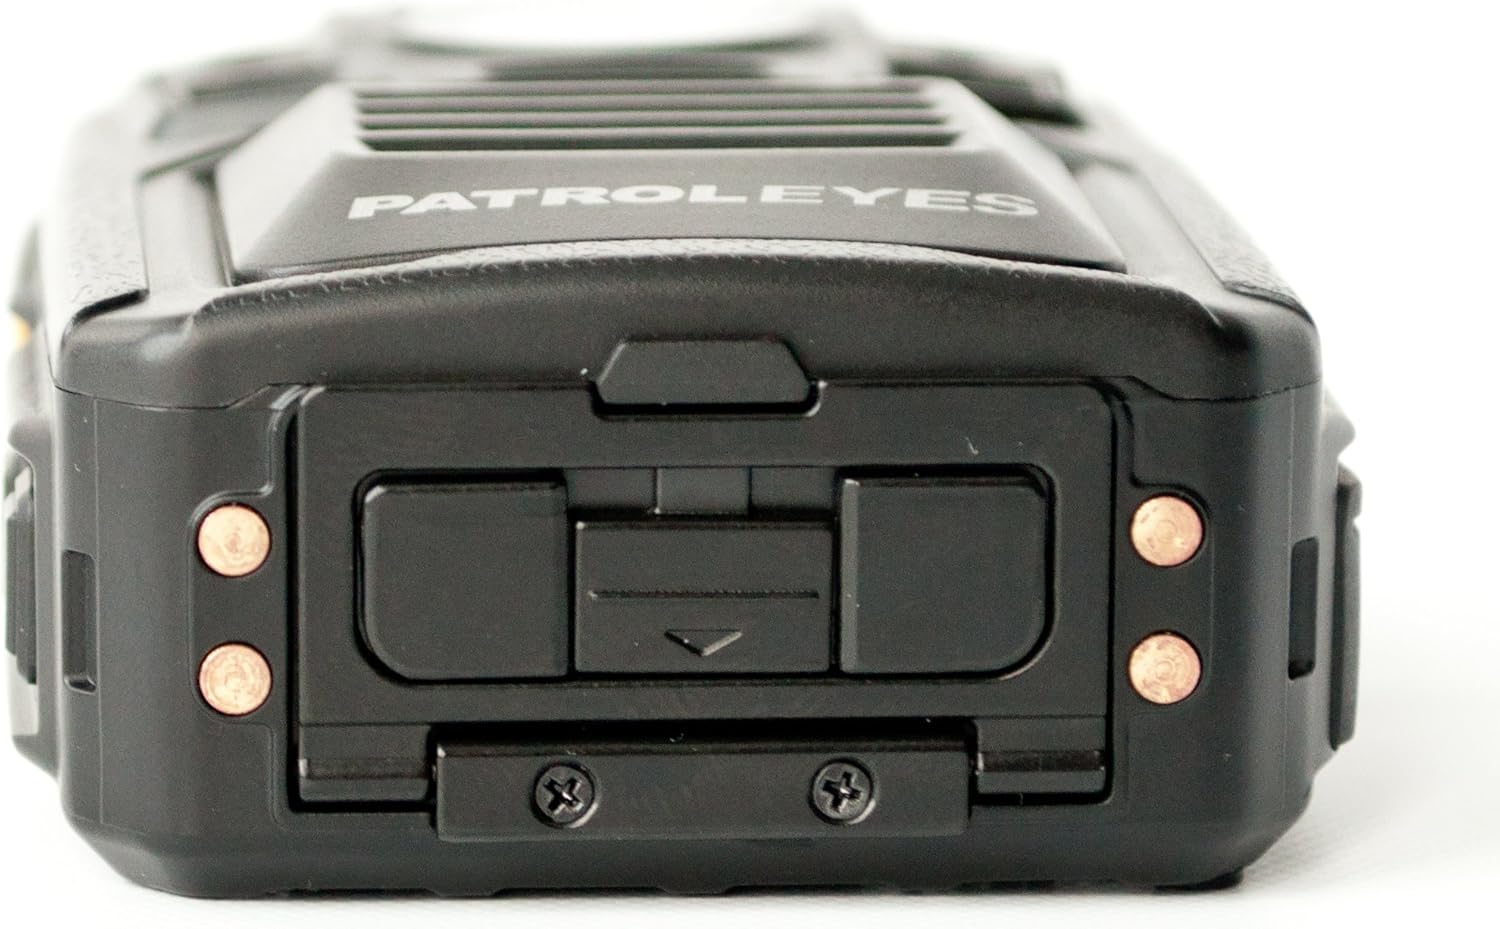
Abbildung 3.4: Spitze view of the PatrolEyes PE-DV5-2 body camera, displaying the GPS indicator light and other top-mounted features.

Abbildung 3.5: Unten view of the PatrolEyes PE-DV5-2 body camera, revealing the charging contacts designed for use with a docking station.
4. Erste Schritte
4.1. Laden des Akkus
Before first use, fully charge the camera's battery. The camera comes with a rechargeable battery.
- Connect the USB charging cable to the camera's USB port.
- Plug the other end of the USB cable into the wall charger and then into a power outlet.
- Die Ladeanzeigeleuchte leuchtet auf. Sie ändert ihre Farbe oder erlischt, sobald der Ladevorgang abgeschlossen ist.
Alternatively, use a compatible docking station (sold separately) for charging.
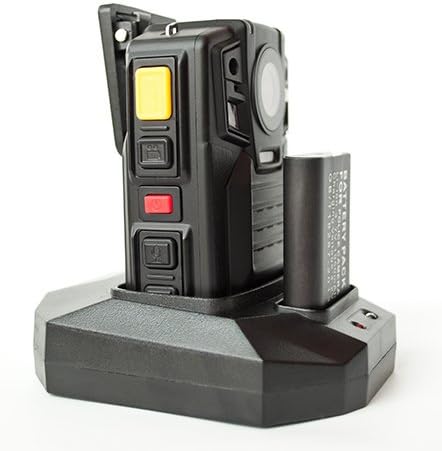
Abbildung 4.1: The PatrolEyes body camera securely placed in its docking station, which also features a dedicated slot for charging an additional battery pack.

Abbildung 4.2: Hinteren view of the PatrolEyes docking station, clearly showing the power input port and the USB data port for connecting to a computer.
4.2. Ein-/Ausschalten
- So schalten Sie das Gerät ein: Press and hold the Power button for a few seconds until the device vibrates and the indicator lights turn on.
- So schalten Sie das Gerät aus: Press and hold the Power button until the device vibrates and the indicator lights turn off.
4.3. Attaching the Mounting Clip
Attach the provided mounting clip to the back of the camera. This allows you to securely fasten the camera to your uniform or gear.
5. Bedienung der Kamera
5.1. Videoaufnahme
The camera supports video capture resolutions of 1080p, 480p, and 720p.
- Stellen Sie sicher, dass die Kamera eingeschaltet ist.
- Drücken Sie die entsprechende Aufnahmetaste (often red) once to start video recording. The recording indicator light will flash.
- Drücken Sie die Aufnahmetaste again to stop recording. The indicator light will stop flashing.
5.2. Fotos machen
The camera has an effective still resolution of 33 MP.
- While in standby mode or during video recording, press the Foto-Schaltfläche einmal, um ein Standbild aufzunehmen.
5.3. Nachtsicht (IR)
The camera features auto IR night vision with a range of 30 feet, utilizing infrared light sources.
- The camera is equipped with automatic infrared (IR) activation. In low-light conditions, the IR lights will automatically turn on to provide clear night vision footage.
5.4. GPS-Funktionalität
The integrated GPS module automatically records location data with your video footage. Ensure the camera has a clear view des Himmels für optimalen GPS-Signalempfang.
5.5. Wiedergabe
Sie könnenview Videos und Fotos wurden direkt auf dem Kamerabildschirm aufgenommen.
- Enter Playback mode via the menu or a dedicated button (refer to on-screen prompts).
- Navigieren Sie durch files using the directional buttons.
- Press the OK/Select button to play a video or view ein Foto.
5.6. Anschließen an einen Computer
Übertragen files, connect the camera to a computer using the provided USB cable.
- Schalten Sie die Kamera ein.
- Verbinden Sie die Kamera über das USB-Kabel mit Ihrem Computer.
- Die Kamera wird auf Ihrem Computer als Wechseldatenträger angezeigt.
- You can now access and transfer video and photo files.
6. Wartung und Pflege
6.1. Reinigung
- Wischen Sie das Kameragehäuse mit einem weichen, fusselfreien Tuch ab.amp Tuch. Verwenden Sie keine scharfen Chemikalien oder Scheuermittel.
- Verwenden Sie für die Linse ein spezielles Linsenreinigungstuch und eine spezielle Linsenreinigungslösung, um Kratzer zu vermeiden.
6.2. Speicherung
- Bewahren Sie die Kamera an einem kühlen, trockenen Ort fern von direkter Sonneneinstrahlung und extremen Temperaturen auf.
- Ensure the battery is partially charged (around 50%) if storing for extended periods to preserve battery life.
6.3. Batteriepflege
- Vermeiden Sie häufiges vollständiges Entladen des Akkus.
- Verwenden Sie ausschließlich Original- oder zugelassenes Ladezubehör.
7. Fehlerbehebung
| Problem | Mögliche Ursache | Lösung |
|---|---|---|
| Die Kamera lässt sich nicht einschalten. | Niedriger oder kein Akkuladestand. | Laden Sie den Akku vollständig auf. |
| Videoaufnahmen/Fotos können nicht aufgenommen werden. | Speicherplatz voll. | Überweisen files to a computer and delete them from the camera. |
| Schlechte Video-/Bildqualität. | Verschmutzte Linse; schlechte Lichtverhältnisse. | Clean the lens; ensure IR is active in low light. |
| GPS empfängt kein Signal. | Versperrt view of sky; indoor use. | Gehen Sie in einen offenen Außenbereich. |
| Die Kamera wird vom Computer nicht erkannt. | Defektes USB-Kabel; Treiberproblem. | Try a different USB port/cable; ensure camera is powered on. |
8. Spezifikationen
| Besonderheit | Detail |
|---|---|
| Modellnummer | PE-DV5-2 |
| Auflösung der Videoaufnahme | 1080p, 480p, 720p |
| Effektive Standbildauflösung | 33 Megapixel |
| Bildfrequenz | 30 fps |
| Nachtsichtbereich | 30 Fuß |
| Konnektivitätstechnologie | Kabellos (Wi-Fi) |
| Stromquelle | Batteriebetrieben |
| Im Lieferumfang enthaltene Komponenten | Batterie |
| Internationale Schutzbewertung | IP54 |
| Besondere Merkmale | Bewegungssensor, Nachtsicht |
| Verwendung im Innen- und Außenbereich | Innenbereich, Außenbereich |
| Hersteller | PatrolEyes |
| Erstes verfügbares Datum | 14. Mai 2017 |
9. Garantieinformationen
PatrolEyes products typically come with a limited manufacturer's warranty. Please refer to the warranty card included with your purchase or visit the official PatrolEyes webDie detaillierten Garantiebedingungen finden Sie auf der Website. Bewahren Sie Ihren Kaufbeleg für Garantieansprüche auf.
10. Kundendienst
For technical assistance, troubleshooting beyond this manual, or inquiries about your PatrolEyes PE-DV5-2 body camera, please contact PatrolEyes customer support. Contact information can typically be found on the manufacturer's webauf der Website oder auf der Produktverpackung.
Online-Ressourcen: Visit the official PatrolEyes webWebsite mit häufig gestellten Fragen, Software-Updates und weiterführenden Supportmaterialien.


