1. Einleitung
The Zoom LiveTrak L-12 is a versatile 12-channel digital mixer and 14-track multitrack recorder, engineered for a wide range of audio applications including live performances, studio recording, band rehearsals, and podcast production. This compact unit integrates a digital mixer with a robust multitrack recorder and a USB audio interface, providing comprehensive control over your audio environment.
Key features include 8 mono channels with high-gain, low-noise microphone preamps, +48V phantom power, and a compression knob, alongside two stereo input channels. Channels 1 and 2 are equipped with Hi-Z inputs for direct instrument connection. Each channel offers a low-cut filter, a 3-band equalizer, pan control, and a dedicated send for the 16 built-in high-quality effects.
2. Packungsinhalt
Bitte prüfen Sie, ob alle unten aufgeführten Artikel in Ihrem Paket enthalten sind. Sollten Artikel fehlen oder beschädigt sein, wenden Sie sich bitte an Ihren Händler.
- Zoom LiveTrak L-12 Digital Mixer & Multitrack Recorder
- Stromkabel
- USB-Kabel
- XLR-XLR Cable (2 units)
- XLR-TRS Cable (2 units)
- Polsen HPC-A30 Closed-Back Studio Monitor Headphones
- Gator Cases G-MIXERBAG-1815 Padded Nylon Mixer/Equipment Bag
3. Einrichtung
3.1 Auspacken und Aufstellen
Carefully remove the LiveTrak L-12 from its packaging. Place the unit on a stable, flat surface, ensuring adequate ventilation around the device. Avoid placing it near heat sources or in direct sunlight.

Figure 3.1: Zoom LiveTrak L-12 Digital Mixer and Multitrack Recorder. This image shows the top-down view of the L-12 unit, highlighting its various faders, knobs, and input/output ports.
3.2 Stromanschluss
- Connect the supplied power cable to the DC IN port on the rear panel of the L-12.
- Stecken Sie das andere Ende des Netzkabels in eine geeignete Wechselstromsteckdose.
- Press the POWER switch to turn on the unit. The display will illuminate.
3.3 Audioeingangsanschlüsse
The L-12 offers various input options:
- Mono Channels (1-8): Use XLR or 1/4" TRS/TS cables for microphones, line-level instruments, or other audio sources. Channels 1 and 2 feature Hi-Z inputs for direct connection of guitars and basses.
- Stereo Channels (9/10, 11/12): Use dual 1/4" TS/TRS or RCA cables for stereo line-level sources.

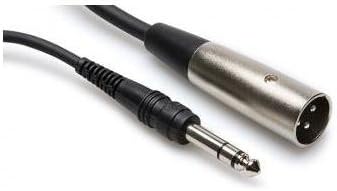
Abbildung 3.2: Bspamples of XLR-XLR (left) and XLR-TRS (right) cables used for connecting microphones and other audio equipment to the L-12.
3.4 Ausgangsanschlüsse
- Master-Ausgang: Connect to your main PA system or studio monitors using XLR cables.
- Monitorausgang: Use for connecting stage monitors or personal monitoring systems.
- Kopfhörerausgänge: Five independent headphone outputs are available for individual monitoring.

Figure 3.3: Polsen HPC-A30 Closed-Back Studio Monitor Headphones, suitable for monitoring audio from the L-12.
3.5 USB-Anschluss
Connect the L-12 to a computer via the USB cable to use it as a 14-in/4-out USB audio interface. This allows for multi-track recording directly to a DAW or playback from a computer. The L-12 is also compatible with iOS devices.
4. Bedienungsanleitung
4.1 Channel Strip Controls
- GAIN-Regler: Passt den Eingangspegel für jeden Kanal an.
- COMP (Compression) Knob: Applies compression to mono channels (1-8) to control dynamics.
- NIEDRIGER SCHNITT-Button: Activates a high-pass filter to reduce unwanted low-frequency noise.
- 3-Band-EQ: Adjusts High, Mid, and Low frequencies for tone shaping.
- PAN-Knopf: Positions the channel's sound in the stereo field.
- SEND EFX Knob: Steuert die Signalstärke, die an den internen Effektprozessor gesendet wird.
- REC/PLAY-Taste: Engages recording or playback for individual tracks on the SD card.
- MUTE-Taste: Silences the channel output.
- FADER: Passt die Gesamtlautstärke des Kanals an.
4.2 Aufnahme auf SD-Karte
The L-12 features a built-in 14-track SD recorder. Insert an SD card (Class 10 or higher recommended) into the SD card slot. Use the dedicated REC/PLAY buttons on each channel and the master recorder controls (REC, PLAY, STOP) to manage your recording sessions. Recordings are saved as WAV files.
4.3 Effekte verwenden
The L-12 includes 16 editable effects. Use the SEND EFX knobs on individual channels to route signal to the effects processor. The EFX RETURN fader controls the overall level of the effects in the mix. Adjust effect parameters using the dedicated controls in the master section.
4.4 Scene Memory
The L-12 allows you to save and recall up to nine mix scenes. This feature is useful for quickly switching between different setups for various songs or performance segments. Use the SCENE buttons to store and recall your preferred settings.
5. Wartung
- Reinigung: Reinigen Sie die Außenseite des Geräts mit einem weichen, trockenen Tuch. Vermeiden Sie scheuernde Reiniger oder Lösungsmittel.
- Lagerung: When not in use, store the L-12 in a cool, dry place, away from direct sunlight and extreme temperatures. The included Gator Cases G-MIXERBAG-1815 is ideal for protection during storage and transport.
- Firmware-Updates: Periodically check the Zoom webWebsite für Firmware-Updates, um optimale Leistung und Zugriff auf neue Funktionen zu gewährleisten.

Figure 5.1: Gator Cases G-MIXERBAG-1815 Padded Nylon Mixer/Equipment Bag, designed for protecting and transporting the L-12.
6. Fehlerbehebung
- Keine Tonausgabe:
- Ensure the L-12 is powered on and connected correctly to your speakers or headphones.
- Check all faders (channel, master, EFX return) are raised and not muted.
- Verify input sources are connected properly and their gain levels are set appropriately.
- Confirm that the correct output (Master Out, Monitor Out, Headphone) is selected and its level is up.
- Verzerrter Klang:
- Reduce input GAIN levels to prevent clipping (indicated by the PEAK LED).
- Check that output levels are not too high, causing distortion in connected devices.
- Ensure cables are in good condition and correctly connected.
- Aufnahmeprobleme:
- Stellen Sie sicher, dass eine SD-Karte eingelegt ist und über ausreichend freien Speicherplatz verfügt.
- Verify the SD card is Class 10 or higher for reliable recording.
- Check that the REC/PLAY button for the desired track is engaged (red).
- Confirm that the master recorder's REC button is pressed to start recording.
- USB-Audio-Interface nicht erkannt:
- Ensure the USB cable is securely connected to both the L-12 and your computer.
- Check your computer's audio settings to select the L-12 as the input/output device.
- Install any necessary drivers from the Zoom website if prompted by your operating system.
7. Spezifikationen
| Besonderheit | Spezifikation |
|---|---|
| Anzahl der Kanäle | 12 (8 Mono, 2 Stereo) |
| Eingebauter Rekorder | 14-track SD Recorder |
| USB Audio Schnittstelle | 14-in/4-out (iOS Compatible) |
| Eingänge | 8x Combo XLR-1/4" (Channels 1-8), 2x Dual 1/4" (Channels 9/10, 11/12), 2x RCA (Channels 9/10, 11/12) |
| Hi-Z Inputs | Kanäle 1-2 |
| Phantom Power | +48V |
| Voramps | Hohe Verstärkung, geringes Rauschen |
| Kompression | Single knob (Channels 1-8) |
| EQ | 3-Band (Hoch, Mittel, Tief) pro Kanal |
| Auswirkungen | 16 built-in, editable |
| Ausgaben | Master Out (XLR), Monitor Out, 5x Headphone Outputs |
| Stromquelle | Kabelgebundene Elektrik |
| Geräuschpegel | 26 Dezibel |
8. Garantie und Support
8.1 Produktgarantie
The Zoom LiveTrak L-12 comes with a Limited 1-Year Warranty from the date of purchase. This warranty covers defects in materials and workmanship under normal use. Please retain your proof of purchase for warranty claims. For specific terms and conditions, refer to the warranty card included with your product or visit the official Zoom webWebsite.
The Polsen HPC-A30 Closed-Back Studio Monitor Headphones and Gator Cases G-MIXERBAG-1815 Padded Nylon Mixer/Equipment Bag included in this bundle may have separate warranties. Please refer to their respective documentation for details.
8.2 Kundendienst
For technical assistance, troubleshooting, or service inquiries, please visit the official Zoom support website or contact their customer service department. You can typically find contact information and FAQs on the manufacturer's webWebsite:


