1. Einleitung
This manual provides essential information for the safe and efficient operation, maintenance, and troubleshooting of your HERON EWH 220 Gasoline Welding Generator. Please read this manual thoroughly before operating the unit to ensure proper use and to prevent injury or damage.
The HERON EWH 220 is a high-quality multi-purpose power generator with an integrated welding unit. It is designed for use in construction and assembly work, or any situation where access to a stable electrical grid is unavailable. It functions as a power source for tools and appliances up to 5.5 kW and as a powerful 220A DC welding aggregate for demanding tasks. The unit is equipped with handles and wheels for enhanced portability and ease of handling in various terrains.
2. Wichtige Sicherheitshinweise
WARNUNG: Die Nichtbeachtung dieser Sicherheitshinweise kann zu schweren Verletzungen, Tod oder Sachschäden führen.
- Betreiben Sie den Generator stets in einem gut belüfteten Bereich, um eine Kohlenmonoxidvergiftung zu vermeiden. Betreiben Sie ihn niemals in geschlossenen Räumen.
- Halten Sie Kinder und Haustiere während des Betriebs vom Generator fern.
- Stellen Sie sicher, dass der Generator auf einer ebenen, stabilen Fläche steht.
- Do not refuel the generator while it is running or hot. Allow it to cool down before adding fuel.
- Use only the recommended fuel type (gasoline) and engine oil.
- Always wear appropriate personal protective equipment (PPE) when welding, including a welding helmet, gloves, and protective clothing.
- Ensure proper grounding for both generator and welding operations.
- Betreiben Sie den Generator nicht bei Nässe und setzen Sie ihn keinem Regen aus.
- The generator and welding functions cannot be used simultaneously. Select one mode of operation at a time.
- Regularly inspect the unit for any damage or wear before each use.
3. Komponenten vorbeiview
Familiarize yourself with the main components of your HERON EWH 220 generator.

Abbildung 3.1: Front view of the HERON EWH 220 Gasoline Welding Generator, showing the main body, wheels, and handles.

Abbildung 3.2: Nahaufnahme view of the control panel, featuring the engine switch, AC 220V outlets, AC circuit breaker, current control for welding, and DC 12V output terminals.
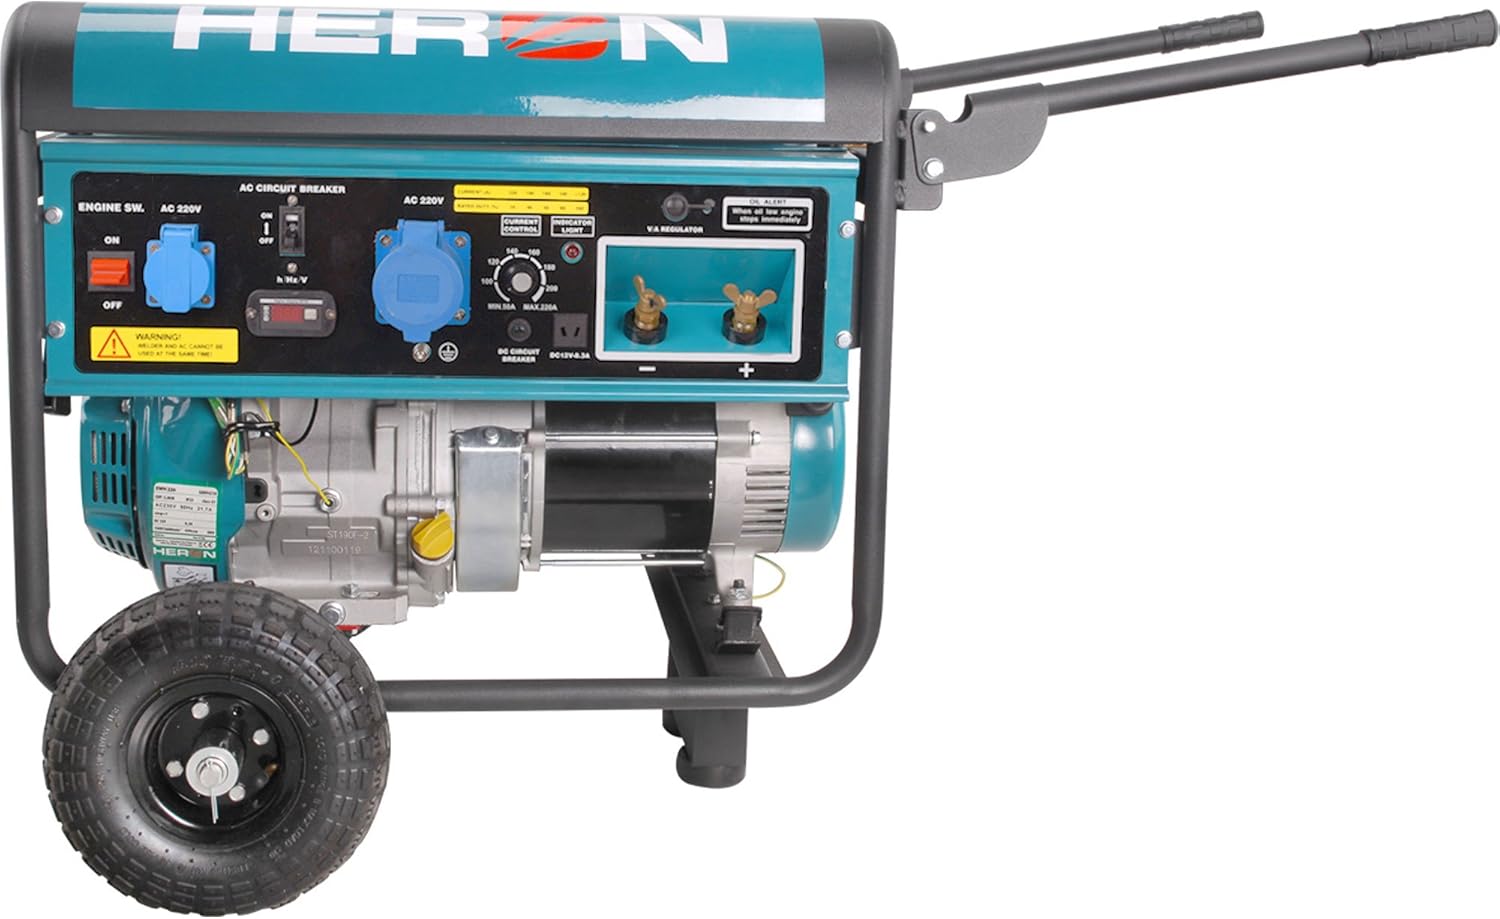
Abbildung 3.3: Seite view of the generator, highlighting the control panel and the robust frame with wheels for portability.

Abbildung 3.4: Gegenseite view of the generator, showing the engine and exhaust components.

Abbildung 3.5: Hinteren view of the generator, illustrating the sturdy frame and wheel assembly.
4. Einrichtung und Vorbereitung
4.1 Auspacken und Zusammenbau
Carefully remove the generator from its packaging. Attach the wheels and handles if they are not pre-assembled, following the instructions in the separate assembly guide (if provided). Ensure all bolts and nuts are securely tightened.
4.2 Motoröl nachfüllen
- Stellen Sie den Generator auf eine ebene Fläche.
- Suchen Sie den Öleinfülldeckel/Ölmessstab.
- Füllen Sie das empfohlene Motoröl (siehe Spezifikationen für Sorte und Füllmenge) bis zur oberen Markierung am Ölmessstab ein. Nicht überfüllen.
- Den Öleinfülldeckel wieder fest verschließen.
4.3 Kraftstoff nachfüllen
- Stellen Sie sicher, dass der Motor ausgeschaltet und abgekühlt ist.
- Öffnen Sie den Tankdeckel.
- Carefully pour fresh, unleaded gasoline into the fuel tank. Do not overfill; leave space for fuel expansion.
- Den Tankdeckel fest verschließen.
- Wischen Sie verschütteten Kraftstoff sofort auf.
CAUTION: Gasoline is highly flammable. Handle with extreme care. Do not smoke or use open flames near the generator.
5. Bedienungsanleitung
IMPORTANT: The generator and welding functions cannot be used simultaneously. Ensure the engine switch is in the OFF position before switching between modes.
5.1 Motor starten
- Ensure the generator is on a level surface and away from flammable materials.
- Drehen Sie den Kraftstoffhahn in die Position "EIN".
- Den Chokehebel in die Position "CHOKE" bringen (für Kaltstarts).
- Den Motorschalter in die Position „EIN“ drehen.
- Den Seilzugstarterhebel fest und gleichmäßig ziehen, bis der Motor anspringt.
- Sobald der Motor anspringt, bewegen Sie den Chokehebel allmählich in die Position „RUN“.
- Allow the engine to warm up for a few minutes before applying a load.
5.2 Using as a Power Generator (AC Output)
- Ensure the engine is running stably.
- Connect your electrical appliances to the AC 220V outlet.
- Do not exceed the maximum rated output of 5.5 kW.
- The AVR (Automatic Voltage Regulation) system will help protect your connected devices from voltage Schwankungen.
5.3 Using as a Welding Unit (DC Output)
- Stellen Sie sicher, dass der Motor läuft.
- Connect the welding cables to the DC output terminals (+ and -).
- Select the desired welding current using the "CURRENT CONTROL" knob on the control panel.
- Wear all necessary PPE (welding helmet, gloves, protective clothing).
- The unit supports welding with standard electrodes up to 5mm thickness.
- The DC welding unit with precise rectification provides weld quality comparable to inverter welders.
5.4 Abstellen des Motors
- Disconnect all electrical loads and welding cables.
- Den Motorschalter in die Position „AUS“ drehen.
- Drehen Sie den Kraftstoffhahn in die Position „AUS“.
6. Wartung
Regelmäßige Wartung ist entscheidend für die Langlebigkeit und den sicheren Betrieb Ihres Generators.
- Motoröl: Ölstand vor jedem Gebrauch prüfen. Öl nach den ersten 20 Betriebsstunden wechseln, danach alle 50–100 Stunden oder jährlich.
- Luftfilter: Clean or replace the air filter every 50 hours or more frequently in dusty conditions.
- Zündkerze: Inspect and clean the spark plug every 100 hours. Replace if worn.
- Kraftstofffilter: Den Kraftstofffilter regelmäßig prüfen und reinigen.
- Allgemeine Reinigung: Keep the generator clean and free of debris. Ensure cooling fins are clear.
- Lagerung: For long-term storage, drain the fuel tank and carburetor, or use a fuel stabilizer. Store in a dry, well-ventilated area.
7. Fehlerbehebung
| Problem | Mögliche Ursache | Lösung |
|---|---|---|
| Motor startet nicht | No fuel; Low oil level; Choke incorrect; Engine switch OFF; Spark plug issue | Add fuel; Add oil; Adjust choke; Turn engine switch ON; Inspect/replace spark plug |
| No power output (AC) | Schutzschalter ausgelöst; Überlastung; Lose Verbindungen | Leitungsschutzschalter zurücksetzen; Last reduzieren; Anschlüsse prüfen |
| Schlechte Schweißleistung | Incorrect current setting; Poor electrode contact; Improper grounding | Adjust current; Ensure good contact; Check grounding |
| Motor läuft unrund | Verdorbener Kraftstoff; verstopfter Luftfilter; verschmutzte Zündkerze | Kraftstoff ablassen und ersetzen; Luftfilter reinigen/ersetzen; Zündkerze reinigen/ersetzen |
8. Technische Daten
- Modell: HERON EWH 220
- Hersteller: Madal Bal als
- Produktkennung: 8896310
- Abmessungen (L x B x H): 105.59 x 113.28 x 161.29 cm
- Ausgangsvolumentage (AC): 230 Volt
- Generator Power Output: 5.5 kW
- Welding Current (DC): 220 Amperes
- Motortyp: 4-Takt, Benzin
- Kraftstoffart: Bleifreies Benzin
- Besondere Merkmale: AVR Voltage Regulation, Portable (with wheels)
- Steckdosen: 1 x AC 230 V
- Welding Electrode Compatibility: Up to 5mm thickness
9. Garantie und Support
For warranty information, please refer to the separate warranty card included with your product or contact your authorized HERON dealer. For technical support or service inquiries, please contact the manufacturer or your point of purchase.
Hersteller: Madal Bal als
Please have your model number (EWH 220) and product identifier (8896310) ready when contacting support.


