1. Einleitung
This manual provides comprehensive instructions for the setup, operation, and maintenance of your NooElec JYETech DSOShell DSO150 Portable Oscilloscope. The DSO150 is a budget-friendly, fully assembled digital storage oscilloscope featuring a 2.4-inch color TFT LCD, designed for various electronic testing applications.
2. Produktüberschreitungview
2.1 Hauptmerkmale
- Portable and compact design with a 2.4" color TFT LCD.
- Fully assembled unit, ready for use with a power supply.
- Includes a 1x/10x BNC oscilloscope probe and protective enclosure.
- Improved structure, mechanics, and operation compared to previous models.
- Operates on a 9V DC power supply (not included).
2.2 Komponenten
The DSO150 oscilloscope consists of the main unit, a BNC probe, and an enclosure. Familiarize yourself with the device's layout and controls.
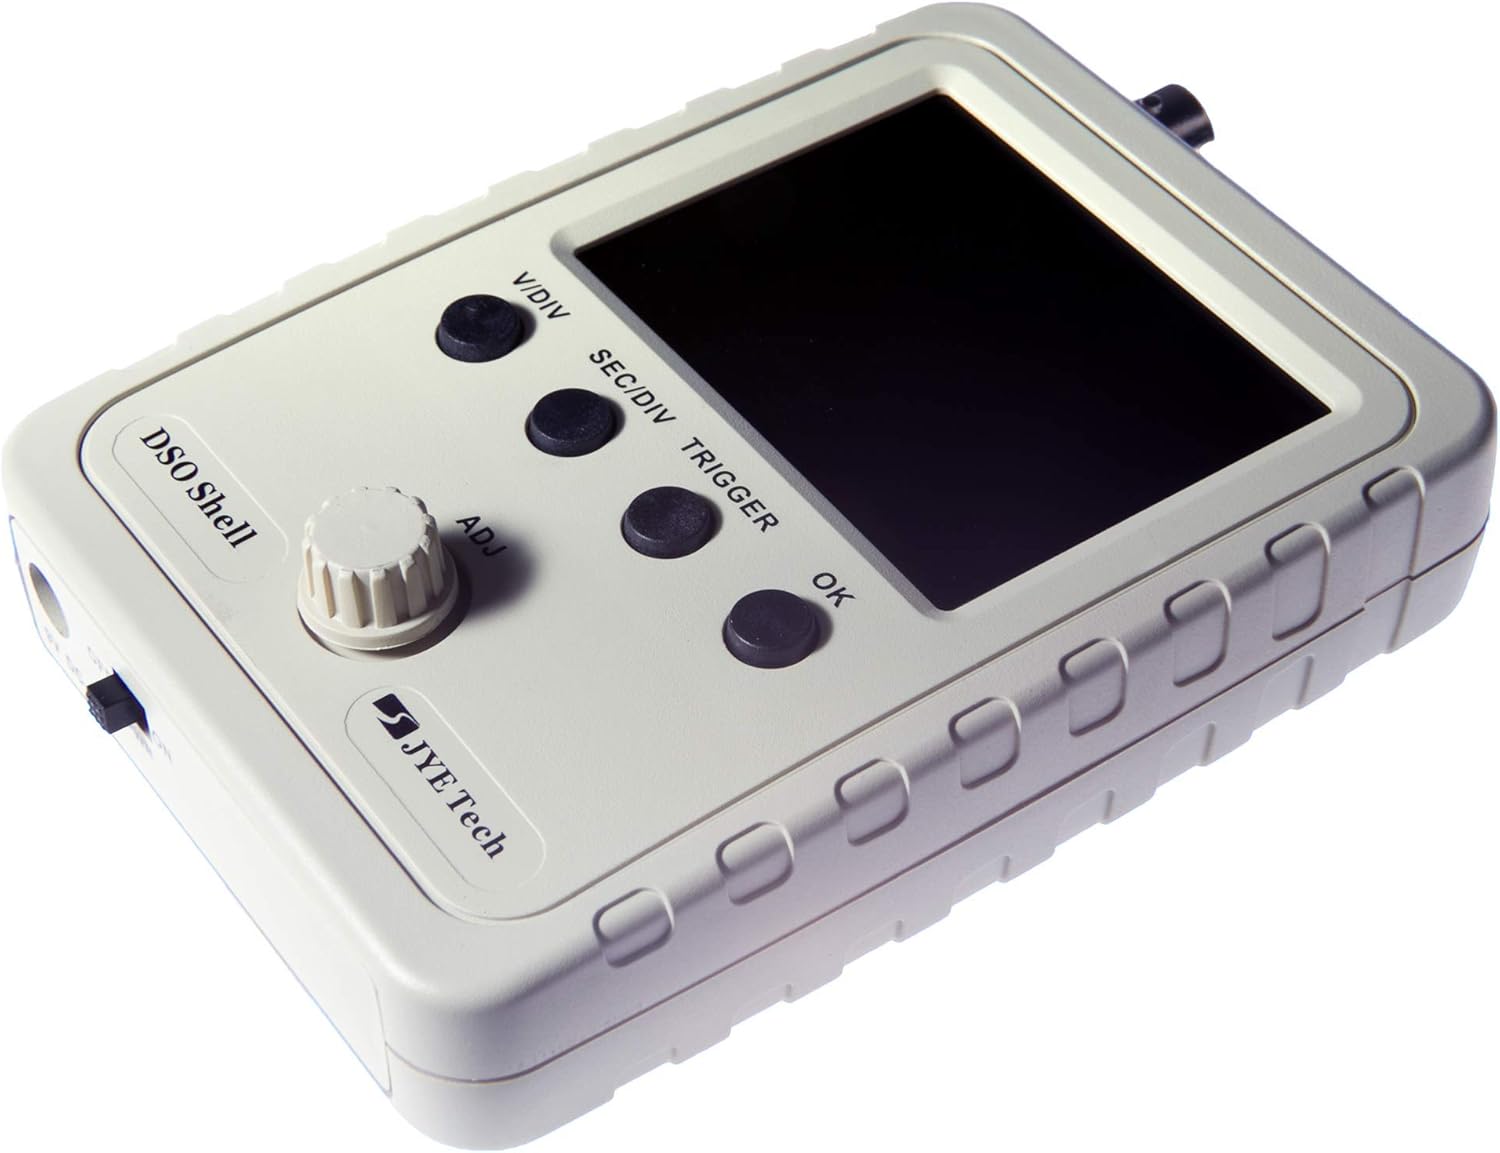
Abbildung 1: Vorderseite view of the DSO150 Oscilloscope, showing the display, control buttons (V/DIV, SEC/DIV, TRIGGER, OK), and the rotary adjustment knob (ADJ).

Figure 2: The included 1x/10x BNC oscilloscope probe, featuring a switch for attenuation selection and a BNC connector for attachment to the oscilloscope.

Abbildung 3: Rückseite view of the DSO150, highlighting the 9V DC power input jack and the power ON/OFF switch.

Abbildung 4: Oben view of the DSO150, showing the BNC input connector, the AC/DC/GND coupling switch, and the 1KHz calibration output.
3. Einrichtung
3.1 Stromversorgungsanschluss
The DSO150 requires a 9V DC power supply. The power jack on the mainboard accepts a standard 5.5mm/2.1mm DC plug. Ensure the power supply voltage does not exceed 10V, as higher voltages can permanently damage the unit. A typical current draw is around 90-120mA.
- Connect a compatible 9V DC power adapter to the power input jack on the rear of the oscilloscope.
- Flip the PWR switch to the "ON" position. The display should illuminate.
3.2 Sondenanschluss
- Connect the BNC end of the included probe to the BNC input connector on the top of the oscilloscope.
- Set the probe's attenuation switch to either 1x or 10x, depending on your measurement requirements. For most general purpose measurements, 10x is recommended to reduce loading effects on the circuit under test.
- Connect the probe's ground clip to the ground reference of the circuit you are testing.
4. Bedienungsanleitung
The DSO150 features intuitive controls for adjusting waveform display and measurement parameters.
4.1 Grundlegende Bedienelemente
- V/DIV-Taste: Adjusts the vertical sensitivity (Volts per Division). Press to cycle through available voltage-Bereiche.
- SEC/DIV-Taste: Adjusts the horizontal time base (Seconds per Division). Press to cycle through available time ranges.
- AUSLÖSER-Taste: Controls the trigger mode and level. Press to adjust trigger settings.
- Einstellknopf: Rotary encoder used for fine adjustment of selected parameters (e.g., trigger level, position).
- OK-Taste: Bestätigt die Auswahl oder ruft Untermenüs auf.
4.2 Input Coupling (AC/DC/GND)
A slide switch on the top of the unit allows selection of input coupling:
- Klimaanlage: Blocks the DC component of the input signal, displaying only the AC component.
- Gleichstrom: Displays both AC and DC components of the input signal.
- Masse: Disconnects the input signal and grounds the input, allowing you to set the ground reference on the display. Always remove the input signal or unplug the probe when switching to GND to avoid potential issues.
4.3 Eingangsvoltage Grenzen
Die maximale Eingangslautstärketage for the DSO150 is 50V peak-to-peak (Vpk) when the probe is set to 1x. When using the 10x probe setting, the maximum input voltage increases to 100V/DIV, allowing for measurements up to 500Vpk. Exceeding these limits can damage the oscilloscope's input circuitry.
5. Wartung
Proper care and maintenance will ensure the longevity and reliable operation of your DSO150 oscilloscope.
- Reinigung: Reinigen Sie die Außenseite des Geräts mit einem weichen, trockenen Tuch. Vermeiden Sie die Verwendung von Scheuermitteln oder Lösungsmitteln.
- Lagerung: Bewahren Sie das Oszilloskop bei Nichtgebrauch in einer trockenen, staubfreien Umgebung auf.
- Stromversorgung: Always use a stable and regulated 9V DC power supply. Unstable or fluctuating power sources can lead to erratic behavior or damage.
- Sondenpflege: Handle the probe carefully. Avoid bending or stressing the cable and connectors.
6. Fehlerbehebung
If you encounter issues with your DSO150, consider the following common troubleshooting steps:
- Erratic Display/No Signal:
- Verify your 9V DC power supply is providing stable voltage and sufficient current. Low or unstable power can cause the unit to behave erratically.
- Stellen Sie sicher, dass die Sonde sowohl mit dem Oszilloskop als auch mit dem zu testenden Stromkreis fest verbunden ist.
- Check the probe's attenuation setting (1x/10x) and ensure it matches your expectations for the signal level.
- Confirm the input coupling switch (AC/DC/GND) is set appropriately for your signal.
- Kein Strom:
- Ensure the power adapter is correctly plugged into a working outlet and the oscilloscope.
- Check the power switch on the oscilloscope is in the "ON" position.
- Display Frozen/Unresponsive:
- Versuchen Sie, das Gerät neu zu starten (ausschalten, einige Sekunden warten und dann wieder einschalten).
For more detailed troubleshooting or advanced issues, refer to online forums and resources dedicated to the JYETech DSO150, or contact NooElec support.
7. Spezifikationen
| Besonderheit | Spezifikation |
|---|---|
| Marke | NooElec |
| Modellname | DSO Shell (DSO150) |
| Bildschirmgröße | 2.4 Zoll |
| Maximale Bildschirmauflösung | 1080p Full HD (Actual display resolution is typically 320x240 pixels for this model) |
| Artikelgewicht | 6.9 Unzen |
| Produktabmessungen (L x B x H) | 6.69 x 4.33 x 0.79 Zoll |
| Stromquelle | Kabelgebundene Elektrik |
| Bandtage | 9 Volts DC (Do not exceed 10V) |
| Included Probe | 1x/10x BNC Oscilloscope Probe |
| Max. Eingangslautstärketage (1x probe) | 50 VSpitze |
| Max. Eingangslautstärketage (10x probe) | 500 VSpitze |
8. Lieferumfang
Your NooElec JYETech DSOShell DSO150 package typically includes:
- DSO Shell Oscilloscope Unit (Fully Assembled)
- Gehäuse
- 10x BNC Probe
Note: While some listings may indicate a power adapter and USB cable, user feedback and product features suggest these are typically not included and must be acquired separately.
9. Garantie und Support
For product support, technical inquiries, or warranty information, please contact NooElec directly. You can visit the official NooElec store on Amazon for more information and contact options: