Einführung
Thank you for choosing the Genius GLT-85.4D 4-Channel Class-D Car Amplifier. This compact, high-performance amplifier is designed to deliver exceptional audio quality and power efficiency for your vehicle's sound system. This manual provides essential information for proper installation, operation, and maintenance of your amplifier. Please read it thoroughly before attempting installation or use.
Sicherheitshinweise
Beachten Sie bei der Installation und dem Betrieb stets die folgenden Sicherheitsvorkehrungen:
- Disconnect the vehicle's negative battery terminal before any electrical work to prevent short circuits.
- Ensure all wiring is properly insulated to prevent damage and electrical hazards.
- Montieren Sie die amplifier securely in a dry, well-ventilated area, away from direct sunlight, heat sources, and moisture.
- Verwenden Sie für die Strom-, Masse- und Lautsprecheranschlüsse die in diesem Handbuch angegebenen Kabel mit dem entsprechenden Querschnitt.
- Betreiben Sie das amplifier if it is damaged or malfunctioning. Refer to the troubleshooting section or seek professional assistance.
- Behalten Sie die ampBewahren Sie das Gerät außerhalb der Reichweite von Kindern auf.
Packungsinhalt
Überprüfen Sie, ob alle Artikel im Paket vorhanden sind:
- Genius GLT-85.4D 4-Channel Ampschwerer
- Befestigungsmaterial (Schrauben)
- Benutzerhandbuch (dieses Dokument)
Produkt überview
The Genius GLT-85.4D is a compact 4-channel Class-D amplifier designed for high efficiency and powerful audio output. Its nanotechnology and SMD components contribute to its small size and robust performance.
Amplifier-Oberteil View

Dieses Bild zeigt die Oberseite view of the Genius GLT-85.4D amplifier, highlighting its compact design and the "GENIUS AUDIO" branding along with the model number "GLT-85.4D" and "1000wMax" power rating.
Control Panel Layout (Input Side)
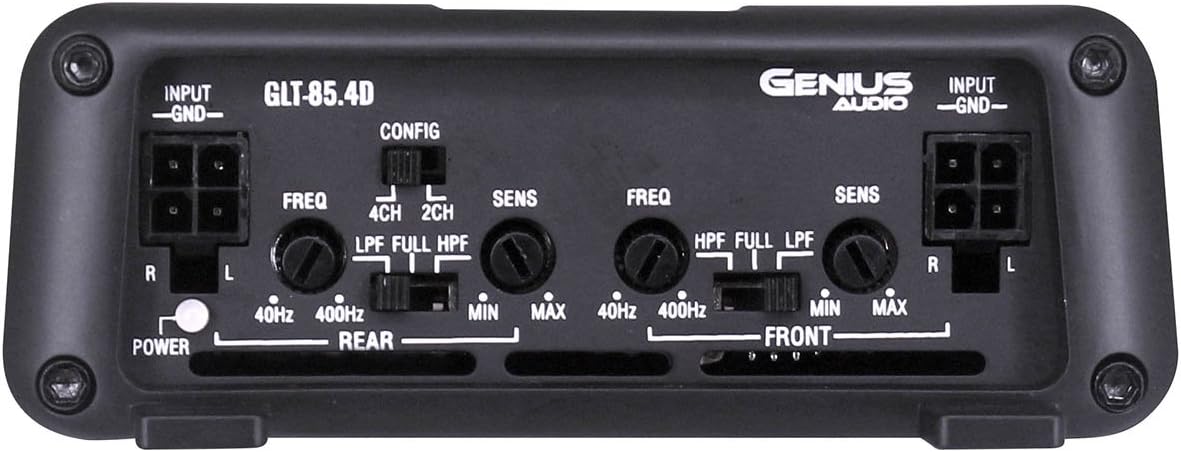
This image displays the input side of the GLT-85.4D amplifier, detailing the various controls and connections. It includes RCA input terminals (R, L) for both Rear and Front channels, gain controls (SENS MIN/MAX), frequency adjustment knobs (FREQ 40Hz-400Hz), and crossover switches (LPF, FULL, HPF) for both Rear and Front channels. A configuration switch (CONFIG 4CH, 2CH) is also visible, along with the Power indicator light.
Power and Speaker Terminal Layout (Output Side)

This image shows the output side of the GLT-85.4D amplifier, featuring the power and speaker terminals. From left to right, it includes the GROUND terminal, REMOTE turn-on terminal, +12V power terminal, and speaker output terminals for REAR BRIDGED (L+, L-, R+, R-) and FRONT BRIDGED (L+, L-, R+, R-) connections. The "4 Channel 'CLASS D' 2 ohm Stable Stereo Bridgeable MOSFET" text indicates key ampVerstärkerleistung.
Setup und Installation
Eine fachgerechte Installation ist entscheidend für optimale Leistung und Sicherheit. Wenn Sie sich bei einem Schritt unsicher sind, wenden Sie sich bitte an einen professionellen Installateur.
Montageort
- Choose a location that is dry, well-ventilated, and protected from direct sunlight, excessive heat, and moisture.
- Sorgen Sie für ausreichende Luftzirkulation um das/die/den/das ampVerstärker für ordnungsgemäße Kühlung.
- Montieren Sie die amplifier securely to a solid surface using the provided mounting hardware to prevent movement during vehicle operation.
Kabelverbindungen
Bevor Sie irgendwelche Verbindungen herstellen, trennen Sie den Minuspol der Fahrzeugbatterie.
- Stromkabel (+12V): Run a heavy-gauge power cable (e.g., 8 AWG or thicker, depending on total system power) directly from the positive terminal of the vehicle's battery to the +12V terminal on the ampVerstärker. Installieren Sie einen Inline-Sicherungshalter mit einer geeigneten Sicherung (nicht im Lieferumfang enthalten) innerhalb von 45 cm (18 Zoll) von der Batterie.
- Erdungsdraht (GND): Connect a heavy-gauge ground cable (same gauge as power wire) from the GND terminal on the ampSchließen Sie den Verstärker an eine saubere, unlackierte Metalloberfläche des Fahrzeugchassis an. Achten Sie auf eine feste, niederohmige Verbindung.
- Remote Turn-On Wire (REMOTE): Connect a remote turn-on wire (typically 18 AWG) from your head unit's remote output to the REMOTE terminal on the ampVerstärker. Dieses Kabel signalisiert dem ampVerstärker zum Ein- und Ausschalten mit Ihrem Autoradio.
- RCA-Eingangskabel: Schließen Sie RCA-Kabel von den Vor-/Unterbuchsen Ihres Autoradios an.amp outputs (Front and Rear) to the corresponding RCA input jacks on the ampschwerer.
- Lautsprecherkabel: Verbinden Sie Ihre Lautsprecher mit dem amplifier's speaker output terminals. Ensure correct polarity (+ to + and - to -). The GLT-85.4D supports 2-ohm stereo and 4-ohm bridged configurations. Refer to the "Power and Speaker Terminal Layout" image for terminal identification.
Notiz: For bridged operation, connect the speaker to the designated bridged terminals (e.g., L+ and R- for a single channel in bridged mode). Consult a wiring diagram for specific bridged configurations.
Bedienungsanleitung
Erstes Einschalten
- After all connections are made and verified, reconnect the vehicle's negative battery terminal.
- Schalten Sie Ihr Autoradio ein. amplifier's power indicator light should illuminate.
- Beginnen Sie mit dem amplifier's gain (SENS) controls set to minimum.
- Play a familiar piece of music at a moderate volume level on your head unit.
Einstellen der Bedienelemente
- Gain (SENS): Slowly increase the gain control for each channel until you hear distortion, then back off slightly. The gain control matches the amplifier's input sensitivity to the head unit's output voltage. It is not a volume control.
- Crossover (LPF/FULL/HPF):
- LPF (Tiefpassfilter): Allows only frequencies below the set point to pass. Typically used for subwoofers.
- HPF (Hochpassfilter): Allows only frequencies above the set point to pass. Typically used for full-range speakers to prevent low-frequency distortion.
- VOLL: Allows all frequencies to pass.
- Configuration (CONFIG 4CH/2CH): This switch determines how the input signals are routed to the ampVerstärkerkanäle.
- 4CH: Uses all four RCA inputs (Front L/R, Rear L/R) to drive the four output channels independently.
- 2CH: Uses only the Front L/R RCA inputs and internally routes them to all four output channels. Useful if your head unit only has two pre-amp outputs but you want to power four speakers.
Empfehlung: Fine-tune settings gradually and listen carefully to avoid speaker damage or poor sound quality.
Wartung
- Behalten Sie die ampReinigen Sie den Verstärker, indem Sie ihn mit einem weichen, trockenen Tuch abwischen. Verwenden Sie keine scharfen Chemikalien oder Scheuermittel.
- Stellen Sie sicher, dass die ampDie Kühlrippen des Verstärkers sind frei von Staub und Schmutz, um eine ordnungsgemäße Wärmeableitung zu gewährleisten.
- Überprüfen Sie regelmäßig alle Kabelverbindungen auf festen Sitz und Korrosion.
Fehlerbehebung
| Problem | Mögliche Ursache | Lösung |
|---|---|---|
| Kein Strom / Amplifier schaltet sich nicht ein |
|
|
| Kein Ton |
|
|
| Verzerrter Klang |
|
|
| Amplifier überhitzt |
|
|
Technische Daten
| Besonderheit | Detail |
|---|---|
| Modell | GLT-85.4D |
| Kanäle | 4 |
| Amplifier-Klasse | Klasse D |
| Max Power @ 12.6V | 1700 W |
| RMS Power Output (4 Ohm Stereo @ 12.6V) | 85W x 4 |
| RMS Power Output (2 Ohm Stereo @ 12.6V) | 120W x 4 |
| RMS Power Output (4 Ohm Bridged @ 12.6V) | 240W x 2 |
| Mindestvorrat Voltage | 8.5 V |
| Maximales Versorgungsvolumentage | 16.8 V |
| Idle Current Consumption @ 12.6VDC | 0.66 A |
| Musical Max Current Consumption @ 12.6VDC | 31 A |
| Abmessungen (L x B x H) | 11.02 x 7.99 x 2.76 Zoll |
| Artikelgewicht | 3.5 Pfund |
Garantie und Support
For warranty information, technical support, or service inquiries, please refer to the official Genius Audio webBesuchen Sie die Website oder kontaktieren Sie den Kundendienst. Bewahren Sie Ihren Kaufbeleg als Kaufnachweis für Garantieansprüche auf.
Offiziell WebWebsite: Genius Audio Store on Amazon


