Einführung
This manual provides instructions for the proper setup, operation, and maintenance of your Mastercool 96236 4-Way Aluminum Manifold Gauge Set. This professional-grade tool is designed for use with R410A, R22, and R407C refrigerants in automotive and HVAC/R air conditioning systems. Please read this manual thoroughly before use to ensure safe and efficient operation.
Produkt überview und Komponenten
The Mastercool 96236 manifold set includes a robust aluminum manifold block, two 2 1/2" gauges, and a set of hoses designed for various refrigerant applications.
- Manifold Block: Features a 4-way design with a full 3/8" bore for increased flow. Equipped with ball valves that rotate 90° for quick opening and closing.
- Messgeräte: Two 2 1/2" gauges (PSI, °F) for precise pressure and temperature readings. Color-coordinated for multi-refrigerant recognition (R410A, R22, R407C).
- Schläuche: Includes three 36" 1/4" SAE blue, red, and yellow nylon barrier ball valve hoses with manual shut-off valves, and one 36" 3/8" SAE black vacuum hose.
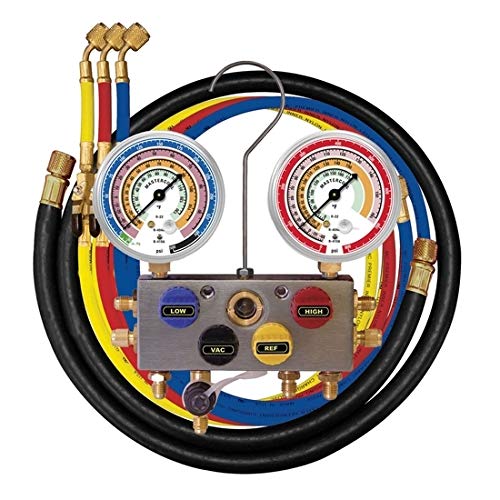
Abbildung 1: Mastercool 96236 4-Way Aluminum Manifold Gauge Set. This image displays the complete manifold set, including the central aluminum block with two large gauges (blue for low pressure, red for high pressure), and four color-coded hoses (red, blue, yellow, and black) coiled around the unit. The hoses are equipped with brass fittings and manual shut-off valves. A metal hook for hanging the manifold is visible at the top.
Installationsanweisungen
- Komponenten prüfen: Before each use, visually inspect all components for damage, wear, or leaks. Ensure all hose connections are clean and free of debris.
- Schläuche anschließen:
- Verbinden Sie blauer Schlauch to the "LOW" port on the manifold and to the low-side service port of the AC system.
- Verbinden Sie roter Schlauch to the "HIGH" port on the manifold and to the high-side service port of the AC system.
- Verbinden Sie yellow hose to the "REF" (refrigerant) port on the manifold. This hose will connect to the refrigerant tank or charging station.
- Verbinden Sie black vacuum hose to the "VAC" (vacuum) port on the manifold. This hose will connect to a vacuum pump for evacuation.
- Sichere Verbindungen: Hand-tighten all connections, then use a wrench to ensure a snug, leak-free seal. Do not overtighten.
Bedienungsanleitung
A. System Evacuation
- Ensure all manifold valves are closed.
- Connect the black vacuum hose to a vacuum pump.
- Open the "LOW" and "HIGH" valves on the manifold.
- Start the vacuum pump. Monitor the gauges; they should drop into a vacuum.
- Allow the pump to run until the desired vacuum level is achieved, typically for 15-30 minutes after reaching the target vacuum, depending on system size.
- Close the "LOW" and "HIGH" valves on the manifold, then turn off the vacuum pump.
- Observe the gauges for at least 10-15 minutes to ensure the vacuum holds, indicating no leaks in the system.
B. Refrigerant Charging
- Ensure the system has been properly evacuated and holds vacuum.
- Connect the yellow hose to the refrigerant tank.
- Slightly open the refrigerant tank valve to purge air from the yellow hose by briefly loosening the connection at the manifold's "REF" port until refrigerant escapes, then retighten.
- With the engine off (for automotive AC) or system off (for HVAC/R), open the "LOW" valve on the manifold to allow refrigerant to enter the system. Monitor the low-side gauge.
- For liquid charging, invert the refrigerant tank and open the "HIGH" valve briefly, then close it. This method is typically used for initial charge or larger systems. Exercise caution with liquid charging.
- Once the desired charge is reached, close the "LOW" and "HIGH" valves on the manifold, then close the refrigerant tank valve.
- Disconnect the hoses from the service ports.
C. Pressure Testing
- Connect the blue and red hoses to the low and high-side service ports, respectively.
- Ensure all manifold valves are closed.
- Start the AC system and allow it to stabilize.
- Open the "LOW" and "HIGH" valves on the manifold.
- Read the pressure values on both gauges. Compare these readings to the manufacturer's specifications for the specific refrigerant and ambient temperature.
- Close the "LOW" and "HIGH" valves before disconnecting the hoses.
Wartung
- Reinigung: After each use, wipe down the manifold and hoses with a clean, dry cloth. Avoid using harsh chemicals that could damage the gauges or hose material.
- Lagerung: Store the manifold set in its original blow-molded case in a clean, dry environment to protect it from dust and physical damage.
- O-Rings and Gaskets: Periodically inspect O-rings and gaskets in the hose fittings for wear or damage. Replace them as needed to prevent leaks.
- Messgerätekalibrierung: While gauges are factory calibrated, significant impacts or prolonged use may affect accuracy. If accuracy is suspected, consult a professional for recalibration.
Fehlerbehebung
| Problem | Mögliche Ursache | Lösung |
|---|---|---|
| Gauges not reading correctly | Loose connections, damaged gauge, incorrect refrigerant selected. | Check all connections for tightness. Inspect gauges for physical damage. Ensure correct refrigerant scale is being read. |
| System not holding vacuum | Leaks in hoses, manifold, or AC system. | Inspect all hose connections and O-rings. Check AC system components for leaks using a leak detector. |
| Refrigerant not flowing | Manifold valves closed, hose shut-off valves closed, clogged hose, empty refrigerant tank. | Ensure all necessary valves are open. Check refrigerant tank level. Inspect hoses for kinks or blockages. |
Technische Daten
- Modell: Mastercool 96236
- Manifold Type: 4-Way Aluminum
- Messgröße: 2 1/2 inches (PSI, °F)
- Kältemittelkompatibilität: R410A, R22, R407C
- Schlauchkonfiguration: Three 36" 1/4" SAE nylon barrier ball valve hoses (blue, red, yellow) with manual shut-off valves; One 36" 3/8" SAE black vacuum hose.
- Manifold Bore: Full 3/8"
- Ventiltyp: 90° Ball Valve with Teflon Washers
- Material: Aluminum (manifold block)
- Artikelgewicht: 3 Pfund
- UPC: 700376601596
Garantie und Support
Specific warranty details for the Mastercool 96236 are typically provided with the product packaging or can be obtained by contacting Mastercool directly. For technical support or service inquiries, please refer to the contact information provided by Mastercool or your authorized distributor.


