1. Einleitung
This manual provides essential information for the safe and effective operation of the Mark-10 EKM5-200 Myometer Kit. The EKM5-200 Myometer Kit is designed to facilitate a wide range of strength assessments and ergonomics studies. It features a Series 5 force gauge with a 200 lbF (1,000 N) range, a tabletop mount, a strap, and various accessories. This kit is suitable for ergonomists and other professionals requiring precise force measurement.
2. Sicherheitshinweise
Please read all instructions carefully before using the EKM5-200 Myometer Kit. Failure to follow these instructions may result in injury or damage to the equipment.
- Ensure the device is used within its specified force capacity of 200 lbF (1,000 N). Exceeding this limit can damage the force gauge.
- Only use the provided AC adapter/charger for powering and charging the device.
- Halten Sie das Gerät von Flüssigkeiten und extremen Temperaturen fern.
- Versuchen Sie nicht, das Gerät zu zerlegen oder zu reparieren. Überlassen Sie alle Wartungsarbeiten qualifiziertem Fachpersonal.
- Always secure the force gauge properly when using the tabletop mounting kit to prevent accidental detachment.
- When performing strength assessments, ensure the subject is positioned safely and comfortably.
3. Packungsinhalt
The Mark-10 EKM5-200 Myometer Kit includes the following components:
- M5-200 Advanced Force Gauge
- Tragetasche
- Tabletop Mounting Kit (for vertical or horizontal orientations)
- Adjustable Length Looped Strap
- AC Adapter/Charger (110V)
- MESUR Lite Data Collection Software
- USB-Kabel
- NIST-traceable Certificate of Calibration with Data
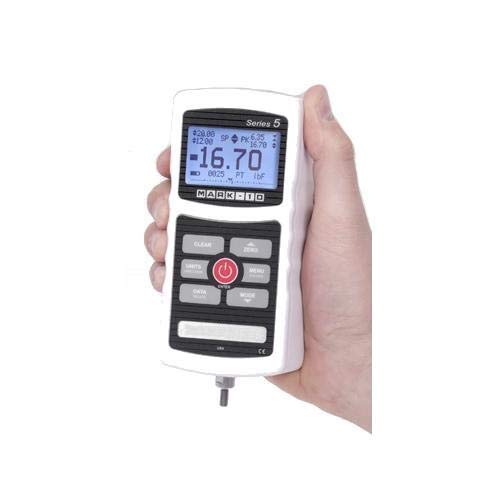
Figure 1: The M5-200 Advanced Force Gauge, a key component of the EKM5-200 kit. It features a digital display and control buttons.
4. Produktüberschreitungview und Funktionen
The EKM5-200 Myometer Kit is designed for precise force measurement in various applications. Its core component, the M5-200 force gauge, offers advanced capabilities.
Hauptmerkmale:
- Measures real-time, average, and peak pull and push forces.
- Force capacity: 200 lbF (1,000 N).
- Accuracy: ±0.1% of full scale.
- Sampling rate: 7,000 Hz.
- Output options: USB, RS-232, and analog.
- High/low limit indicators for pass/fail and minimum force testing.
- 1,000-point data memory with statistical calculations.
- Data can be bulk downloaded to the included MESUR Lite data collection software.
- Force gauge is compatible with other Mark-10 grips and attachments.
5. Einrichtung
5.1 Charging the Force Gauge
- Connect the AC adapter/charger to the force gauge's power input port.
- Plug the AC adapter into a standard 110V electrical outlet.
- Allow the device to charge fully before initial use. The charging indicator on the gauge will provide status.
5.2 Assembling the Tabletop Mounting Kit
- Identify the components of the tabletop mounting kit.
- Attach the force gauge securely to the mounting bracket. Ensure all fasteners are tightened.
- Mount the assembly to a stable tabletop or surface, ensuring it is firm and does not wobble. The kit supports both vertical and horizontal orientations.
- Attach the adjustable length looped strap to the force gauge or an appropriate attachment point on the mounting kit, depending on the test setup.

Abbildung 2: Bspample setup of the EKM5-200 Myometer Kit for an ergonomics study, showing the force gauge mounted on a table and connected to a subject via a strap.
6. Bedienungsanleitung
6.1 Ein-/Ausschalten
- Zum Einschalten halten Sie die LEISTUNG Drücken Sie die Taste, bis das Display aufleuchtet.
- Halten Sie zum Ausschalten die Taste gedrückt LEISTUNG gedrückt, bis sich das Display ausschaltet.
6.2 Grundlegende Messung
- Ensure the force gauge is powered on and properly calibrated (refer to NIST certificate).
- Drücken Sie die NULL button to tare the current reading before applying any force.
- Apply force to the sensor via the strap or other attachment. The display will show the real-time force.
- The gauge can display peak force, average force, and real-time force. Use the MODUS button to cycle through display modes.
- Observe the high/low limit indicators for pass/fail testing, if configured.
6.3 Einheitenauswahl
Drücken Sie die EINHEITEN button to cycle through available measurement units (e.g., lbF, N, kgF).
7. Datenverwaltung
7.1 Internal Data Memory
The M5-200 force gauge can store up to 1,000 data points internally, along with statistical calculations. Refer to the force gauge's dedicated manual for detailed instructions on saving and reviewing data directly on the device.
7.2 MESUR Lite Data Collection Software
- Install the MESUR Lite data collection software on your computer using the provided media or by downloading it from the Mark-10 webWebsite.
- Connect the force gauge to your computer using the supplied USB cable.
- Launch the MESUR Lite software. The software will detect the connected force gauge.
- Follow the on-screen instructions within MESUR Lite to bulk download stored data, perform real-time data acquisition, and analyze measurements.
8. Wartung
8.1 Reinigung
- Wipe the exterior of the force gauge and accessories with a soft, damp Tuch.
- Verwenden Sie keine Scheuermittel oder Lösungsmittel, da diese die Oberfläche oder die internen Bauteile beschädigen können.
- Ensure no moisture enters the device's ports.
8.2 Speicherung
- When not in use, store the EKM5-200 Myometer Kit in its provided carrying case to protect it from dust, impacts, and environmental factors.
- An einem kühlen, trockenen Ort aufbewahren und vor direkter Sonneneinstrahlung und extremen Temperaturen schützen.
8.3 Kalibrierung
The force gauge comes with a NIST-traceable certificate of calibration. Regular recalibration is recommended to maintain accuracy, especially for critical applications. Refer to Mark-10's guidelines or contact their support for recalibration services.
9. Fehlerbehebung
| Problem | Mögliche Ursache | Lösung |
|---|---|---|
| Gerät lässt sich nicht einschalten. | Problem mit schwacher Batterie oder defektem Netzteil. | Connect the AC adapter and charge the device. Ensure the adapter is properly plugged into a working outlet. |
| Ungenaue Messwerte. | Not zeroed before use, or device requires recalibration. | Drücken Sie die NULL button before measurement. If problem persists, consider recalibration. |
| Cannot connect to MESUR Lite software. | USB cable issue, driver not installed, or software not running. | Ensure USB cable is securely connected. Install necessary drivers. Restart MESUR Lite software and the force gauge. |
| Im Display wird „ÜBERLASTUNG“ angezeigt. | Applied force exceeds the device's capacity. | Immediately remove the excessive force. Ensure future measurements stay within the 200 lbF (1,000 N) limit. |
If you encounter issues not listed here or if the suggested solutions do not resolve the problem, please contact Mark-10 technical support.
10. Spezifikationen
| Parameter | Wert |
|---|---|
| Modell | EKM5-200 |
| Kapazität erzwingen | 200 lbF (1,000 N) |
| Genauigkeit | ±0.1 % vom Skalenendwert |
| Sampling-Rate | 7,000 Hz |
| Datenspeicher | 1,000 Datenpunkte |
| Ausgaben | USB, RS-232, Analog |
| Leistungsaufnahme | 110-V-Netzteil |
| Hersteller | Markus-10 |
| ASIN | B07D8SFSKC |
| UPC | 666758807621 |
11. Garantie und Support
11.1 Garantieinformationen
For detailed warranty information regarding your Mark-10 EKM5-200 Myometer Kit, please refer to the documentation included with your purchase or visit the official Mark-10 webDie Garantiebedingungen decken in der Regel Herstellungsfehler für einen bestimmten Zeitraum ab Kaufdatum ab.
11.2 Technischer Support
Should you require technical assistance, troubleshooting, or service for your EKM5-200 Myometer Kit, please contact Mark-10 customer support.
- Hersteller: Markus-10
- WebWebsite: www.mark-10.com (Bitte besuchen Sie die offizielle webAuf dieser Website finden Sie Kontaktdaten und die neuesten Support-Ressourcen.)
When contacting support, please have your model number (EKM5-200) and serial number (if applicable) ready.


