1. Einleitung
This manual provides essential information for the safe and effective installation, operation, and maintenance of your Ariete replacement oven timer. This timer is designed for compatibility with various Ariete Gran Gusto and Bon Cuisine oven models. Please read these instructions thoroughly before attempting any installation or use.
2. Sicherheitshinweise
- Elektrische Gefahr: Always disconnect the oven from the main power supply before attempting any installation, maintenance, or repair. Failure to do so can result in electric shock, injury, or death.
- Professionelle Installation empfohlen: Installation of electrical components should ideally be performed by a qualified technician. If you are unsure about any step, consult a professional.
- Komponentenkompatibilität: Ensure the replacement timer is compatible with your specific oven model. Refer to your oven's original manual or manufacturer specifications.
- Vorsichtig handhaben: Electrical components can be delicate. Handle the timer carefully to avoid damage.
3. Produktkomponenten und -identifizierung
The Ariete oven timer is a compact electrical component responsible for controlling oven cooking durations. It features a central shaft for knob attachment and electrical terminals for connection.
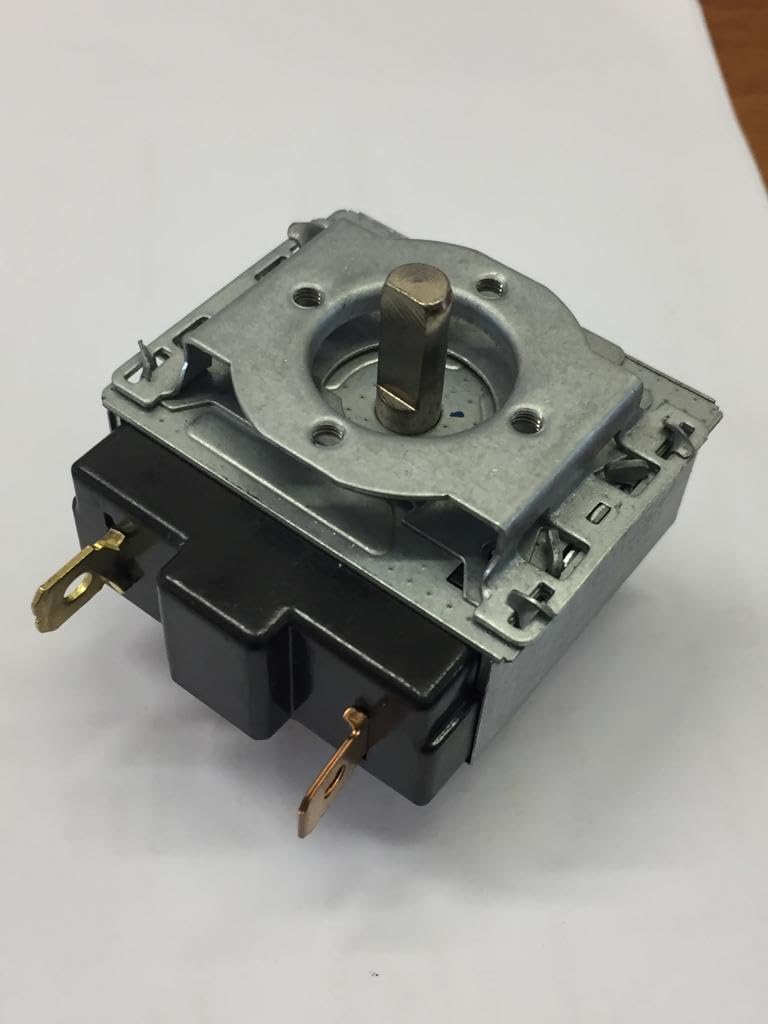
Abbildung 3.1: Spitze view of the Ariete oven timer, showing the hexagonal shaft for knob attachment and the metal mounting plate. This specific timer features a hexagonal shaft.

Abbildung 3.2: Seite view of the Ariete oven timer, illustrating a round shaft type. Notiz: It is crucial to verify if your oven requires a hexagonal or round shaft timer before purchase and installation, as variations exist.

Abbildung 3.3: Unten view of the timer, displaying electrical ratings: AC 125V 15A and AC 250V 15A. This indicates the voltage and current capacity of the timer's contacts.

Abbildung 3.4: Seite view showing the model identifier "DKJ/1-60 BS-01" and a manufacturing date code "2022 0601 24".

Abbildung 3.5: Nahaufnahme von oben view of the timer's mounting plate, showing screw holes for secure attachment within the oven's control panel.
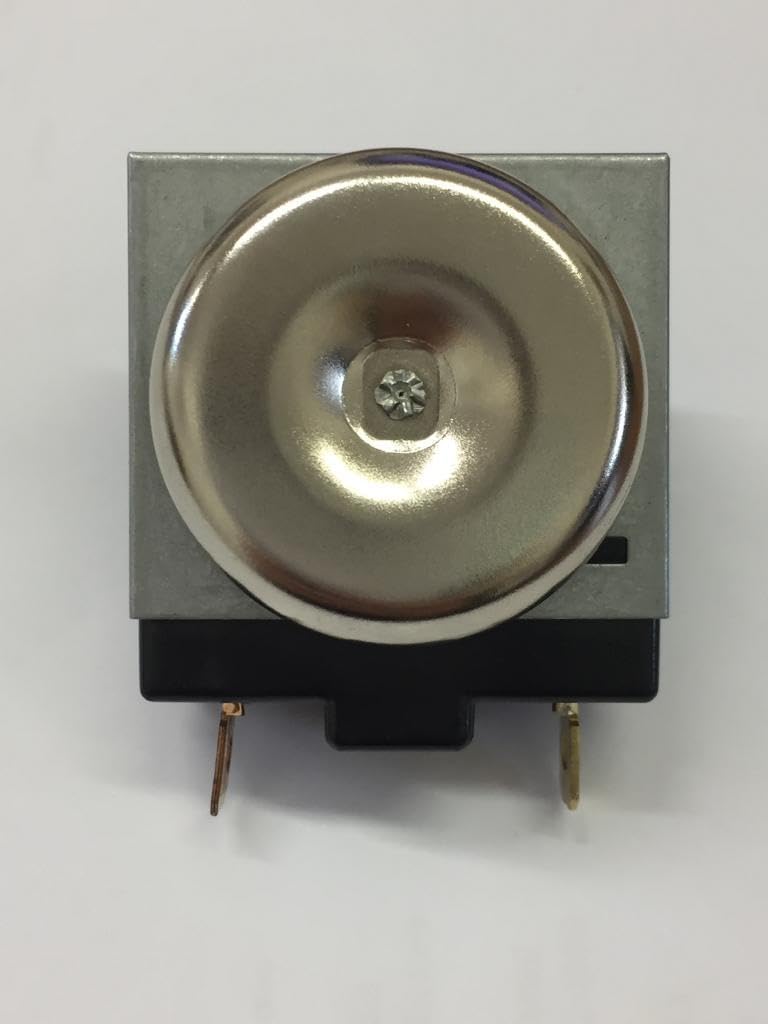
Abbildung 3.6: Unten view of the timer, highlighting the integrated bell mechanism which signals the end of the set cooking time.
4. Einrichtung und Installation
- Stromabschaltung: Before beginning, ensure the oven is completely disconnected from the electrical supply. Turn off the circuit breaker or unplug the oven.
- Zugangskontrollfeld: Carefully remove the oven's control panel to gain access to the existing timer. This usually involves removing screws and gently prying the panel.
- Dokumentenverbindungen: Before disconnecting any wires, take clear photographs or make a diagram of the existing wiring connections to the old timer. This will be crucial for correct re-connection.
- Alten Zeitgenossen entfernen: Disconnect all wires from the old timer. Unscrew and remove the old timer from its mounting position.
- Verify Shaft Type: Compare the shaft type (hexagonal or round) of the new timer with your oven's knob and the old timer. Ensure they match for proper fit and function.
- Neuen Timer installieren: Position the new Ariete timer in the mounting location. Secure it with the appropriate screws.
- Verkabelung anschließen: Refer to your photographs or diagram and carefully re-connect all wires to the new timer's terminals. Ensure connections are secure.
- Bedienfeld wieder zusammenbauen: Once all connections are secure and the timer is mounted, carefully reassemble the oven's control panel.
- Strom wiederherstellen: Reconnect the oven to the main power supply.
- Testfunktionalität: Test the timer's operation as described in the "Operating Instructions" section.
Haftungsausschluss: If you are not confident in performing these steps, it is strongly recommended to seek assistance from a qualified appliance repair technician.
5. Bedienungsanleitung
The Ariete oven timer functions as a mechanical countdown device to control cooking duration. Its operation is typically straightforward:
- Garzeit einstellen: Rotate the oven timer knob clockwise to the desired cooking duration. The maximum setting is typically 60 minutes.
- Timer-Aktivierung: As the knob is rotated, the timer mechanism engages, and the countdown begins.
- Überwachung: The timer will audibly tick as it counts down.
- Ende des Zyklus: Once the set time has elapsed, the timer will ring a bell to indicate the completion of the cooking cycle and will typically switch off the oven's heating element.
- Continuous Operation (if applicable): Some ovens may have a "stay on" or "manual" setting on the timer. If present, rotating the knob counter-clockwise past the "off" position (or to a specific symbol) may allow for continuous oven operation without a timed shut-off. Consult your oven's main manual for specific instructions on this feature.
6. Wartung
The Ariete oven timer is designed for durability and generally requires minimal maintenance. However, periodic checks can help ensure its longevity:
- Reinigung: If the timer knob or surrounding area becomes dirty, wipe it with a soft, damp cloth. Avoid using abrasive cleaners or excessive moisture, which could damage the electrical components.
- Inspektion: Periodically inspect the timer knob for any looseness or damage. If the knob feels loose, ensure it is properly seated on the timer shaft.
- Elektrische Anschlüsse: If you suspect an issue, and only after disconnecting power, a qualified technician can inspect the electrical connections for corrosion or looseness.
7. Fehlerbehebung
If you encounter issues with your Ariete oven timer, consider the following troubleshooting steps:
- Timer wird nicht aktiviert:
- Ensure the oven has power.
- Verify the timer knob is correctly seated on the shaft and is not slipping.
- Check if the timer is rotated sufficiently past the "off" position to engage the mechanism.
- Oven Not Turning Off After Timer:
- Confirm the timer is correctly wired and the internal contacts are functioning. This may require professional inspection.
- Ensure the timer is not set to a "manual" or "stay on" mode, if applicable to your oven model.
- Timer Knob Does Not Fit:
- This is a common issue if the replacement timer's shaft type (hexagonal vs. round) does not match your original oven knob. Verify the shaft type required for your specific oven model before purchasinGa-Ersatz.
- No Bell Sound:
- The internal bell mechanism may be faulty. If the timer otherwise functions, this may be a minor inconvenience.
For complex issues or if troubleshooting does not resolve the problem, it is advisable to contact a qualified appliance repair technician.
8. Spezifikationen
| Marke | Ariete |
| Technische Daten | 5.4 x 4 x 4.4 cm |
| Artikelgewicht | 80 Gramm |
| Elektrische Wertung | AC 125V 15A, AC 250V 15A |
| Compatible Oven Capacity | 40 Liters, 60 Liters (for associated oven models) |
| ASIN | B07DL1QSNH |
| Erstes verfügbares Datum | 6. Juni 2018 |
9. Garantie und Support
For information regarding warranty coverage or technical support for your Ariete oven timer, please refer to the documentation provided with your original oven appliance or contact Ariete customer service directly. Keep your purchase receipt as proof of purchase.
You can visit the official Ariete store for more products and support: Ariete Store on Amazon.it


