Einführung
This manual provides essential information for the safe and efficient operation of your VEVOR 6KW Sauna Heater. Please read all instructions carefully before installation, operation, or maintenance. Retain this manual for future reference.
Wichtige Sicherheitshinweise
- Elektrische Gefahr: Installation must be performed by a qualified electrician in accordance with all local and national electrical codes. Ensure proper grounding.
- Verbrennungsgefahr: The sauna heater and stones become extremely hot during operation. Avoid direct contact. Keep children and pets away from the heater.
- Brandgefahr: Do not place flammable materials near the heater. Ensure adequate clearance from walls and benches as specified in the installation section. Do not operate without sauna stones.
- Belüftung: Proper ventilation is crucial for safe operation. Ensure the sauna room has adequate air circulation.
- Wasserverbrauch: Only pour small amounts of water onto the hot stones to create steam. Excessive water can damage the heating elements and pose a safety risk.
- Wartung: Vor jeglichen Wartungs- oder Reinigungsarbeiten die Stromzufuhr unterbrechen.
Produkt überview
The VEVOR 6KW Sauna Heater is designed for dry steam baths in home and commercial sauna rooms. It features a durable stainless steel construction, efficient heating coils, and an internal control system for easy temperature and time adjustments.

Figure 1: VEVOR 6KW Sauna Heater with internal controls.
Hauptmerkmale:
- Premium-Konstruktion: Stainless steel shell for durability and corrosion resistance.
- Schnelles Aufheizen: 316 stainless steel heating coils ensure rapid heat-up.
- Interne Kontrollen: Integrated knobs for adjusting temperature (up to 90°C) and operating time (up to 60 minutes).
- Wandmontiertes Design: Space-saving installation with pre-drilled brackets.
- Geeignete Raumgröße: Designed for sauna rooms between 5-9m³ (176-318 cubic feet) with a height of approximately 190cm.

Figure 2: Illustration of the sauna heater's stainless steel structure and heating elements.

Figure 3: Close-up of the built-in temperature and timer controls.
Technische Daten
| Besonderheit | Detail |
|---|---|
| Leistung | 6 kW |
| Saunatyp | Trockendampf |
| Arbeitsvolumentage | 220 bis 240 V |
| Drahtanforderung | 3*10 (N*mm²) |
| Heating Coil Material | 316 Edelstahl |
| Schalenmaterial | 430 Edelstahl |
| Maximaltemperatur | 90 °C (194 °F) |
| Timerbereich | max. 60 Minuten |
| Suitable Sauna Room Volume | 5-9m³ (176-318 cubic feet) |
| Suitable Sauna Room Height | Approx. 190cm (6.2 feet) |
| Saunasteinbedarf | Approx. 18kg (35 lbs) - Nicht enthalten |
| Technische Daten | 16.93 x 13.78 x 24.41 Zoll (43 x 35 x 62 cm) |
| Artikelgewicht | 24.2 Pfund (11 kg) |
| Zertifizierungen | UL(us) Certified, CE IPX4 |

Abbildung 4: Detaillierte Produktabmessungen und Spezifikationen.
Setup und Installation
Installation of the VEVOR Sauna Heater requires careful attention to electrical and safety guidelines. It is highly recommended that a qualified electrician performs the electrical wiring.
1. Überlegungen vor der Installation:
- Ensure your sauna room meets the recommended volume and height requirements (5-9m³, approx. 190cm height).
- Verify that your electrical supply matches the heater's requirements (220-240V).
- Prepare the necessary wiring (3*10 N*mm² wire recommended).
- Sorgen Sie für ausreichende Belüftung im Saunaraum.
Video 1: This video demonstrates the detailed display and features of the sauna heater, including its internal components and controls.
2. Montage des Heizgerätes:
- Measure the distance of the screw holes on the back of the sauna stove.
- Mark the corresponding positions on the sauna room wall.
- Install screws on the wall, ensuring they are approximately 35cm (13.8 inches) above the ground.
- Carefully hang the sauna stove onto the installed screws, ensuring it is securely in place.
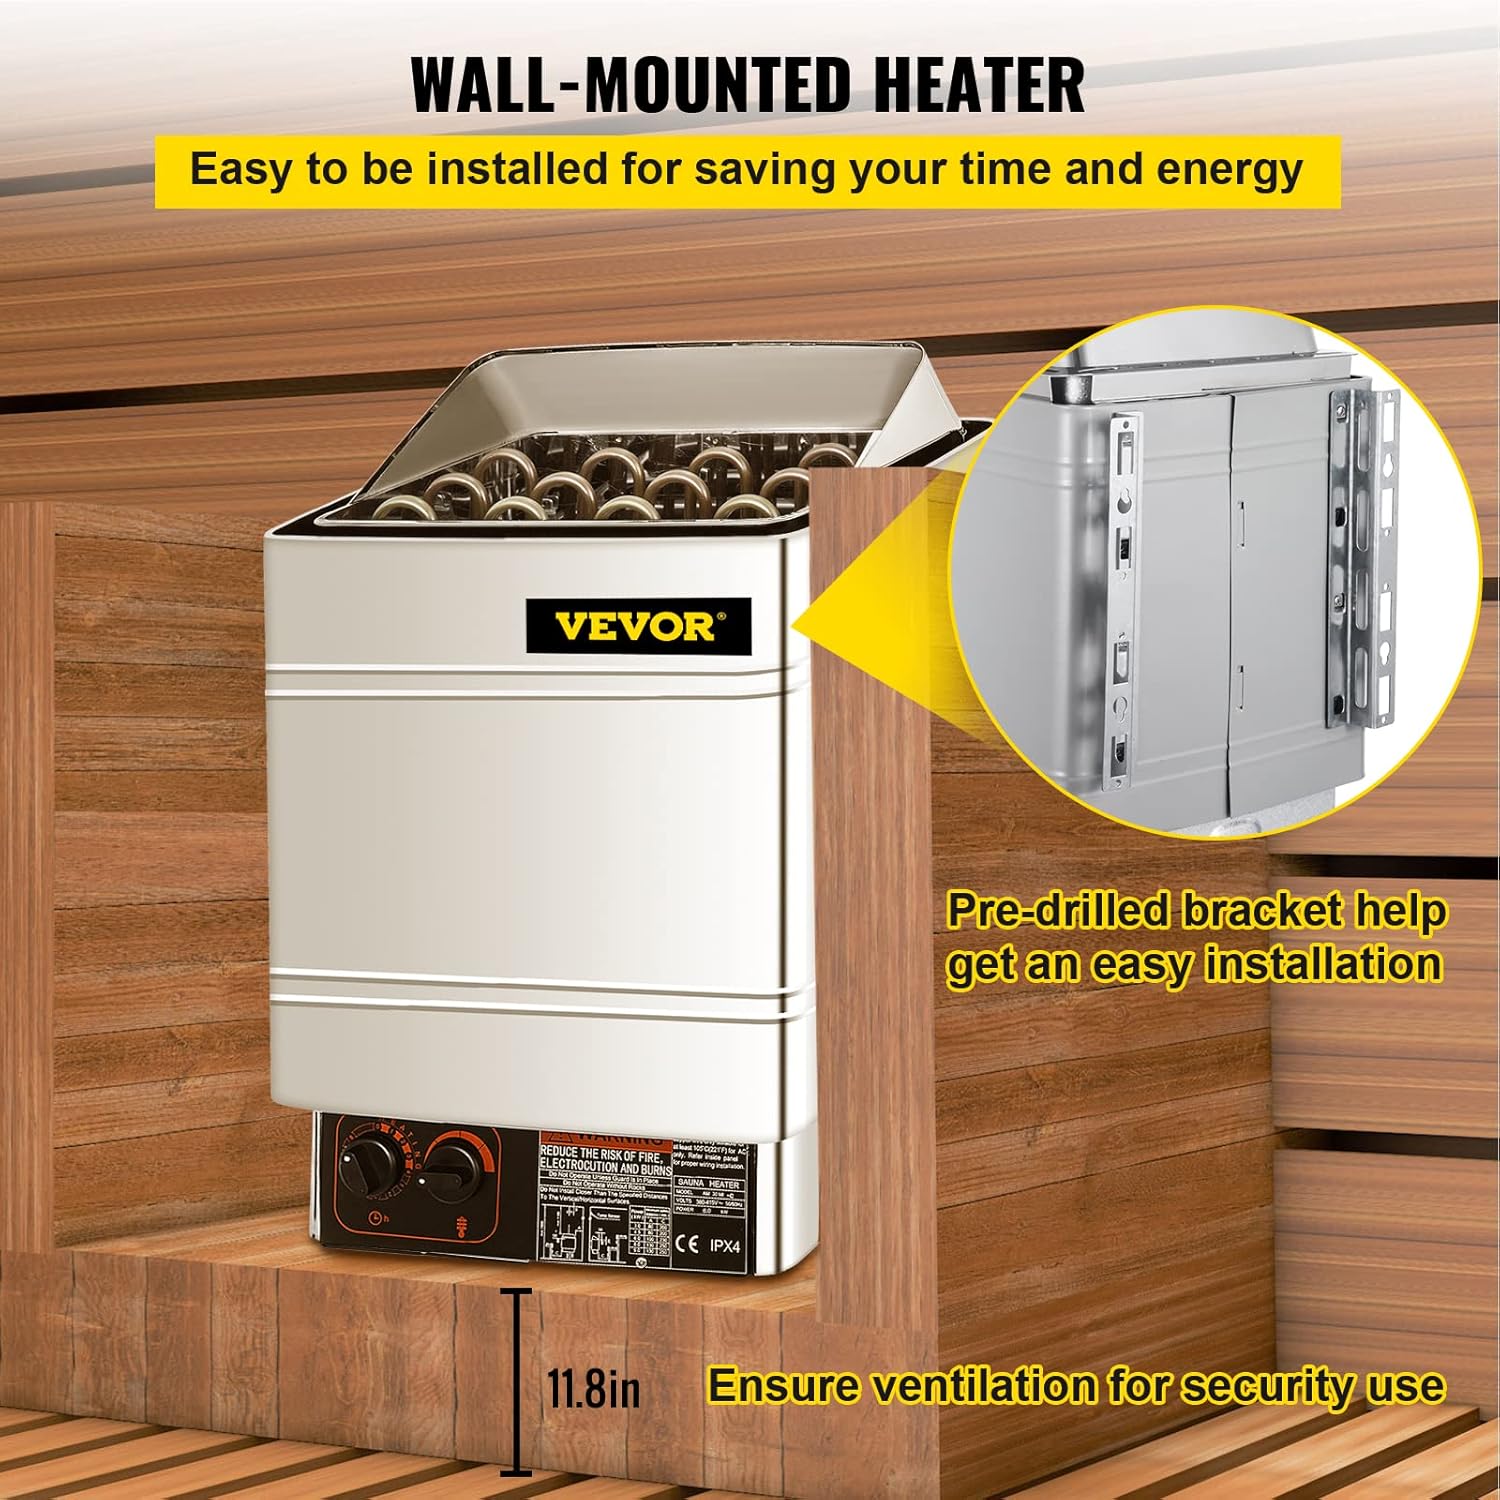
Figure 5: Illustration of the wall-mounted installation process, showing the pre-drilled brackets.
3. Electrical Wiring (220-240V):
WARNUNG: Electrical installation must be performed by a licensed electrician. Ensure power is disconnected at the main breaker before starting any wiring.
- Locate the wiring terminal block inside the heater's control panel.
- Connect the L1 and L2 (live) wires from your power supply to the corresponding L1 and L2 terminals on the heater.
- Connect the ground wire to the ground terminal (marked with a ground symbol).
- Stellen Sie sicher, dass alle Verbindungen fest und sicher sind.
Video 2: This video provides a step-by-step guide on how to wire the sauna heater for operation, including connecting the power cord and temperature probe.
4. Loading Sauna Stones:
- Place approximately 18kg (35 lbs) of sauna stones into the stone compartment.
- Ensure the stones are not packed too densely to allow for proper air circulation and heat distribution.
- The stones should cover the heating elements but not obstruct the air vents.
- Note: Sauna stones are not included with the heater.

Figure 6: Sauna heater with stones in place, ready for use.
Bedienungsanleitung
Once installed and wired correctly, your VEVOR Sauna Heater is ready for operation.
1. Timer einstellen:
- Turn the timer knob to your desired operating time, up to a maximum of 60 minutes.
- The heater will begin to heat once the timer is set.
2. Temperatur einstellen:
- Turn the temperature knob to set the desired sauna temperature. The maximum temperature is 90°C (194°F).
- Die Heizung wird ein- und ausgeschaltet, um die eingestellte Temperatur aufrechtzuerhalten.
3. Creating Steam (Löyly):
- Once the stones are hot, carefully ladle small amounts of water onto them to create steam.
- Do not pour large quantities of water at once, as this can damage the heater and create excessive steam.
- Verwenden Sie nur sauberes Wasser.
Figure 7: Enjoying a sauna session with steam generated by the heater.
Wartung
Regelmäßige Wartung gewährleistet die Langlebigkeit und den sicheren Betrieb Ihres Saunaofens.
- Reinigung: Wischen Sie die Außenseite des Heizgeräts regelmäßig mit einem Desinfektionsmittel ab.amp Tuch. Keine Scheuer- oder Lösungsmittel verwenden.
- Steininspektion: Inspect sauna stones regularly for signs of crumbling or deterioration. Replace any broken or worn-out stones to ensure efficient heating and prevent damage to the elements.
- Elektrische Anschlüsse: Lassen Sie jährlich alle elektrischen Verbindungen von einem qualifizierten Elektriker auf festen Sitz und Verschleißerscheinungen überprüfen.
- Belüftung: Ensure that air vents are not blocked by debris or lint.
Fehlerbehebung
| Problem | Mögliche Ursache | Lösung |
|---|---|---|
| Heizung schaltet sich nicht ein. | No power supply, tripped circuit breaker, faulty wiring, timer not set. | Check power supply and circuit breaker. Verify wiring connections. Ensure timer is set correctly. Consult a qualified electrician if issues persist. |
| Die Heizung erreicht nicht die gewünschte Temperatur. | Incorrect temperature setting, insufficient sauna stones, poor room insulation, ventilation issues, faulty heating element. | Adjust temperature setting. Ensure sufficient and properly placed sauna stones. Check sauna room insulation and ventilation. Contact customer support if heating elements are suspected to be faulty. |
| Excessive steam or water dripping. | Too much water poured onto stones, stones not hot enough. | Pour smaller amounts of water. Allow stones to heat thoroughly before adding water. |
| Ungewöhnliche Geräusche während des Betriebs. | Loose components, stones shifting, normal expansion/contraction. | Ensure heater is securely mounted. Rearrange stones if they are unstable. Some minor noises from thermal expansion are normal. |
Garantie und Support
For warranty information, technical support, or replacement parts, please contact VEVOR customer service. Refer to your purchase documentation for specific warranty terms and conditions.
Hersteller: VEVOR
WebWebsite: www.vevor.com


