1. Einleitung
Thank you for choosing the NEDIS Automatic Lead Acid Battery Charger, model BACCH02. This charger is designed for safe and efficient charging and maintenance of 2V, 6V, and 12V lead-acid batteries. Please read this manual thoroughly before use to ensure proper operation and to prevent damage to the charger or battery.
2. Sicherheitshinweise
Beachten Sie beim Gebrauch des Ladegeräts stets die folgenden Sicherheitsvorkehrungen:
- This charger is for indoor use only. Do not expose to rain or moisture.
- Außerhalb der Reichweite von Kindern aufbewahren.
- Sorgen Sie während des Ladevorgangs für ausreichende Belüftung, um Gasansammlungen zu vermeiden.
- Avoid sparks, flames, or smoking near the battery during charging. Batteries can produce explosive gases.
- Tragen Sie beim Arbeiten mit Batterien einen Augenschutz und Schutzkleidung.
- Always disconnect the AC power supply before connecting or disconnecting the battery clamps.
- Verbinden Sie die rote (+) Klamp zum Pluspol der Batterie und dem schwarzen (-) Steckeramp zum Minuspol der Batterie.
- Versuchen Sie nicht, eingefrorene, beschädigte oder nicht wiederaufladbare Batterien aufzuladen.
- Öffnen Sie das Ladegerät nicht.asing. Alle Wartungsarbeiten sind qualifiziertem Personal zu überlassen.
- Wenn das Netzkabel beschädigt ist, muss es vom Hersteller, seinem Kundendienst oder einer ähnlich qualifizierten Person ausgetauscht werden, um Gefährdungen zu vermeiden.
3. Produktüberschreitungview
The NEDIS BACCH02 is a compact and automatic battery charger. It features a main unit with LED indicators and a voltage selection switch, connected to an AC power cable and DC output cables with battery clamps.

Image: The main unit of the NEDIS BACCH02 charger, showing the LED indicators for polarity and charge status, and the voltage Wahlschalter.
Komponenten:
- Ladegerät: Main body containing the electronics.
- Bandtage Wahlschalter: Allows selection between 2V, 6V, and 12V charging modes.
- Polarity LED (Red): Indicates incorrect battery connection.
- Charge LED (Green): Indicates charging status (blinking for charging, solid for fully charged).
- Batterie Clamps: Rot (+) und Schwarz (-) zum Anschluss an die Batteriepole.
- Wechselstromkabel: Zum Anschluss an eine Wandsteckdose.
4. Einrichtung
Befolgen Sie diese Schritte, um Ihr Ladegerät einzurichten:
- Ensure Charger is Unplugged: Before making any connections, ensure the charger's AC power cable is disconnected from the wall outlet.
- Identify Battery Voltage: Bestimmen Sie die Lautstärketage of the battery you intend to charge (2V, 6V, or 12V).
- Select Correct Voltage: Verwenden Sie die Lautstärketage selection switch on the charger unit to set the appropriate voltage (2V, 6V, or 12V) for your battery.
- Batterie Cl anschließenamps:
- Verbinden Sie rot (+) Batterie clamp an den Pluspol (+) der Batterie anschließen.
- Verbinden Sie Schwarz (-) Batterie clamp an den Minuspol (-) der Batterie.
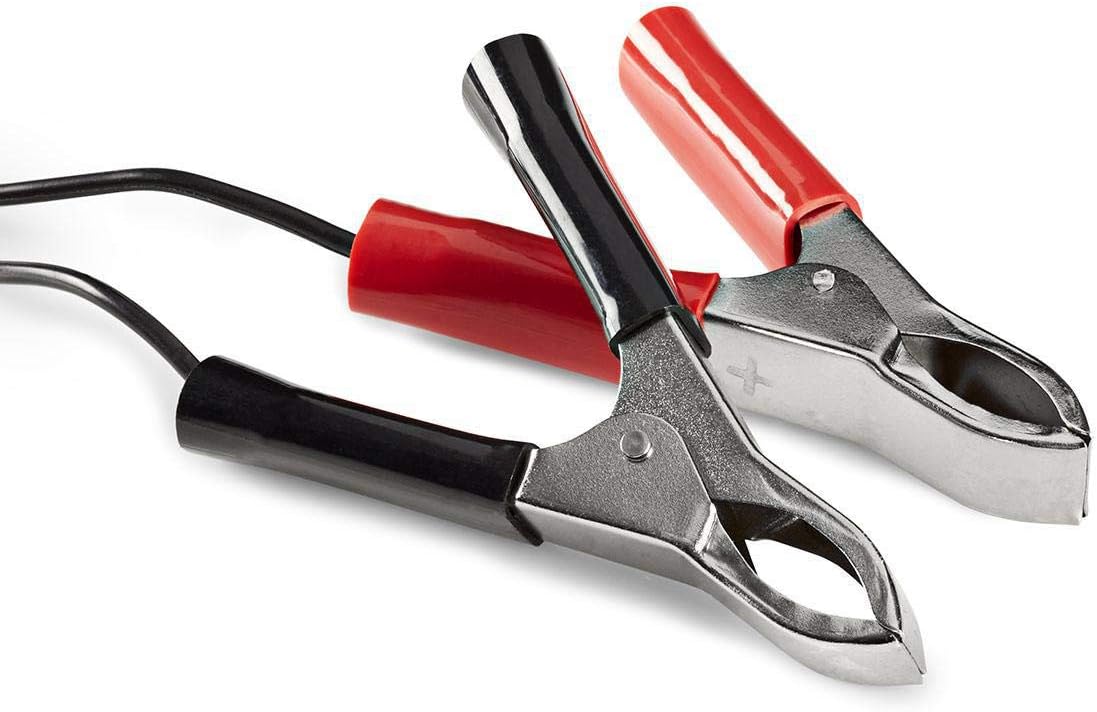
Image: Close-up of the red (positive) and black (negative) battery clamps.
- An die Stromversorgung anschließen: Sobald die Batterie clamps are securely connected, plug the charger's AC power cable into a standard 220V wall outlet.
5. Bedienungsanleitung
The NEDIS BACCH02 is a fully automatic charger. Once connected to the battery and power, it will automatically begin the charging process.
Ladevorgang:
- Polaritätsprüfung: If the red 'Polarity' LED illuminates, it indicates that the battery clamps are connected incorrectly. Immediately unplug the charger from the AC outlet and correct the connections before plugging it back in.
- Ladeanzeige: The green 'Charge' LED will blink when the battery is actively charging.
- Anzeige für volle Ladung: When the battery is fully charged, the green 'Charge' LED will stop blinking and remain solid. The charger will then automatically switch to a maintenance (float) charge mode to keep the battery at optimal capacity without overcharging.
Ladegerät abziehen:
So trennen Sie das Ladegerät nach Gebrauch:
- Unplug the charger's AC power cable from the wall outlet first.
- Disconnect the black (-) battery clamp from the negative terminal of the battery.
- Disconnect the red (+) battery clamp vom Pluspol der Batterie.
6. Wartung
Durch sachgemäße Wartung wird die Langlebigkeit Ihres Ladegeräts gewährleistet:
- Halten Sie das Ladegerät sauber und trocken. Wischen Sie es mit einem weichen, trockenen Tuch ab. Verwenden Sie keine Scheuermittel oder Lösungsmittel.
- Bewahren Sie das Ladegerät an einem kühlen, trockenen Ort auf, wenn Sie es nicht verwenden.
- Regularly inspect the AC power cable, DC output cables, and battery clampPrüfen Sie auf Anzeichen von Beschädigung, Verschleiß oder Korrosion. Ersetzen Sie die Teile gegebenenfalls.
7. Fehlerbehebung
If you encounter issues with your charger, refer to the following table:
| Problem | Mögliche Ursache | Lösung |
|---|---|---|
| Charger not turning on / No LEDs lit | No power supply; Faulty outlet; Damaged cable. | Check AC power connection; Try a different outlet; Inspect cable for damage. |
| Red 'Polarity' LED is lit | Anschluss mit umgekehrter Polarität. | Unplug charger, correct battery clamp connections (red to +, black to -), then plug back in. |
| Green 'Charge' LED not blinking / Battery not charging | Battery too deeply discharged; Incorrect voltage selected; Damaged battery. | Achten Sie auf die richtige Lautstärketage is selected; Battery may be beyond recovery; Have battery tested by a professional. |
| Charger unit feels excessively hot | Normal operation (some warmth is expected); Overload; Internal fault. | Ensure adequate ventilation; Disconnect immediately if excessively hot and contact support. |
8. Spezifikationen
| Besonderheit | Spezifikation |
|---|---|
| Modell | BACCH02 |
| Artikelmodellnummer | 5412810284245 |
| Eingangslautstärketage | 220 V Wechselstrom |
| Ausgangsvolumentage | 2V / 6V / 12V DC (selectable) |
| Suitable Battery Capacity | 2.2 Ah bis 10 Ah |
| Schutzfunktionen | Verpolung, Kurzschluss |
| Produktabmessungen (L x B x H) | 7 x 10 x 6 cm |
| Artikelgewicht | 680 Gramm |
| Einhaltung | CE |
| Farbe | Schwarz |
9. Garantie und Support
This product is covered by the standard warranty terms provided by the retailer at the time of purchase. For specific warranty details, please refer to your purchase documentation or contact the retailer directly.
For technical support, troubleshooting assistance beyond what is provided in this manual, or inquiries regarding parts and service, please contact your point of purchase or the manufacturer's customer service department.


