1. Einleitung
This user manual provides detailed instructions for the operation and maintenance of your LOTUS Mini Portable Projector YG-300. Please read this manual thoroughly before using the projector to ensure proper functionality and to prevent damage.
The YG-300 is a compact and versatile video projection system designed for various applications, including presentations, conferences, training, and home theater setups. It projects light beams to display images and videos from compatible sources.
2. Packungsinhalt
Bitte überprüfen Sie nach dem Auspacken, ob alle unten aufgeführten Artikel in Ihrem Paket enthalten sind:
- YG-300 Projector Unit
- Power Adapter (AC/DC 12V, 1.5A)
- Fernbedienung
- Three-in-one AV Cable
- Englisches Benutzerhandbuch

Figure 2.1: Included accessories with the YG-300 Mini Portable Projector.
3. Produktüberschreitungview
3.1. Projector Front and Side View

Abbildung 3.1: Vorderseite view of the YG-300 projector, highlighting the projection lens and side ventilation.
3.2. Projector Top Panel Controls
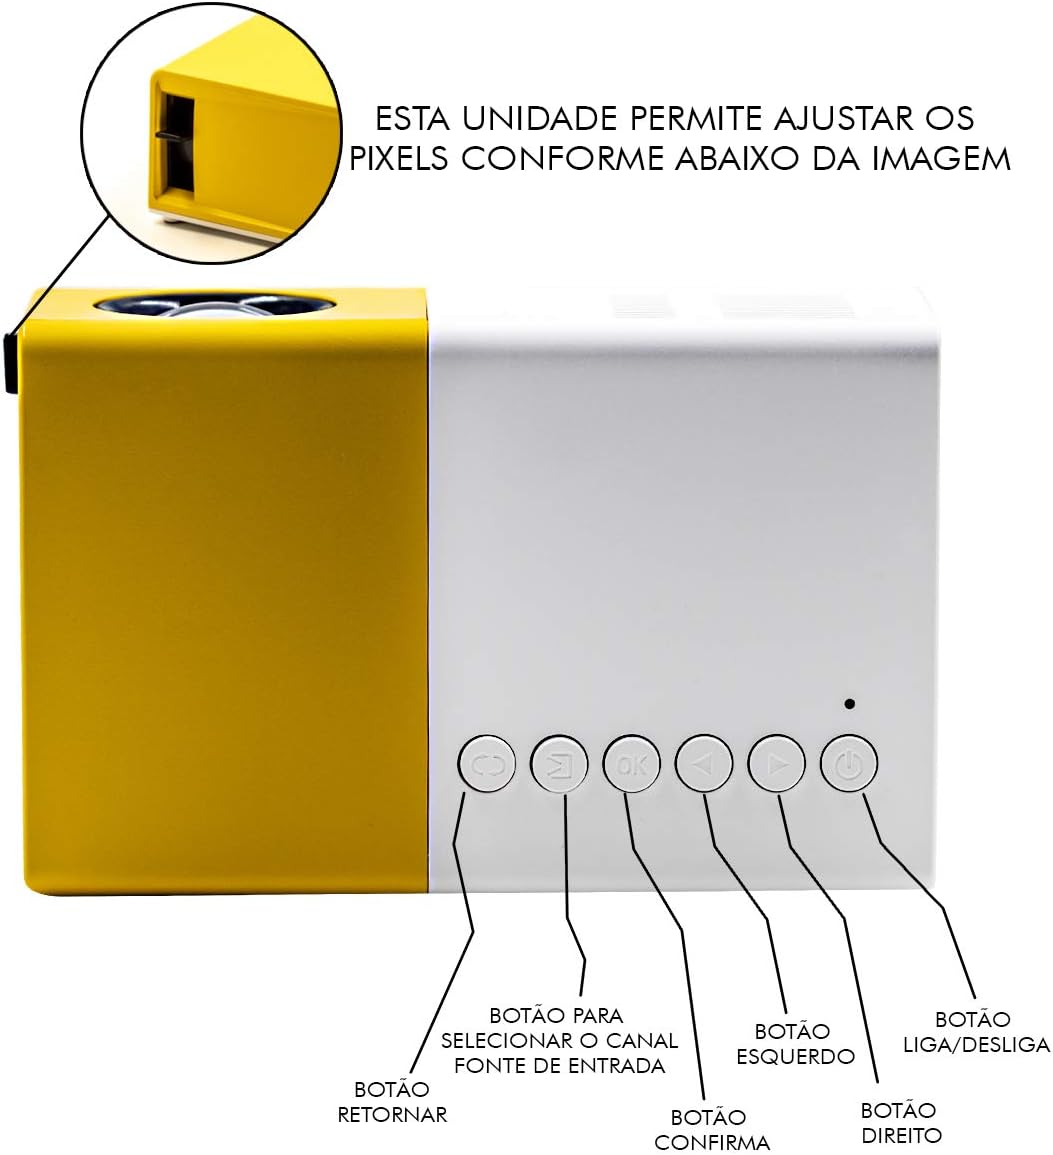
Figure 3.2: Top panel controls of the YG-300 projector. From left to right: Return button, Input Source selection button, OK (Confirm) button, Left navigation button, Right navigation button, and Power On/Off button.
3.3. Projector Rear Panel Ports
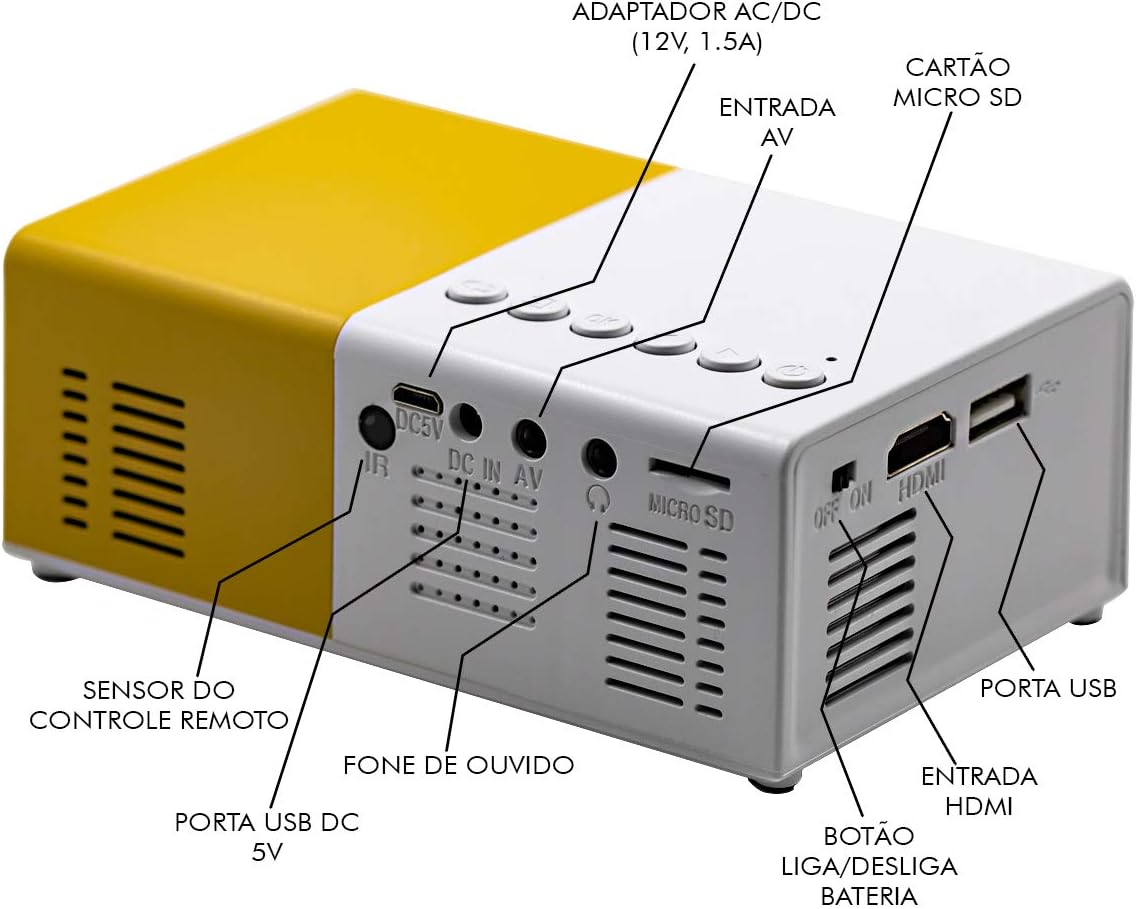
Figure 3.3: Rear panel of the YG-300 projector, detailing the connectivity options including USB, AV, Micro SD, HDMI, and audio output.
3.4. Fernbedienungsfunktionen

Figure 3.4: Remote control for the YG-300 projector, showing buttons for power, menu access, source selection, directional navigation, OK, play/pause, volume control, and exit.
4. Einrichtung
4.1. Stromanschluss
- Connect the provided power adapter to the "DC IN AV" port on the rear of the projector.
- Stecken Sie das Netzteil in eine normale Steckdose.
- Ensure the power switch (if present, often near the DC IN port) is in the "ON" position.
4.2. Positionierung des Projektors
Place the projector on a stable, flat surface. For optimal image quality, position the projector between 1.2 to 3 meters (approximately 4 to 10 feet) from the projection surface. This distance will yield an image size between 20 to 80 inches.

Abbildung 4.1: Bspample setup of the YG-300 projector for home use.
4.3. Anschließen von Eingabegeräten
The YG-300 supports multiple input sources:
- HDMI: Connect an HDMI cable from your device (e.g., laptop, game console, streaming stick) to the HDMI port on the projector.
- USB: Stecken Sie einen USB-Stick in den USB-Anschluss, um Medien abzuspielen. files direkt.
- Micro SD: Legen Sie eine Micro-SD-Karte in den Micro-SD-Steckplatz ein, um Medien abzuspielen. files.
- EIN V: Use the provided three-in-one AV cable to connect to devices with AV output (e.g., older DVD players, set-top boxes).
5. Bedienungsanleitung
5.1. Ein-/Ausschalten
- Zum Einschalten drücken Sie die Ein-/Ausschalten button on the projector's top panel or the remote control.
- Zum Ausschalten drücken Sie die Ein-/Ausschalten erneut die Taste.
5.2. Eingangsquelle auswählen
After powering on, use the Quelle Taste auf der Fernbedienung oder die Auswahl der Eingangsquelle button on the projector's top panel to cycle through available input sources (HDMI, USB, Micro SD, AV).
5.3. Adjusting Image Focus
The projector features a manual focus adjustment. Rotate the focus ring located around the lens until the projected image appears clear and sharp.
5.4. Navigating Menus and Media
Verwenden Sie die Richtungstasten (Links, Rechts, Up, Runter) und die OK button on the remote control or projector to navigate through menus and select media files. Die Zurückkehren button will take you back to the previous screen.
5.5. Lautstärkeregelung
Stellen Sie die Lautstärke mit den Lautstärke erhöhen Und Lautstärke verringern buttons on the remote control. You can also connect external speakers or headphones to the 3.5mm audio jack for enhanced sound.
6. Wartung
6.1. Reinigung der Linse
Reinigen Sie die Projektorlinse vorsichtig mit einem weichen, fusselfreien Tuch, das speziell für optische Oberflächen geeignet ist. Verwenden Sie keine Scheuermittel oder Lösungsmittel.
6.2. Reinigung des Projektorgehäuses
Wischen Sie die Außenseite des Projektors mit einem weichen, trockenen Tuch ab. Vermeiden Sie die direkte Anwendung von flüssigen Reinigungsmitteln auf dem Gerät.
6.3. Belüftung
Ensure that the ventilation grilles on the projector are not blocked to prevent overheating. Adequate airflow is crucial for the projector's longevity.
7. Fehlerbehebung
| Problem | Mögliche Ursache | Lösung |
|---|---|---|
| Kein Bild projiziert |
|
|
| Bild ist verschwommen |
|
|
| Kein Ton |
|
|
| Der Projektor überhitzt und schaltet sich ab. |
|
|
8. Spezifikationen
| Besonderheit | Detail |
|---|---|
| Marke | LOTUS |
| Modell | YG-300 |
| Hersteller | LEJIADA |
| Helligkeit | 600 Lumen |
| Native Auflösung | 800 x 480 Pixel |
| Projektionsabstand | 1.2 - 3 meters (approx. 4 - 10 feet) |
| Bildgröße | 20 - 80 Zoll |
| Bildschirm-Verhältnis | 4:3 |
| Konnektivität | HDMI, USB, 3.5mm Audio, Micro SD Card Slot |
| Technische Daten | 12.5 x 8 x 5 cm (4.9 x 3.1 x 2 Zoll) |
| Produktgewicht | 480 g (1.06 Pfund) |

Figure 8.1: Dimensions of the YG-300 projector and its remote control.
9. Garantie und Support
For warranty information and technical support, please refer to the contact details provided by your retailer or the manufacturer, LEJIADA. Keep your purchase receipt as proof of purchase for any warranty claims.
This product is designed for durability and performance. For any issues not covered in the troubleshooting section, please contact customer support.


