Einführung
This manual provides detailed instructions for the safe installation, operation, and maintenance of your Progress Lighting Tobin Collection 1-Light Etched White Glass Modern Bath Vanity Light. Please read all instructions carefully before beginning installation and retain this manual for future reference.
The Tobin vanity light features a modern design with tubular arms and an etched white glass shade, finished in Brushed Nickel. It is designed to provide functional and aesthetic lighting for your bathroom space.
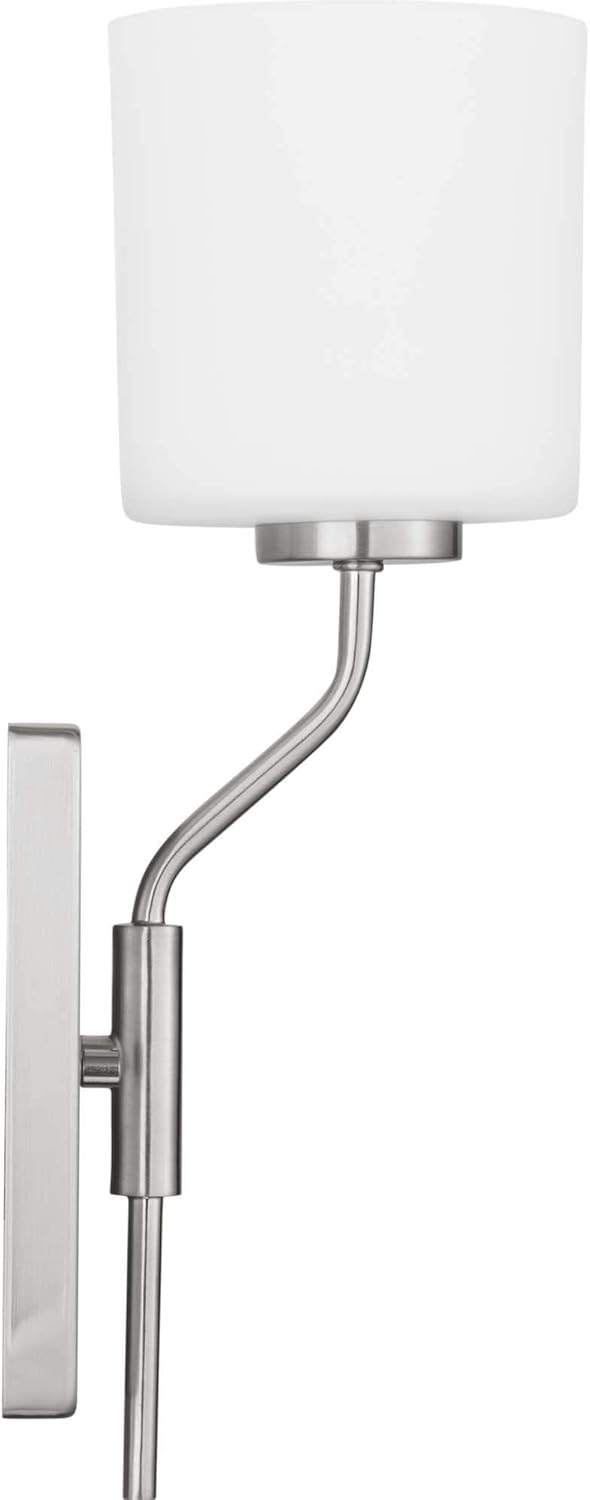
Figure 1: Progress Lighting Tobin 1-Light Vanity Light.
Sicherheitshinweise
- WARNUNG: Stromschlaggefahr. Vor Installation oder Wartung die Stromzufuhr am Sicherungskasten oder Leitungsschutzschalter unterbrechen.
- Alle elektrischen Anschlüsse müssen den örtlichen Vorschriften, Verordnungen oder dem National Electric Code (NEC) entsprechen. Wenden Sie sich an einen qualifizierten Elektriker, wenn Sie mit den korrekten elektrischen Anschlüssen nicht vertraut sind.
- Diese Leuchte ist nur für den Innenbereich bestimmt.
- Verwenden Sie nur den Lampentyp und das richtige Watttage specified for this fixture. Exceeding the recommended wattage kann zu Überhitzung und Schäden führen.
- Gehen Sie vorsichtig mit Glaskomponenten um, um ein Zerbrechen zu vermeiden.
- Stellen Sie sicher, dass die Leuchte sicher an einem tragenden Bauteil des Gebäudes befestigt ist.
- This product is UL Listed, ensuring it meets specific safety standards.
Packungsinhalt
Carefully unpack your new fixture and lay out all parts on a clear area. Ensure all components listed below are present before discarding packaging materials.
- Fixture Body (with tubular arm and backplate)
- Geätzter weißer Glasschirm
- Mounting Hardware (crossbar, mounting screws, wire nuts)
- Installationsblatt
Technische Daten
| Marke | Fortschritt Beleuchtung |
| Modellname | Tobin |
| Teilenummer | P300222-009 |
| Farbe | Brushed Nickel (Fixture), Etched White (Shade) |
| Material | Alloy Steel (Fixture), Glass (Shade) |
| Stil | Modern |
| Leuchtenform | Eitelkeit |
| Zimmertyp | Badezimmer |
| Verwendung im Innen- und Außenbereich | Innenbereich |
| Stromquelle | AC |
| Installationstyp | Aufputz |
| Besonderheit | Dimmbar |
| Lichtquellentyp | Glühlampe (kompatibel mit LED) |
| Anzahl der Lichtquellen | 1 |
| Bandtage | 120 Volt |
| Wastage | 100 Watt (max) |
| Lampensockel | E26 Mittel |
| Helligkeit | 250 lumens (typical for included bulb, may vary with bulb choice) |
| Artikelgewicht | 3.02 Pfund |
| Montage erforderlich | Ja |
| Spezifikation erfüllt | UL-zertifiziert |

Abbildung 2: Produktabmessungen.
Setup und Installation
Bevor Sie beginnen: Stellen Sie sicher, dass die Stromzufuhr am Sicherungskasten unterbrochen ist. Lesen Sie alle Anweisungen sorgfältig durch.
- Bereiten Sie die Montagefläche vor: Ensure the electrical box is securely installed and capable of supporting the fixture's weight.
- Montageplatte anbringen: Secure the mounting crossbar to the electrical box using the provided screws.
- Drahtverbindungen: Connect the fixture's wires to the corresponding house wires (black to black, white to white, ground to ground) using the provided wire nuts. Ensure all connections are secure.
- Montieren Sie die Vorrichtung: Carefully align the fixture's backplate with the mounting screws on the crossbar. Secure the fixture in place with the decorative nuts or screws.
- Glasschirm installieren: Place the etched white glass shade over the socket and secure it according to the specific design (e.g., with a threaded ring or set screws).
- Glühbirne einbauen: Insert one E26 medium base bulb (max 100W incandescent or equivalent LED) into the socket.
This fixture can be mounted with the light facing upwards or downwards, depending on your preference and desired lighting effect.

Figure 3: Mounting Options (Up or Down).
Installationsvideo-Anleitung
Video 1: Bath and Vanity Sizing and Placement Guidelines. This video provides general guidance on sizing and placement for bathroom vanity lights, which can be helpful during installation.
Bedienungsanleitung
Once installed, restore power at the circuit breaker. The fixture is operated via a standard wall switch (not included). If connected to a compatible dimmer switch, the light output can be adjusted. Ensure the bulb used is dimmable if you intend to use a dimmer switch.
Wartung
- Reinigung: Always turn off power before cleaning. Wipe the fixture with a soft, dry cloth. Do not use abrasive cleaners or solvents as they may damage the finish.
- Glasschirm: The etched white glass shade can be removed for cleaning. Wash with mild soap and water, rinse thoroughly, and dry completely before reattaching.
- Lampenwechsel: Ensure power is off and the bulb has cooled before attempting to replace it. Use an E26 medium base bulb, not exceeding 100 watts.
Fehlerbehebung
| Problem | Mögliche Ursache | Lösung |
|---|---|---|
| Licht geht nicht an. |
|
|
| Licht flackert. |
|
|
| Der Glasschirm ist locker. |
|
|
Garantie und Support
This Progress Lighting product is covered by a 1 Jahr eingeschränkte GarantieDiese Garantie sichert Ihnen die volle Zufriedenheit mit Ihrem Kauf zu und beinhaltet professionellen Kundendienst.
Bei Garantieansprüchen oder technischen Fragen wenden Sie sich bitte an die Kontaktinformationen auf Ihrem Kaufbeleg oder besuchen Sie die offizielle Website von Progress Lighting. webWebsite.


