1. Einleitung
This manual provides essential information for the proper setup, operation, and maintenance of your RCA RT2781HB 1000-Watt Audio Receiver Home Theater System. Please read this manual thoroughly before using the product to ensure optimal performance and safety. This system delivers Dolby Digital 5.1 surround sound, an AM/FM tuner, Bluetooth connectivity, and USB playback capabilities.
2. Sicherheitshinweise
- Energiequelle: Schließen Sie das Gerät nur an die auf dem Produktetikett angegebene Stromversorgung an.
- Belüftung: Sorgen Sie für ausreichende Belüftung. Blockieren Sie keine Belüftungsöffnungen.
- Wasser und Feuchtigkeit: Das Gerät darf weder Regen, Feuchtigkeit noch tropfenden/spritzenden Flüssigkeiten ausgesetzt werden.
- Hitze: Halten Sie das Gerät von Wärmequellen wie Heizkörpern, Heizregistern, Öfen oder anderen wärmeerzeugenden Geräten fern.
- Wartung: Versuchen Sie nicht, dieses Produkt selbst zu warten. Überlassen Sie alle Wartungsarbeiten qualifiziertem Servicepersonal.
- Reinigung: Ziehen Sie vor der Reinigung den Netzstecker. Verwenden Sie zum Reinigen ein trockenes Tuch.
3. Packungsinhalt
Bitte überprüfen Sie, ob alle unten aufgeführten Artikel in Ihrem Paket enthalten sind:
- 1 x RCA RT2781HB Audio Receiver
- 5 x Satellite Surround Sound Speakers
- 1 x Subwoofer
- 1 x Fernbedienung (Batterien enthalten)
- 1 x UKW-Antenne.
4. Produktüberschreitungview
The RCA RT2781HB system is designed to provide an immersive audio experience. It includes a central receiver unit, five satellite speakers, and a subwoofer.

Figure 4.1: Complete RCA RT2781HB Home Theater System
4.1. Komponenten
- Empfänger: The central unit for audio processing, amplification, and input management.
- Satellite Speakers (5): Four compact speakers for front left/right and rear left/right channels, and one center channel speaker for dialogue clarity.
- Subwoofer (1): Provides deep bass frequencies for a rich audio experience.
- Fernbedienung: Für die komfortable Bedienung aller Systemfunktionen.
4.2. Frontblende vorbeiview
The front panel of the receiver features controls for power, volume, input selection, and sound adjustments, along with a display and front-facing input ports.
4.3. Rückwand überview
The rear panel provides various connection ports for speakers, audio/video sources, and the power supply.

Figure 4.2: Rear Panel Digital and Analog Audio Inputs
This image illustrates the digital audio inputs (Coaxial, Optical 1, Optical 2) and analog audio inputs (AUX 1 R/L) on the rear panel of the receiver. These ports are used to connect external audio sources such as Blu-ray/DVD players, game systems, and cable boxes.

Figure 4.3: Rear Panel HDMI Inputs and Output
This image shows the HDMI IN ports (HDMI IN 1, HDMI IN 2, HDMI IN 3) and the HDMI OUT (to TV) port on the rear panel. These are used for connecting HDMI-enabled devices and outputting video to your television.
5. Einrichtung
5.1. Lautsprecheranschluss
Connect the included speakers to the corresponding terminals on the rear of the receiver. Ensure correct polarity (+ to + and - to -) for each speaker.
- Vorne links/rechts: Connect the two satellite speakers to the FRONT L/R terminals.
- Center: Connect the center speaker to the CENTER terminal.
- Hinten links/rechts: Connect the remaining two satellite speakers to the SURROUND L/R terminals.
- Subwoofer: Connect the subwoofer to the SUBWOOFER output.
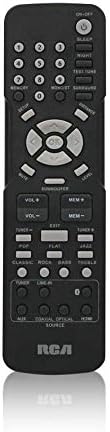
Figure 5.1: Subwoofer Unit
This image displays the subwoofer unit, which connects to the receiver to provide low-frequency audio.
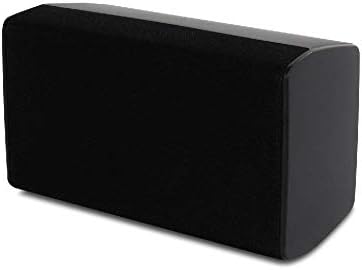
Figure 5.2: Center Speaker Unit
This image shows the center channel speaker, crucial for clear dialogue in your home theater setup.

Figure 5.3: Satellite Speaker Unit
This image illustrates one of the satellite speakers, used for front and surround sound channels.
5.2. Audio/Video Connections
Connect your audio and video sources to the receiver using the appropriate cables.
- HDMI-Anschlüsse: Use HDMI cables to connect devices like Blu-ray players, game consoles, or cable boxes to the HDMI IN ports. Connect your TV to the HDMI OUT (to TV) port.
- Digitale Audioverbindungen: For devices with optical or coaxial digital audio outputs, use the OPTICAL or COAXIAL inputs on the receiver.
- Analoge Audioanschlüsse: Use RCA stereo cables for devices with analog audio outputs (e.g., CD players, VCRs) to the AUX IN ports.
5.3. Stromanschluss
Once all speakers and audio/video sources are connected, plug the receiver's power cord into a standard AC outlet.
6. Bedienungsanleitung
6.1. Grundlegende Bedienung
- Ein-/Ausschalten: Drücken Sie die LEISTUNG Zum Ein- und Ausschalten des Systems dient eine Taste an der Vorderseite oder auf der Fernbedienung.
- Lautstärkeregelung: Verwenden Sie die BAND +/- buttons on the remote or the main volume knob on the receiver to adjust the master volume.
6.2. Eingabeauswahl
Drücken Sie die QUELLE button on the front panel or the corresponding input buttons (e.g., HDMI 1, OPTICAL, AUX, BT) on the remote control to select your desired audio/video source.
6.3. Bluetooth-Kopplung
- Wählen Sie die BT input source on the receiver. The display will show "BT PAIRING".
- Aktivieren Sie Bluetooth auf Ihrem Bluetooth-fähigen Gerät (Smartphone, Tablet usw.) und suchen Sie nach verfügbaren Geräten.
- Select "RCA RT2781HB" from the list of devices.
- Once paired, the receiver will indicate a successful connection, and you can stream audio wirelessly.
6.4. USB-Wiedergabe
Stecken Sie einen USB-Stick mit Audio ein files into the USB port on the front panel. The system will automatically switch to USB mode and begin playback. Use the remote control to navigate tracks and control playback.
6.5. AM/FM-Tuner
Wählen Sie die TUNER input source. Use the TUNE +/- buttons on the remote to scan for radio stations. Use the ERINNERUNG buttons to save and recall your favorite stations.
6.6. Klangeinstellungen
Use the dedicated controls on the front panel or remote for fine-tuning your audio:
- Bass Hochtöne: Adjust these to enhance low or high frequencies.
- Gleichgewicht: Stellen Sie die Balance zwischen linkem und rechtem Lautsprecherausgang ein.
- Subwoofer-Lautstärke: Control the output level of the subwoofer independently.
6.7. Fernbedienung
The included remote control provides full functionality for your home theater system.

Abbildung 6.1: Layout der Fernbedienung
This image displays the remote control for the RCA RT2781HB system, featuring buttons for power, volume, input selection, tuner controls, and sound adjustments.
7. Wartung
- Reinigung: Wipe the unit with a soft, dry cloth. Do not use liquid or aerosol cleaners.
- Belüftung: Periodically check that the ventilation openings on the receiver are clear of dust and debris.
- Lagerung: Wenn Sie das Gerät über einen längeren Zeitraum lagern, ziehen Sie den Netzstecker und bewahren Sie es an einem kühlen, trockenen Ort auf.
8. Fehlerbehebung
| Problem | Mögliche Ursache | Lösung |
|---|---|---|
| Kein Strom | Netzkabel nicht angeschlossen; Steckdose nicht aktiv. | Vergewissern Sie sich, dass das Netzkabel fest eingesteckt ist; Testen Sie die Steckdose mit einem anderen Gerät. |
| Kein Ton | Incorrect input selected; Speaker wires loose; Volume too low. | Select correct input source; Check all speaker connections; Increase volume. |
| Bluetooth nicht gekoppelt | Receiver not in pairing mode; Device too far; Interference. | Ensure receiver is in BT mode; Move device closer; Restart both devices. |
| Schlechter Radioempfang | FM antenna not connected or positioned incorrectly. | Schließen Sie die FM-Antenne sicher an; justieren Sie die Antennenposition für besseren Empfang. |
9. Spezifikationen
| Besonderheit | Spezifikation |
|---|---|
| Technische Daten | 16.93 x 12.68 x 5.47 Zoll |
| Artikelgewicht | 20.9 Pfund |
| Artikelmodellnummer | RT2781HB U |
| Batterien | 2 AAA-Batterien erforderlich (im Lieferumfang enthalten) |
| Konnektivitätstechnologie | Auxiliary, Bluetooth, Coaxial, HDMI, Optical, RCA, USB |
| Controllertyp | Kabelgebundene Elektrik |
| Kompatible Geräte | Fernsehen, Lautsprecher |
| Gesamtzahl der HDMI-Anschlüsse | 4 (3 Eingänge, 1 Ausgang) |
| Audioausgabemodus | Umgeben |
| Surround Sound-Kanalkonfiguration | 5.1 |
10. Garantie und Support
Informationen zur Garantie und zum Kundendienst finden Sie in der Ihrer Bestellung beiliegenden Dokumentation oder auf der offiziellen RCA-Website. webBewahren Sie Ihren Kaufbeleg für eventuelle Garantieansprüche auf.