1. Einleitung
This manual provides detailed instructions for the installation, operation, and maintenance of your Anlapus FULL HD 1080P H.265+ Surveillance Kit. This system includes an 8-channel DVR with a pre-installed 1TB hard drive, 4 bullet cameras, and 4 dome cameras, designed to provide comprehensive security monitoring for your property.

Figure 1.1: Anlapus 8-channel DVR surveillance system components.
2. Packungsinhalt
Bitte prüfen Sie, ob alle unten aufgeführten Artikel in Ihrem Paket enthalten sind. Sollten Artikel fehlen oder beschädigt sein, kontaktieren Sie bitte unseren Kundenservice.
- 1x 8-Channel DVR (with 1TB HDD pre-installed)
- 4x 1080P Bullet-Überwachungskameras
- 4x 1080P Dome Surveillance Cameras
- 8x 60ft BNC Video Cables
- 3x Power Adapters (12V 2A)
- 2x 1-zu-4 Stromverteiler
- 1x USB-Maus
- 1x Bedienungsanleitung (dieses Dokument)
- 8 Beutel mit Befestigungsschrauben
- 8x Warnaufkleber

Figure 2.1: Contents of the Anlapus surveillance kit package.
3. Produktmerkmale
- Full HD 1080P-Auflösung: Captures clear and detailed images with 2.0-megapixel quality.
- Erweiterte H.265+ Videokomprimierung: Reduziert file sizes by up to 50% compared to H.264, allowing for longer recording times and more efficient storage.
- Verbesserte Nachtsicht: Equipped with 24 IR LEDs and an IR-CUT filter, providing clear black and white night vision up to 24 meters (80 feet).
- IP66-Wetterschutzklasse: Cameras are designed for both indoor and outdoor use, capable of withstanding various extreme weather conditions.
- Bewegungserkennung und Warnungen: Configurable motion detection zones with instant email alerts and push notifications to your smartphone.
- Mehrere Aufnahmemodi: Supports 24/7 continuous recording, motion-activated recording, scheduled recording, and manual recording.
- Fernzugriff: View Live-Feeds und aufgezeichnete Lebensmitteltage from anywhere using the free mobile application on your smartphone or tablet.
- Pre-installed 1TB Hard Drive: Ready for immediate use, eliminating the need to purchase and install a separate hard drive.

Figure 3.1: Day and Night Vision.
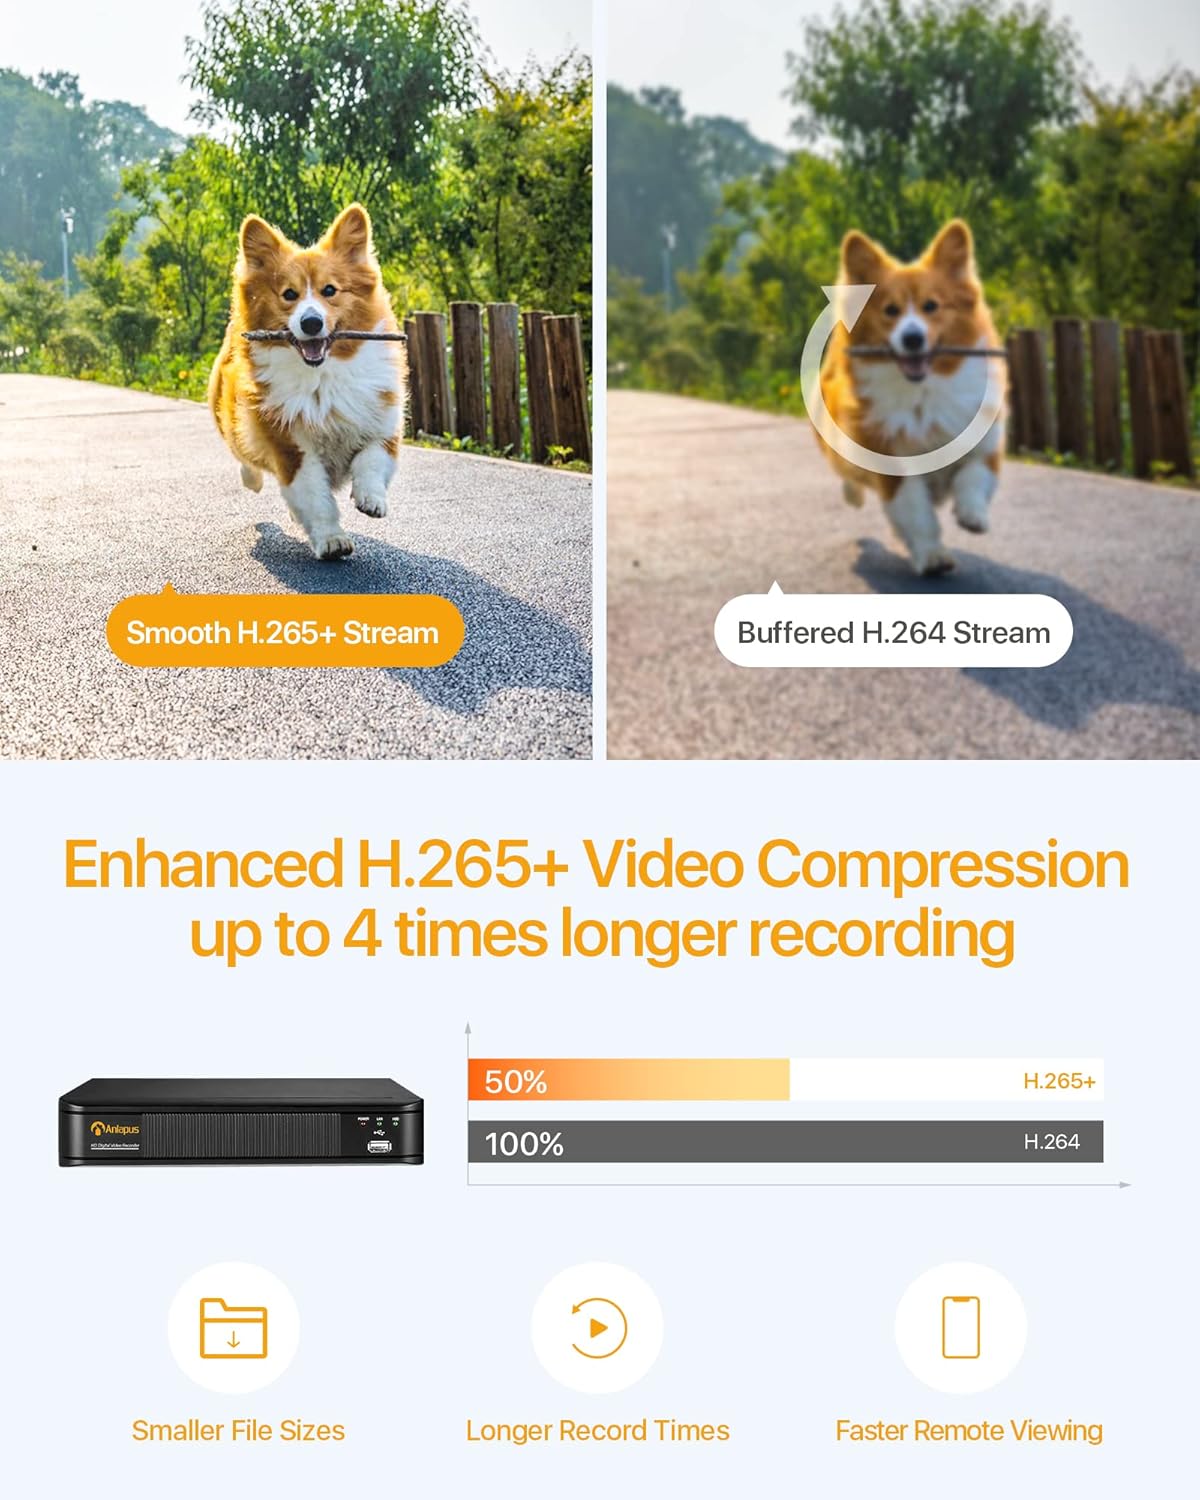
Figure 3.2: H.265+ Video Compression Benefits.

Figure 3.3: Day and Night Surveillance Example.

Figure 3.4: All-Weather Protection and Applications.
4. Systemkomponenten im Überblickview
4.1 DVR (Digitaler Videorekorder)
The DVR is the central unit for recording, storing, and managing video footage from all connected cameras. It features multiple video input ports, audio input/output, VGA and HDMI outputs for display, and USB ports for mouse control and data backup.
4.2 Überwachungskameras
The kit includes both bullet and dome cameras. Both types offer 1080P resolution, night vision capabilities, and IP66 weatherproof housing. Bullet cameras are typically used for directional surveillance, while dome cameras offer a more discreet appearance and are often vandal-resistant.

Figure 4.1: Camera and DVR Connection Diagram.
5. Installationsanleitung
5.1 Erstverbindung
- Kameras anschließen: Use the provided BNC video cables to connect each camera to the 'VIDEO IN' ports on the back of the DVR.
- Leistungsstarke Kameras: Use the power adapters and 1-to-4 power splitters to provide power to all cameras.
- DVR an Display anschließen: Connect the DVR to a monitor or TV using either an HDMI or VGA cable.
- DVR mit dem Netzwerk verbinden: Connect the DVR's 'NETWORK' port to your router using an Ethernet cable for remote access.
- USB-Maus anschließen: Plug the USB mouse into one of the DVR's USB ports for navigation.
- DVR einschalten: Connect the DVR to its power adapter and plug it into an electrical outlet. The system will boot up.

Figure 5.1: Simple Connection for Mobile Access.
5.2 Einrichtung der mobilen App
- Lade App herunter: Suchen nach the official Anlapus security app on Google Play Store or Apple App Store and install it on your smartphone.
- Account registrieren: Öffnen Sie die App und folgen Sie den Anweisungen auf dem Bildschirm, um ein neues Benutzerkonto zu registrieren.
- Gerät hinzufügen: Scan the QR code displayed on your DVR's monitor or manually enter the device ID to add your DVR to the app.
- View Kameras: Nach dem Hinzufügen können Sie view live feeds from your cameras and access recorded footage aus der Ferne.
6. Bedienungsanleitung
6.1 Aufnahmemodi
Your DVR supports several recording modes:
- Kontinuierliche Aufzeichnung (24/7): Speichert kontinuierlich auf und überschreibt dabei die ältesten Daten.tage, wenn die Festplatte voll ist.
- Aufnahme mit Bewegungserkennung: Es wird nur aufgezeichnet, wenn eine Bewegung erkannt wird, wodurch Speicherplatz gespart wird.
- Geplante Aufnahme: Legen Sie feste Aufnahmezeiten fest.
- Manuelle Aufnahme: Aufnahme manuell starten und stoppen.
Configure these settings via the DVR's main menu using the USB mouse.

Figure 6.1: 24/7 Recording View.
6.2 Bewegungserkennung und Benachrichtigungen
Das System kann so konfiguriert werden, dass es Bewegungen erkennt und Warnmeldungen versendet:
- Erkennungszonen konfigurieren: In the DVR settings, define specific areas within the camera's view zur Bewegungserkennung.
- Empfindlichkeit einstellen: Passen Sie die Empfindlichkeit der Bewegungserkennung an, um Fehlalarme zu minimieren.
- Warnungen aktivieren: Activate email alerts and push notifications through the DVR settings and mobile app. When motion is detected, you will receive an alert on your smartphone.

Figure 6.2: Motion Detection and Smartphone Alert.

Figure 6.3: Smart Motion Detection Features.
6.3 Remote Access & Playback
Access your surveillance system from anywhere:
- Live View: Öffnen Sie die mobile App, um view live video streams from all connected cameras.
- Wiedergabe: Use the app's playback function to review aufgenommenes footage stored on the DVR's hard drive. You can select specific dates and times.
- Multi-Gerät Viewing: The system supports simultaneous viewing on multiple devices, including smartphones, tablets, and desktop computers.

Figure 6.4: Mobile App Playback Interface.

Figure 6.5: Multi-Device Remote Viewing.
7. Wartung
- Saubere Kameras: Reinigen Sie die Kameralinsen regelmäßig mit einem weichen Tuch.amp Für eine klare Bildqualität mit einem Tuch abwischen. Scheuermittel vermeiden.
- Kabel prüfen: Ensure all cables are securely connected and free from damage. Replace any damaged cables immediately.
- DVR-Belüftung: Stellen Sie sicher, dass der DVR an einem gut belüfteten Ort aufgestellt wird, um eine Überhitzung zu vermeiden. Achten Sie darauf, dass die Lüftungsschlitze frei von Verstopfungen sind.
- Firmware-Updates: Überprüfen Sie die Angaben des Herstellers webDie Website wird regelmäßig auf Firmware-Updates aktualisiert, um optimale Leistung und Sicherheit zu gewährleisten.
- Datensicherung: Sichern Sie regelmäßig wichtige Daten.tage from the DVR's hard drive to an external USB device.

Figure 7.1: USB Data Backup.
8. Fehlerbehebung
- Kein Videosignal: Check all cable connections between cameras and DVR, and between DVR and display. Ensure cameras and DVR are powered on.
- Schlechte Bildqualität: Clean camera lenses. Ensure cameras are properly focused (if adjustable). Check cable integrity.
- Kein Fernzugriff: Verify the DVR is connected to the internet. Check network settings on the DVR and ensure your router is functioning correctly. Confirm the mobile app is properly configured and the device is added.
- Bewegungserkennung funktioniert nicht: Review motion detection settings in the DVR menu. Adjust sensitivity and detection zones. Ensure alerts are enabled in both DVR and mobile app settings.
- DVR zeichnet nicht auf: Check hard drive status in DVR settings. Ensure recording schedules or motion detection settings are correctly configured.
Weitere Unterstützung finden Sie im Supportbereich oder kontaktieren Sie den Kundendienst.
9. Spezifikationen
| Marke | Anlapus |
| Modellnummer | AJ-AM8A4B-4W441E-106202S |
| Videoauflösung | 1080p Full HD |
| Videokomprimierung | H.265 + |
| DVR-Kanäle | 8 Kanäle |
| Speicherkapazität | 1 TB HDD (vorinstalliert) |
| Kameratyp | Bullet and Dome Cameras |
| Nachtsichtbereich | Bis zu 24 Meter (80 Fuß) |
| Wetterfeste Bewertung | IP66 |
| Konnektivitätstechnologie | Verdrahtet |
| Stromquelle | Cable Electric (12 Volts DC) |
| Produktabmessungen (L x B x H) | 19.99 x 19.99 x 19.99 cm (DVR) |
| Artikelgewicht | 7.36 kilograms (total package) |
| Hersteller | Anlapus |
10. Garantie und Support
The manufacturer, ZOSI (parent company of Anlapus), provides the following support and warranty:
- 30-Tage-Zufriedenheitsgarantie: If you are not satisfied, you may be eligible for a refund or exchange within 30 days.
- Lebenslanger technischer Support: Comprehensive technical support is available for the lifetime of the product.
- 2 Jahr Garantie: Für das Produkt gilt eine einjährige Garantie gegen Herstellungsfehler.
For technical support or warranty claims, please refer to the contact information provided with your product packaging or visit the official Anlapus/ZOSI webWebsite.


