1. Einleitung
The LAUNCH CR319 is a handheld On-Board Diagnostics II (OBD2) code reader designed to assist in diagnosing vehicle engine issues. It provides access to various diagnostic functions to help users identify and clear trouble codes, monitor vehicle performance data, and check emission readiness status. This manual provides detailed instructions for the proper use and maintenance of your CR319 device.
2. Produktüberschreitungview
2.1 Hauptmerkmale
- Vollständige OBD2-Funktionen: Unterstützt alle 10 OBD2-Testmodi.
- DTC-Lookup-Bibliothek: Built-in database with over 3000 code definitions.
- Mehrsprachige Unterstützung: Available in English, Portuguese, Russian, Italian, Spanish, French, and German.
- Plug-and-Play: No batteries or charger required; powered directly from the vehicle's OBD2 port.
- Kompaktes Design: Einfache Handhabung und Lagerung.
2.2 Gerätekomponenten
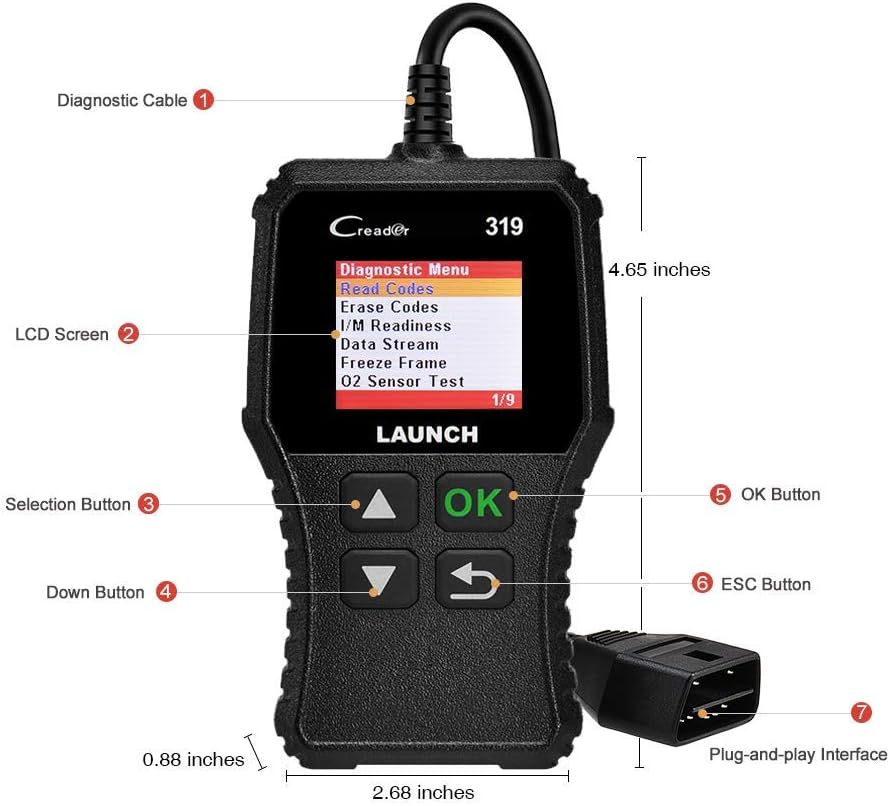
The image above illustrates the main components of the LAUNCH CR319 OBD2 Scanner. Key parts include the Diagnostic Cable (1) for connecting to the vehicle, the LCD Screen (2) for displaying information, Selection Buttons (3) for navigation, the Down Button (4), the OK Button (5) for confirmation, the ESC Button (6) to return to the previous screen, and the Plug-and-Play Interface (7) which is the OBD2 connector.
3. Einrichtung
- Suchen Sie den OBD2-Anschluss: The OBD2 port is typically located under the dashboard on the driver's side of the vehicle. Refer to your vehicle's owner's manual if you cannot locate it.
- Schließen Sie den Scanner an: Plug the CR319's diagnostic cable connector firmly into the vehicle's OBD2 port. The device will power on automatically.
- Starten Sie das Fahrzeug: Turn the vehicle's ignition to the 'ON' position (engine off) or start the engine, depending on the diagnostic function you intend to perform.
4. Bedienungsanleitung
After connecting the CR319 to your vehicle, the main menu will appear. Use the Up/Down selection buttons to navigate through the options and the OK button to confirm a selection. The ESC button returns to the previous screen.
4.1 Codes lesen
Diese Funktion ruft Diagnosefehlercodes (DTCs) vom Fahrzeugcomputer ab. Diese Codes weisen auf spezifische Probleme hin, die vom Selbstdiagnosesystem des Fahrzeugs erkannt wurden.
- Wählen Sie im Hauptmenü 'Diagnose'.
- Wählen 'Codes lesen'.
- The scanner will display any stored, pending, or permanent codes along with their descriptions.
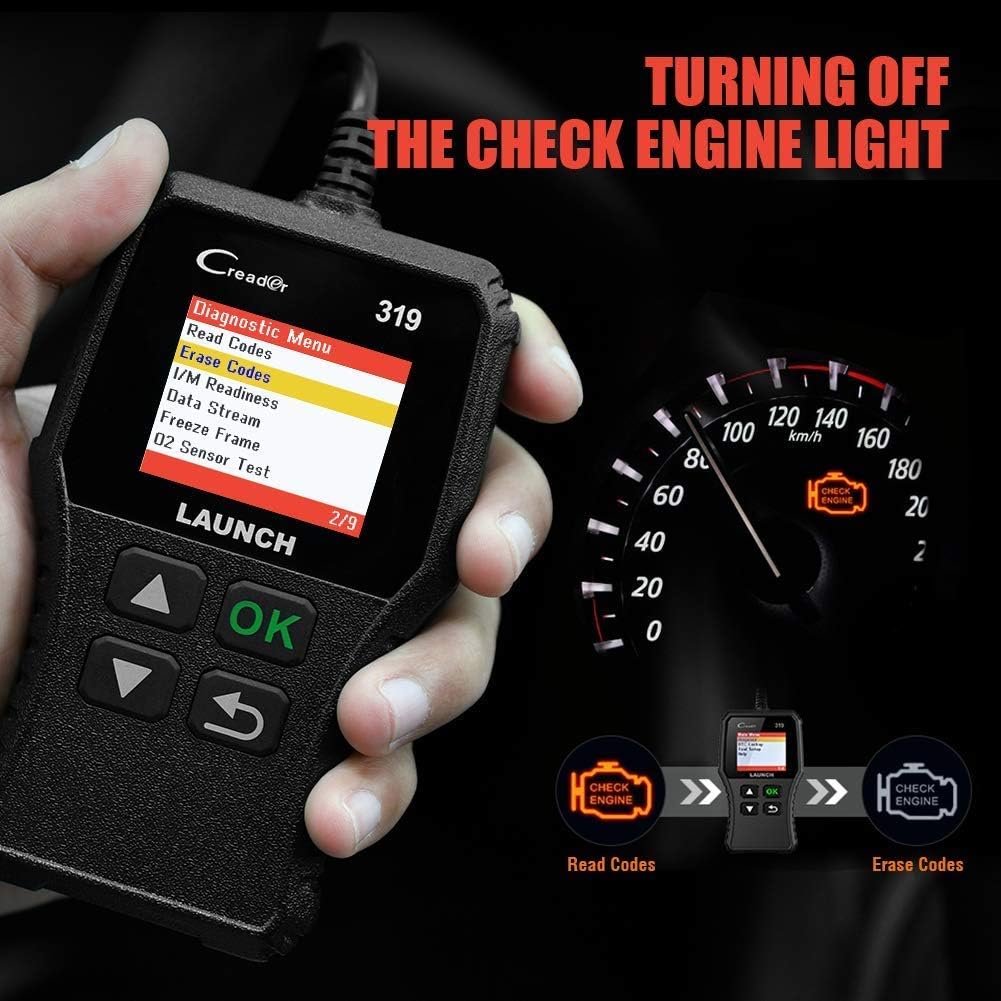
4.2 Codes löschen
This function erases DTCs from the vehicle's computer and turns off the Check Engine Light (MIL). Ensure any underlying issues are resolved before clearing codes, as they may reappear.
- Wählen Sie im Hauptmenü 'Diagnose'.
- Wählen 'Erase Codes'.
- Confirm the action when prompted. The Check Engine Light should turn off.
4.3 I/M-Bereitschaft
Diese Funktion überprüft den Status der emissionsbezogenen Überwachungssysteme des Fahrzeugs, um festzustellen, ob sie für einen Emissionstest bereit sind.
- Wählen Sie im Hauptmenü 'Diagnose'.
- Wählen 'I/M-Bereitschaft'.
- The screen will display the status of various monitors (e.g., Misfire Monitor, Fuel System Monitor). 'OK' or 'Complete' indicates the monitor has run and passed; 'INC' or 'Incomplete' means the monitor has not yet run or completed its diagnostic cycle.
4.4 Data Stream (Live Data)

This function displays real-time operational data from the vehicle's engine control unit (ECU). This data can include engine RPM, vehicle speed, oxygen sensor readings, coolant temperature, and more.
- Wählen Sie im Hauptmenü 'Diagnose'.
- Wählen 'Datenstrom'.
- Use the Up/Down buttons to scroll through the various data parameters.
4.5 Standbild
When an emission-related fault occurs, the vehicle's computer records a snapshot of operating conditions at the time of the fault. This data is called Freeze Frame data.
- Wählen Sie im Hauptmenü 'Diagnose'.
- Wählen 'Freeze Frame'.
- Review the recorded parameters to understand the conditions under which the fault occurred.
4.6 DTC-Suche

This feature allows you to manually enter a Diagnostic Trouble Code and view its definition from the scanner's internal database.
- Wählen Sie im Hauptmenü 'DTC-Suche'.
- Use the navigation buttons to input the desired DTC.
- Drücken 'OK' Zu view the code definition.
4.7 Other OBD2 Functions
The CR319 also supports the following OBD2 functions, accessible through the 'Diagnose' menu:
- O2-Sensortest: Retrieves oxygen sensor monitor test results for the most recently completed tests.
- EVAP-Systemtest (Modus 8): Startet einen Test des Verdunstungsemissionskontrollsystems.
- On-Board-Monitor-Test (Modus 6): Ruft Testergebnisse für emissionsrelevante Antriebskomponenten und -systeme ab, die nicht kontinuierlich überwacht werden.
- Fahrzeuginformationen: Zeigt die Fahrzeugidentifikationsnummer (VIN), die Kalibrierungs-ID (CALID) und die Kalibrierungsprüfnummer (CVN) an.
5. Kompatibilität

The LAUNCH CR319 OBD2 Scanner is compatible with most American, European, and Asian vehicles manufactured from 1996 and newer that are OBDII-compliant. It supports all standard OBDII protocols, including KWP2000, ISO9141, J1850 VPW, J1850 PWM, and CAN (Controller Area Network).
5.1 Unterstützte Fahrzeuge
- 12V Gasoline cars.
- Vehicles compliant with OBDII standards (1996 US-based, 2000 EU-based, and newer Asian cars).
5.2 Not Supported Vehicles
- Diesel cars.
- 24V Heavy duty vehicles.
- Hybrid vehicles.
- Electric vehicles.
6. Spezifikationen
| Besonderheit | Spezifikation |
|---|---|
| Modell | CR319 |
| Anzeige | Farb-LCD |
| Betriebslautstärketage | 9-18 V (über OBD2-Anschluss) |
| Unterstützte Protokolle | KWP2000, ISO9141, J1850 VPW, J1850 PWM, CAN |
| Abmessungen (L x B x H) | 1.5 x 6 x 10.8 Zoll |
| Gewicht | 7.4 Unzen |
| Betriebstemperatur | 0 °C bis 50 °C (32 °F bis 122 °F) |
| Lagertemperatur | -20 °C bis 70 °C (-4 °F bis 158 °F) |
| Unterstützte Sprachen | English, Portuguese, Russian, Italian, Spanish, French, German |
7. Fehlerbehebung
7.1 Gerät lässt sich nicht einschalten
- Stellen Sie sicher, dass das Diagnosekabel fest mit dem OBD2-Anschluss des Fahrzeugs verbunden ist.
- Verify the vehicle's ignition is in the 'ON' position or the engine is running.
- Prüfen Sie die Sicherung des OBD2-Anschlusses am Fahrzeug (siehe Bedienungsanleitung Ihres Fahrzeugs).
7.2 Kommunikationsfehler mit dem Fahrzeug
- Confirm the vehicle is OBDII-compliant (generally 1996 and newer for gasoline vehicles).
- Ensure the diagnostic cable is properly connected.
- Turn off the ignition, wait 10 seconds, then turn it back to 'ON' and try again.
- If possible, test the scanner on another compatible vehicle to rule out a device malfunction.
7.3 Codes Cannot Be Cleared
- Stellen Sie sicher, dass die Zündung des Fahrzeugs in der Position „EIN“ steht (Motor aus).
- If the underlying fault that triggered the code is still present, the code may not clear or will reappear immediately. Address the vehicle's issue first.
8. Wartung
- Reinigung: Verwenden Sie ein weiches, trockenes Tuch, um das Gerät zu reinigen. Vermeiden Sie scheuernde Reiniger oder Lösungsmittel.
- Lagerung: Bewahren Sie den Scanner in einer sauberen, trockenen Umgebung fern von extremen Temperaturen und direkter Sonneneinstrahlung auf.
- Kabelpflege: Do not pull the cable forcefully or bend it sharply. Inspect the cable for damage before each use.
9. Garantie und Support
For warranty information, technical support, or service inquiries, please contact LAUNCH customer support. Refer to the product packaging or the official LAUNCH webDie aktuellsten Kontaktdaten finden Sie auf der Website.


