1. Einleitung
This manual provides detailed instructions for the setup, operation, and maintenance of your Tera Wireless Barcode Scanner, Model 8541733886. Please read this manual thoroughly before using the device to ensure proper functionality and to prevent damage.
The Tera Wireless Barcode Scanner offers versatile connectivity and efficient scanning capabilities for various barcode types, both printed and digital.
2. Produktüberschreitungview
2.1 Komponenten
Das Paket beinhaltet typischerweise:
- Tera Wireless Barcode Scanner
- Hands-Free Stand
- 2.4-GHz-Funk-USB-Dongle
- USB-Lade- / Datenkabel
- Bedienungsanleitung (dieses Dokument)

Image: Tera Wireless Barcode Scanner, showing the scanner unit, flexible stand, 2.4GHz USB dongle, and USB cable.
2.2 Hauptmerkmale
- 3 Verbindungsmodi: Supports Bluetooth, 2.4GHz wireless, and USB 2.0 wired connections.
- Breite Kompatibilität: Works with POS systems, iOS, Android, Windows, Mac OS, and Linux. Supports Bluetooth HID, SPP, and BLE protocols.
- Schnelles und genaues Scannen: Equipped with an ARM32Bit Cortex CPU and a Japan-manufactured scanner head, achieving decoding speeds up to 500 scans per second.
- Dual Upload Modes:
- Sofort-Upload-Modus: Barcodes are transmitted to your device immediately upon scanning.
- Offline-Speichermodus: Stores up to 50,000 barcodes internally when out of range, allowing for later upload.
- Multi-Language Barcode Support: Capable of scanning barcodes in English, Spanish, German, French, Italian, and Japanese. Ensure your keyboard language matches the selected language for correct input.
- Versatile Barcode Symbologies:
- 1D: UPC-A, UPC-E, EAN-8, EAN-13, Code 128, Code 39, Code 93, Code 11, Interleaved 2 of 5, Matrix 2 of 5, Standard 2 of 5, Coda bar, MSI Plessey, RSS, etc.
- 2D: QR Code, Data Matrix, PDF417, Aztec code, Maxicode, etc.
- Haltbarkeit: Designed to withstand impacts from drops of up to 1.5 meters (5 feet) onto concrete.
- Lange Akkulaufzeit: Built-in 2200mAh battery supports approximately 57,000 scans on a full charge, with up to 15 days of standby time.
3. Einrichtung
3.1 Aufladen des Scanners
Before first use, fully charge the scanner. Connect the USB charging cable to the scanner's charging port and to a USB power source (e.g., computer USB port, USB wall adapter). The indicator light will show charging status.

Image: Illustration showing the scanner's 2200mAh battery capacity and its ability to withstand a 1.5-meter drop.
3.2 Verbindungsmodi
Der Scanner unterstützt drei Verbindungsmethoden:

Image: Visual representation of the three connection modes: Bluetooth, 2.4G Wireless via USB dongle, and USB Wired connection.
3.2.1 USB Wired Mode (Plug & Play)
- Connect the scanner directly to your computer using the provided USB cable.
- The computer will typically recognize the device automatically without requiring driver installation.
- Der Scanner ist betriebsbereit.

Image: The scanner connected to a laptop, illustrating its plug-and-play functionality and compatibility with various operating systems including Windows, Mac OS, Linux, and Android.
3.2.2 2.4-GHz-Funkmodus
- Insert the 2.4GHz USB dongle into an available USB port on your computer or device.
- Schalten Sie den Barcode-Scanner ein. Er sollte sich automatisch mit dem Dongle koppeln.
- A successful connection is usually indicated by a specific sound or light on the scanner.
3.2.3 Bluetooth-Modus
- Ensure your device (smartphone, tablet, computer) has Bluetooth enabled.
- Put the scanner into Bluetooth pairing mode (refer to the scanner's quick start guide for specific instructions, usually by scanning a special barcode).
- On your device, search for available Bluetooth devices and select "Tera Barcode Scanner" (or similar name).
- Bestätigen Sie die Kopplung, falls Sie dazu aufgefordert werden.
Notiz: Wireless range varies. Indoors with obstacles, Bluetooth range is approximately 33ft, and 2.4GHz wireless is approximately 98ft. Outdoors in barrier-free environments, Bluetooth range is approximately 65ft, and 2.4GHz wireless is approximately 328ft.
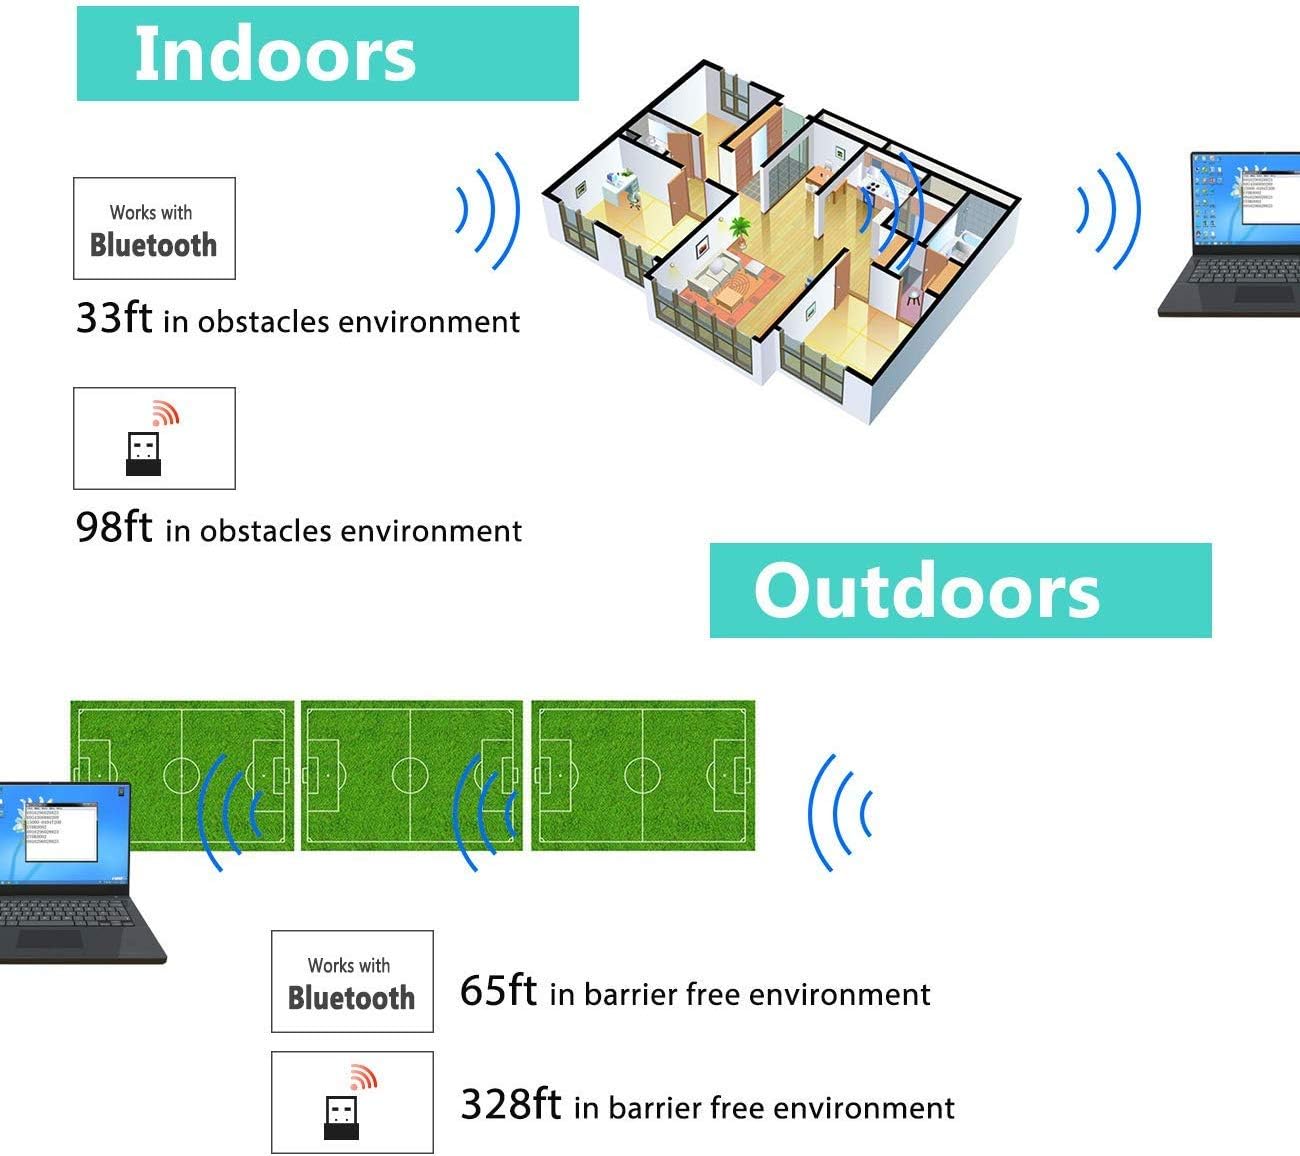
Image: Diagram illustrating the effective wireless range of the scanner in both indoor (with obstacles) and outdoor (barrier-free) environments for Bluetooth and 2.4GHz connections.
4. Bedienungsanleitung
4.1 Scannen von Barcodes
The scanner can read both 1D and 2D barcodes, including QR codes, from printed materials and digital screens.
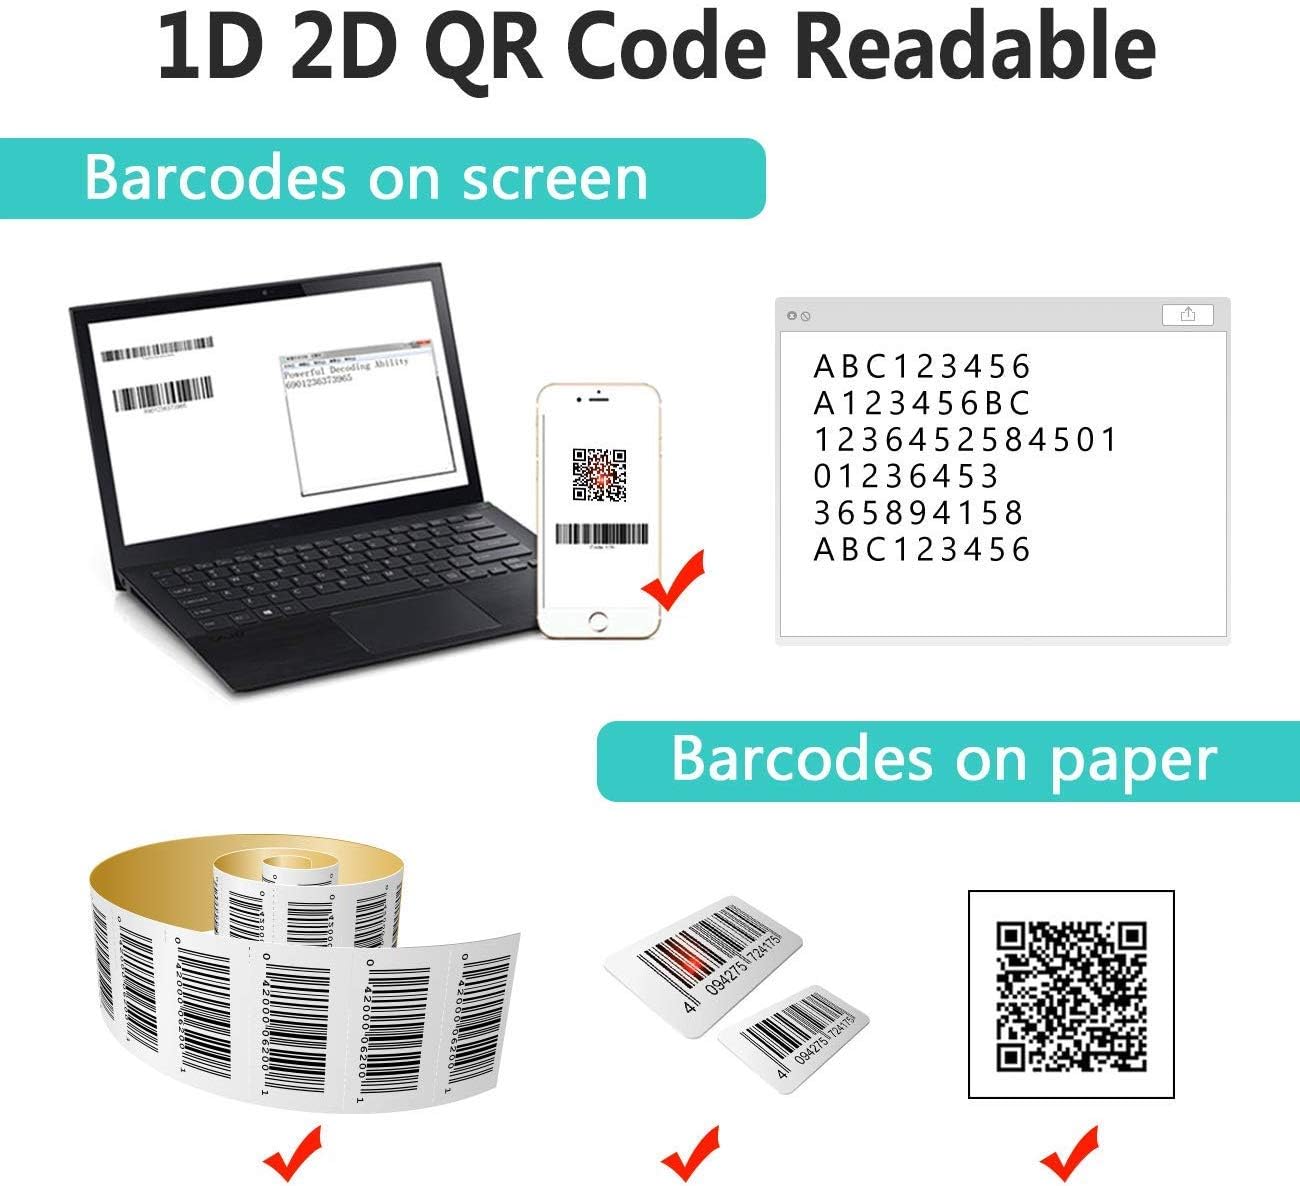
Image: The scanner demonstrating its ability to read 1D and 2D barcodes from both digital screens (laptop, smartphone) and physical printed labels.
So scannen Sie einen Barcode:
- Richten Sie das Scannerfenster auf den Barcode.
- Press the trigger button (or allow the sensor to activate in automatic modes).
- A successful scan is indicated by a beep and/or a green light.
4.2 Scan-Modi
Der Scanner unterstützt drei primäre Scanmodi:

Image: The barcode scanner mounted on its stand, highlighting its 360-degree rotation capability and the three available scanning modes: Key Trigger Mode, Sensor Activated Mode, and Continuous Scan Mode.
- Tastentriggermodus: Scan by manually pressing the trigger button for each barcode.
- Sensor Activated Mode: The scanner automatically activates when a barcode is detected in its field of view.
- Kontinuierlicher Scanmodus: The scanner continuously emits a scan beam, reading any barcode that passes through it.
Refer to the quick start guide or programming barcodes for instructions on how to switch between these modes.
4.3 Datenübertragungsmodi
The scanner offers two methods for uploading scanned data:
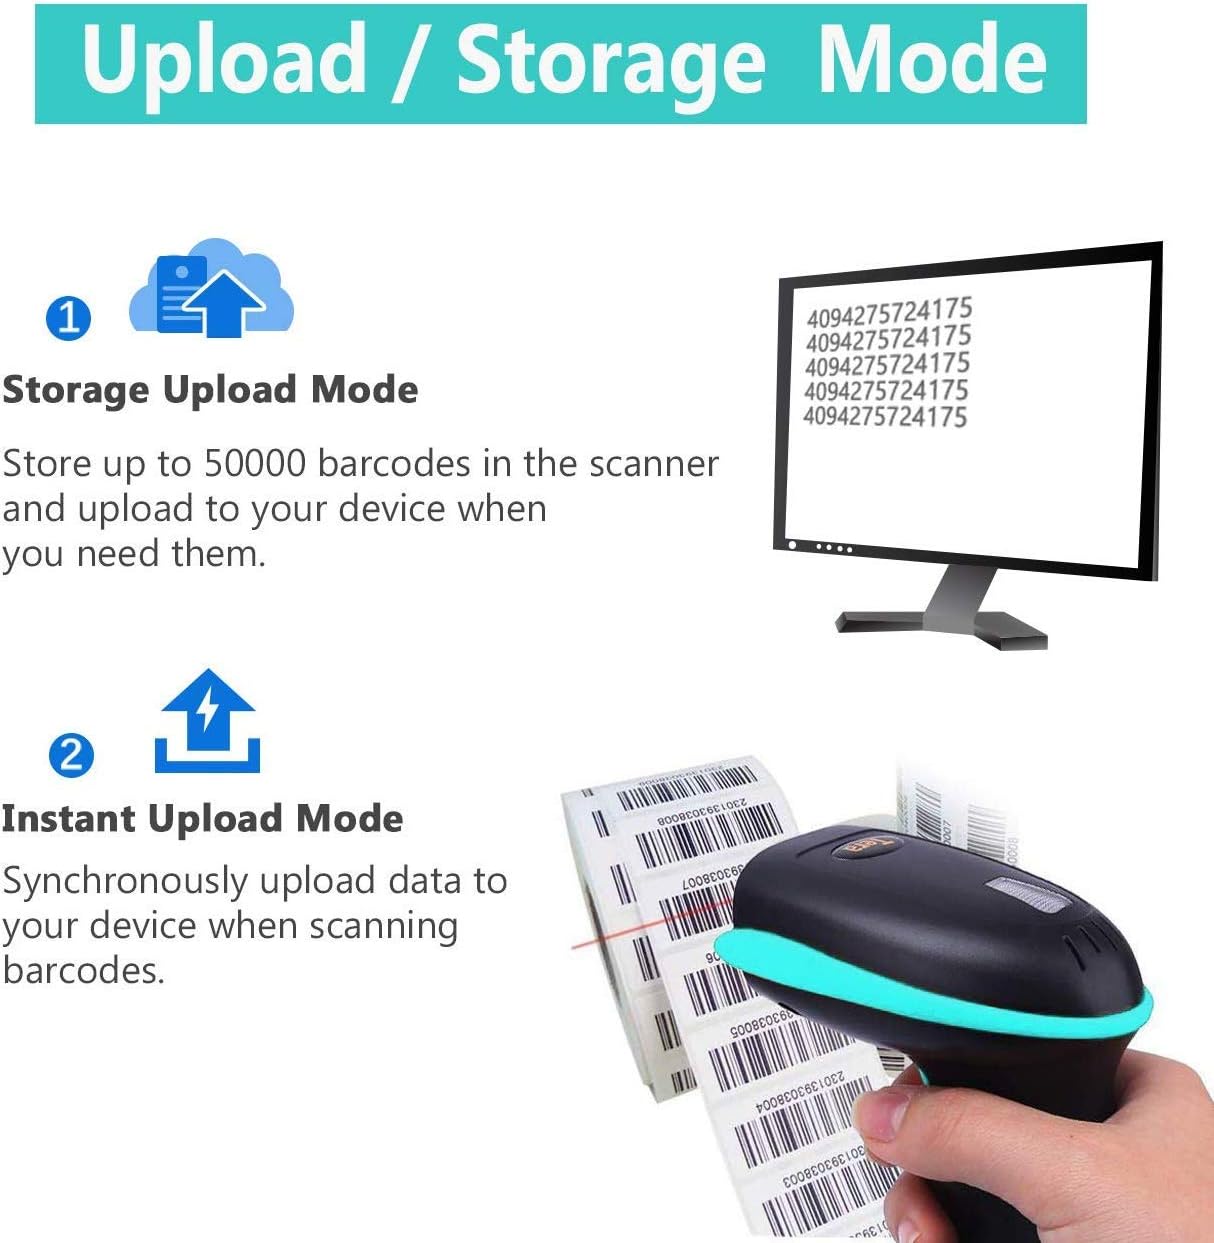
Image: Illustration of the two data upload modes: Storage Upload Mode, where barcodes are stored internally and uploaded later, and Instant Upload Mode, where data is transmitted immediately.
- Sofort-Upload-Modus: Barcodes are sent to your connected device immediately after scanning. This is suitable for real-time data entry.
- Offline-Speichermodus: If the scanner is out of range or not connected, it will store scanned barcodes internally. Up to 50,000 barcodes can be stored. Once reconnected, you can upload the stored data to your device.
To switch between upload modes, scan the appropriate programming barcode found in the quick start guide.
5. Wartung
5.1 Reinigung
- Verwenden Sie ein weiches, sauberes Tuch, das leicht feucht ist.ampAnschließend mit Wasser oder einer milden Reinigungslösung abwischen, um die Außenseite des Scanners zu reinigen.
- Do not use abrasive cleaners, solvents, or excessive liquid, as these can damage the device.
- Keep the scanning window clean and free of dust or smudges to ensure optimal reading performance.
5.2 Batteriepflege
- Charge the scanner regularly, especially if it will be stored for an extended period.
- Vermeiden Sie es, den Akku häufig vollständig zu entladen, da dies seine Lebensdauer verkürzen kann.
- Bewahren Sie den Scanner bei Nichtgebrauch an einem kühlen, trockenen Ort auf.
5.3 Speicherung
When not in use, store the scanner in a safe place to prevent physical damage. The included stand can be used for convenient storage and hands-free operation.
6. Fehlerbehebung
| Problem | Mögliche Ursache | Lösung |
|---|---|---|
| Der Scanner lässt sich nicht einschalten. | Schwache Batterie. | Charge the scanner for at least 2-3 hours. |
| Der Scanner liest keine Barcodes. |
|
|
| No data transmitted to device. |
|
|
| Scanner beeps continuously or behaves erratically. | Configuration error or internal issue. | Perform a factory reset (refer to the quick start guide for the reset barcode). If the issue persists, contact support. |
7. Spezifikationen
- Modellnummer: 8541733886
- Produktabmessungen: 6.1 x 2.55 x 3.54 Zoll
- Artikelgewicht: 1.05 Pfund
- Batterie: 1 Lithium-Ionen-Akku (2200 mAh)
- Konnektivität: Bluetooth, 2.4GHz Wireless, USB 2.0 Wired
- Kompatible Geräte: Desktop, Laptop, Smartphone (POS, iOS, Android, Windows, Mac OS, Linux)
- Energiequelle: Kabelgebundenes Elektrogerät (zum Aufladen)
- Hersteller: Tera
- Als Erstes verfügbar: 7. Mai 2019
8. Garantie und Support
8.1 Garantieinformationen
For specific warranty details, please refer to the warranty card included with your product or visit the official Tera webBewahren Sie Ihren Kaufbeleg als Kaufnachweis für Garantieansprüche auf.
8.2 Kundendienst
If you encounter any issues not covered in this manual or require further assistance, please contact Tera customer support. Contact information can typically be found on the product packaging, the official Tera webWebsite oder über Ihren Händler.
Bitte halten Sie bei Kontaktaufnahme mit dem Support Ihre Produktmodellnummer (8541733886) und die Kaufdetails bereit.


Image: Illustrations representing customer service and technical support teams available to assist users.


