1. Einleitung
This manual provides comprehensive instructions for the TechniSat DIGITRADIO 4 C digital stereo radio. It covers setup, operation, maintenance, and troubleshooting for its various functionalities, including DAB+, FM, Bluetooth audio streaming, and AUX input. Please read this manual thoroughly before using the device to ensure proper operation and to maximize your listening experience.
Packungsinhalt
- DIGITRADIO 4 C unit
- Teleskopantenne
- F-plug tool (for removable antenna)
- Fernbedienung
- Netzteil
- Benutzerhandbuch
2. Einrichtung
2.1 Auspacken und Aufstellen
Carefully remove all components from the packaging. Place the radio on a stable, flat surface away from direct sunlight, heat sources, and moisture. Ensure adequate ventilation around the unit.
2.2 Anschließen der Antenne
The DIGITRADIO 4 C comes with a telescopic antenna for DAB+ and FM reception. Extend the antenna fully for optimal signal reception. For areas with weak reception, an external antenna can be connected to the F-type connector on the rear of the unit. Use the provided F-plug tool if necessary to secure the connection.
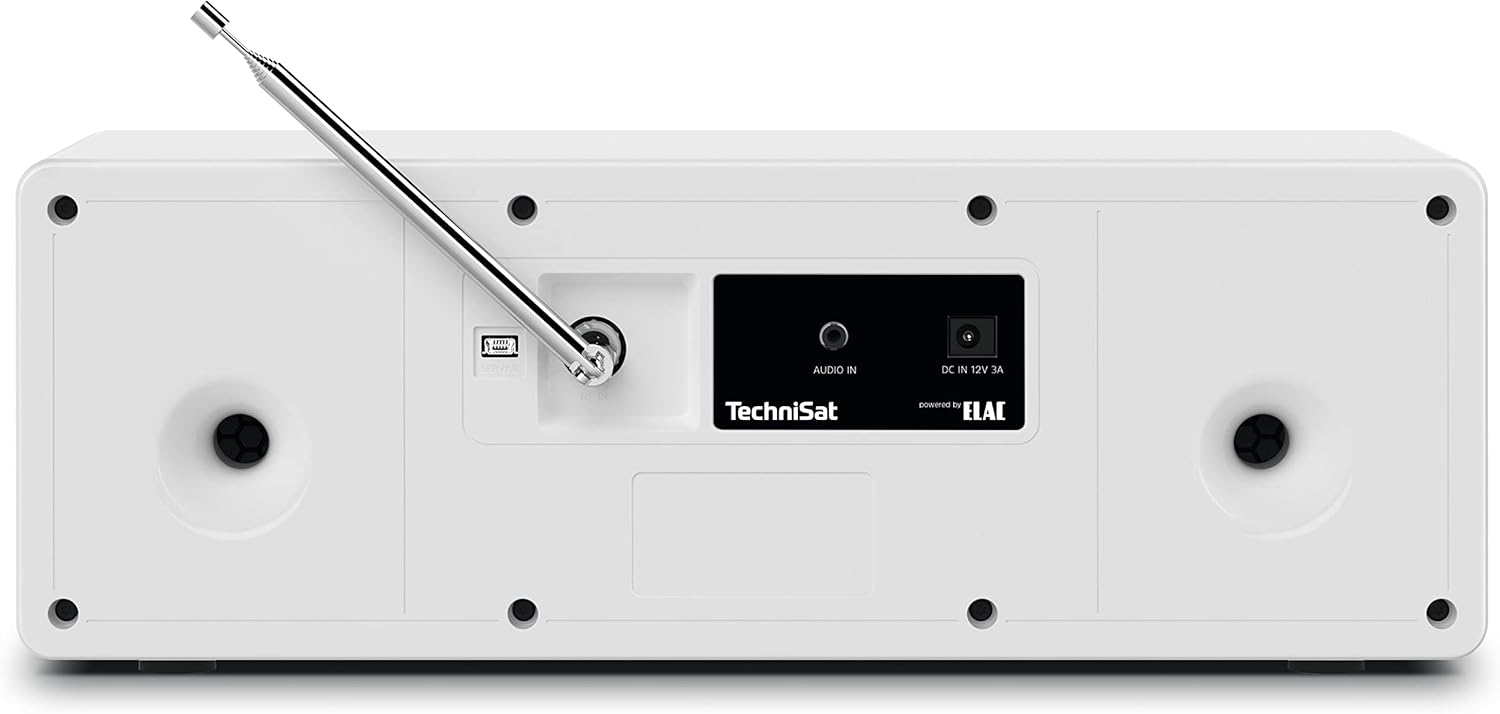
Bild 2.2.1: Rear panel connections, including the F-type antenna connector, AUX IN, and DC power input.
2.3 Stromanschluss
Connect the supplied power adapter to the DC IN 12V 3A port on the rear of the radio. Plug the adapter into a suitable wall outlet. The unit will enter standby mode.
2.4 Initial Power On and Scan
Drücken Sie die VOL / STANDBY knob to turn on the radio. Upon first use, the radio may automatically initiate a scan for available DAB+ stations. This process can take a few minutes. Once complete, the radio will tune to the first available station.
3. Bedienungsanleitung

Bild 3.0.1: Frontblende vorbeiview showing the display, controls, and headphone jack.
3.1 Grundlegende Bedienelemente
- VOL / STANDBY Knob: Rotate to adjust volume. Press to switch between ON and Standby mode.
- SELECT / SNOOZE Knob: Rotate to navigate menus or change stations. Press to confirm selections or activate snooze during an alarm.
- MODE-Taste: Press to switch between DAB+, FM, Bluetooth, and AUX input modes.
- MENU-Taste: Press to access the main menu for settings and options.
- FAV-Taste: Press to access or save favorite stations.
- Navigation Buttons (◀◀, ▶▶, ■, ►►): Used for track control in Bluetooth mode or navigating lists.
3.2 DAB+ Radiobetrieb
In DAB+ mode, the radio receives digital broadcasts. The 2.8-inch color display shows station information, program details, and potentially album art.

Bild 3.2.1: The 2.8-inch TFT color display showing current DAB+ broadcast information.
- Drücken MODUS until DAB+ is selected.
- If a scan is needed, navigate to "Full Scan" in the menu and press WÄHLEN.
- Drehen Sie den WÄHLEN knob to browse available stations. Press to select a station.
- To save a favorite station, press and hold the FAV Taste, dann verwenden Sie die WÄHLEN knob to choose a preset number (1-20) and press to confirm.
3.3 FM-Radiobetrieb
In FM mode, the radio receives analog broadcasts. RDS (Radio Data System) information may be displayed if available.
- Drücken MODUS until FM is selected.
- Drehen Sie den WÄHLEN Drehknopf zur manuellen Frequenzeinstellung.
- Um automatisch nach dem nächsten verfügbaren Sender zu suchen, halten Sie die Taste gedrückt. WÄHLEN Knopf.
- To save a favorite station, press and hold the FAV Taste, dann verwenden Sie die WÄHLEN knob to choose a preset number (1-20) and press to confirm.
3.4 Bluetooth-Audiostreaming
The DIGITRADIO 4 C can receive audio from Bluetooth-enabled devices such as smartphones or tablets.

Bild 3.4.1: Bluetooth audio streaming from a smartphone to the radio.
- Drücken MODUS until Bluetooth is selected. The display will show "Pairing" or "Waiting for connection".
- On your mobile device, enable Bluetooth and search for "DIGITRADIO 4 C".
- Select "DIGITRADIO 4 C" from the list of available devices to pair.
- Once paired, you can play audio from your device, and control playback (play/pause, skip tracks) using the radio's navigation buttons.
3.5 AUX-Eingang
Connect external audio devices (e.g., MP3 players, CD players) using a 3.5mm audio cable to the AUX IN port on the rear of the radio.
- Connect your external device to the AUX IN port.
- Drücken MODUS until AUX is selected.
- Steuern Sie die Wiedergabe über Ihr externes Gerät. Die Lautstärkeregelung des Radios funktioniert weiterhin.
3.6 Wecker und Schlaftimer
The radio includes an alarm clock and a sleep timer function.
- Alarm: Sie können die Alarmeinstellungen über die SPEISEKARTE button. You can set multiple alarms, choose the alarm source (buzzer, DAB+, FM), and adjust volume. Press SELECT / SNOOZE to snooze an active alarm.
- Schlaf-Timer: Set a sleep timer from the SPEISEKARTE to automatically turn off the radio after a specified duration.
3.7 Ausgleich
Stellen Sie den Ton einfile using the built-in equalizer. Access equalizer settings through the SPEISEKARTE to select from preset modes or customize bass and treble levels.

Bild 3.7.1: The radio features two 10W stereo speakers, optimized for sound quality.
4. Wartung
4.1 Reinigung
To clean the radio, disconnect it from the power supply. Use a soft, dry cloth to wipe the surfaces. For stubborn marks, a slightly damp cloth can be used, followed by a dry cloth. Do not use abrasive cleaners, solvents, or chemical sprays, as these can damage the finish.
4.2 Antennenpflege
Handle the telescopic antenna with care to prevent bending or breakage. When not in use, it can be retracted. If using an external antenna, ensure its connection is secure and the cable is not damaged.
5. Fehlerbehebung
| Problem | Mögliche Ursache | Lösung |
|---|---|---|
| Kein Strom | Netzteil nicht angeschlossen; Steckdose nicht aktiv. | Stellen Sie sicher, dass das Netzteil fest mit dem Funkgerät und einer funktionierenden Steckdose verbunden ist. |
| Schlechter DAB+/FM-Empfang | Antenne nicht ausgefahren; schwaches Signal; Störungen. | Fully extend the telescopic antenna. Reposition the radio. Consider connecting an external antenna. |
| Bluetooth-Kopplungsfehler | Bluetooth not enabled on device; radio not in pairing mode; device too far. | Ensure Bluetooth is enabled on your device and the radio is in Bluetooth mode. Move device closer to the radio. Try re-pairing. |
| Kein Ton | Volume too low; mute activated; incorrect input mode. | Increase volume. Check if mute is active. Ensure correct input mode (DAB+, FM, Bluetooth, AUX) is selected. |
| Fernbedienung funktioniert nicht | Batteries depleted; obstruction between remote and radio. | Replace remote control batteries (2x AAA). Ensure no obstructions are blocking the signal path. |
6. Spezifikationen
| Besonderheit | Detail |
|---|---|
| Marke | TechniSat |
| Modellnummer | 0001/3937 |
| Konnektivitätstechnologie | Auxiliary, Bluetooth, External Antenna Connection (F-type) |
| Unterstützte Funkbänder | DAB+, FM (with RDS and PLL) |
| Anzeige | 2.8-inch TFT Color Display (dimmable) |
| Audioausgang | 2 x 10W RMS stereo speakers (Powered by ELAC), Headphone jack (3.5mm) |
| Besondere Merkmale | Bluetooth audio streaming (reception), Equalizer, Favorite memory (20 for DAB+, 20 for FM), Alarm clock, Sleep timer, Snooze function |
| Stromquelle | Externes Netzteil |
| Produktabmessungen (L x B x H) | 38 cm x 16.5 cm x 13.5 cm (14.96 Zoll x 6.5 Zoll x 5.31 Zoll) |
| Batterien für Fernbedienungen | 2 x AAA (not included with main unit, typically for remote) |
7. Garantieinformationen
The TechniSat DIGITRADIO 4 C comes with a 2 Jahr Herstellergarantie. Please retain your proof of purchase for warranty claims. For detailed terms and conditions, refer to the warranty card included with your product or visit the official TechniSat webWebsite.
8. Unterstützung
For further assistance, technical support, or to download the latest version of this manual, please visit the official TechniSat webWebsite:
You may also contact TechniSat customer service directly. Contact details can typically be found on the manufacturer's webWebsite oder in der Produktverpackung.


