Einführung
Thank you for choosing the KBS 17-in-1 Bread Maker. This appliance is designed to simplify your bread-making process with its advanced features and versatile programs. Please read this manual thoroughly before first use to ensure safe and optimal operation.

Image: The KBS 17-in-1 Bread Maker in stainless steel finish, shown with a freshly baked loaf of bread, a jar of jam, and fresh strawberries, highlighting its versatility.
Wichtige Sicherheitshinweise
Beachten Sie beim Gebrauch elektrischer Geräte stets die grundlegenden Sicherheitsvorkehrungen, um das Risiko von Bränden, Stromschlägen und/oder Verletzungen zu verringern. Dazu gehören unter anderem die folgenden Punkte:
- Lesen Sie alle Anweisungen.
- Berühren Sie keine heißen Oberflächen. Benutzen Sie Griffe oder Knöpfe.
- Um einen Stromschlag zu vermeiden, tauchen Sie Kabel, Stecker oder Brotbackautomaten nicht in Wasser oder andere Flüssigkeiten.
- Bei der Benutzung von Geräten durch oder in der Nähe von Kindern ist eine genaue Aufsicht erforderlich.
- Bei Nichtgebrauch und vor der Reinigung den Stecker aus der Steckdose ziehen. Vor dem Anbringen oder Abnehmen von Teilen abkühlen lassen.
- Betreiben Sie kein Gerät mit einem beschädigten Kabel oder Stecker oder nachdem das Gerät nicht richtig funktioniert, fallen gelassen oder in irgendeiner Weise beschädigt wurde.
- Die Verwendung von Zubehör, das vom Gerätehersteller nicht empfohlen wird, kann zu Verletzungen führen.
- Nicht im Freien verwenden.
- Lassen Sie das Kabel nicht über die Tisch- oder Thekenkante hängen oder heiße Oberflächen berühren.
- Nicht auf oder in die Nähe eines heißen Gas- oder Elektrobrenners oder in einen beheizten Ofen stellen.
- Beim Bewegen eines Geräts, das heißes Öl oder andere heiße Flüssigkeiten enthält, ist äußerste Vorsicht geboten.
- Zum Trennen der Verbindung schalten Sie einen beliebigen Regler auf „Aus“ und ziehen Sie dann den Stecker aus der Steckdose.
- Das Gerät darf nur für den vorgesehenen Zweck verwendet werden.
Produktkomponenten und Zubehör
The KBS 17-in-1 Bread Maker comes with essential components and accessories to facilitate your baking experience.
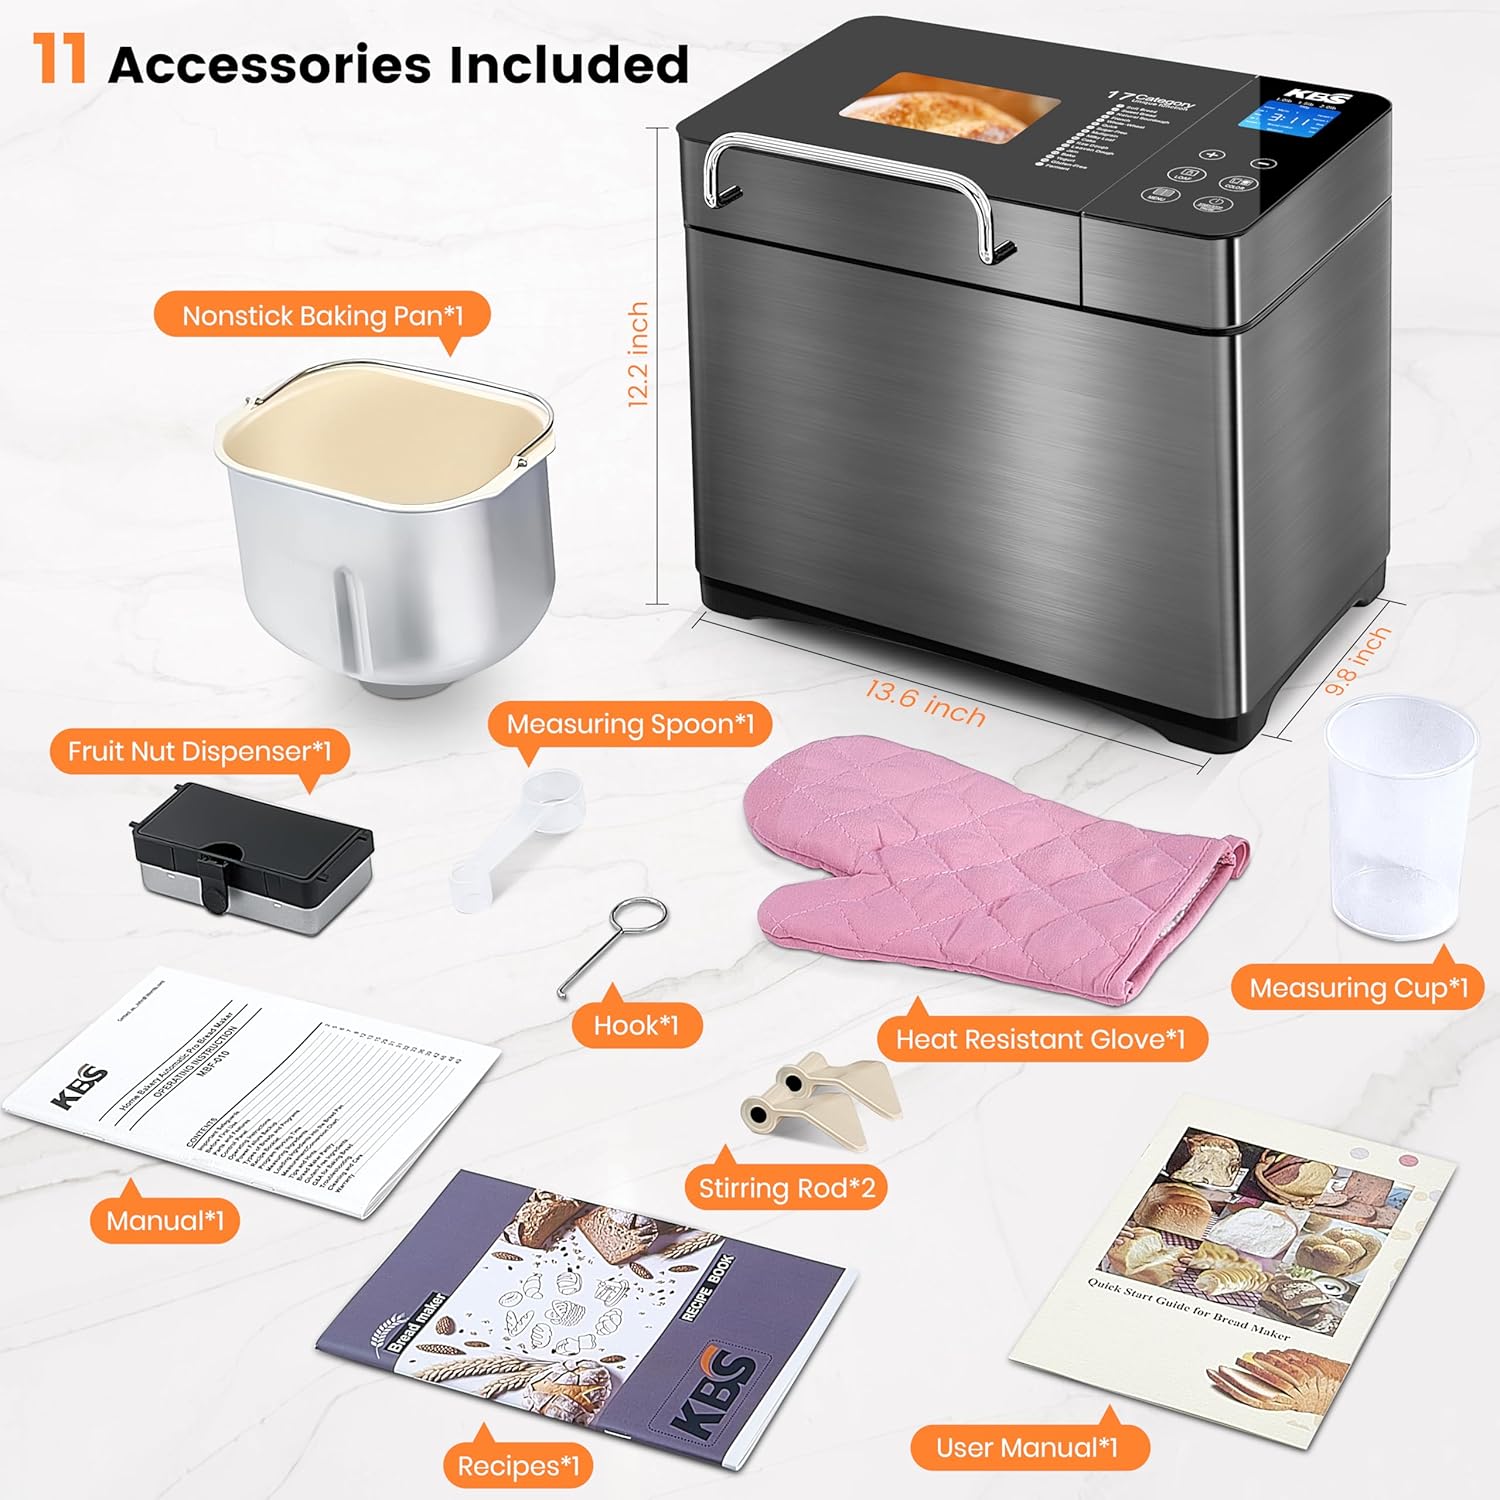
Bild: Eine explodierte view of the KBS Bread Maker and its included accessories, such as the nonstick baking pan, automatic fruit and nut dispenser, measuring spoon, hook for paddle removal, heat-resistant glove, and two stirring rods.
Mitgeliefertes Zubehör:
- Nonstick Baking Pan (1)
- Fruit Nut Dispenser (1)
- Measuring Spoon (1)
- Hook (1) - For removing the kneading paddle from baked bread.
- Heat Resistant Glove (1)
- Stirring Rods (2)
- Messbecher (1)
Einrichtung und erste Verwendung
- Auspacken: Nehmen Sie den Brotbackautomaten und sämtliches Zubehör vorsichtig aus der Verpackung.
- Reinigung: Before first use, wash the bread pan, kneading paddles, measuring cup, and measuring spoon with warm, soapy water. Rinse thoroughly and dry all parts. Wipe the exterior of the bread maker with a damp Tuch.
- Platzierung: Stellen Sie den Brotbackautomaten auf eine stabile, ebene und hitzebeständige Oberfläche, fern von direkter Sonneneinstrahlung und Wärmequellen. Sorgen Sie für ausreichende Belüftung um das Gerät herum.
- Knethaken einbauen: Insert the kneading paddle onto the shaft inside the bread pan. Ensure it clicks into place securely.
- Brotbackform einsetzen: Place the bread pan into the bread maker, pressing down firmly until it locks into position.
- Stromanschluss: Stecken Sie das Netzkabel in eine geerdete Steckdose. Das Display leuchtet auf und zeigt damit an, dass der Brotbackautomat betriebsbereit ist.

Image: A visual guide demonstrating the three easy steps to operate the bread maker: adding ingredients, selecting settings on the touch panel, and the final baked bread.
Bedienungsanleitung
Systemsteuerung überview:
Video: An official demonstration of the KBS Bread Maker's control panel and its various functions, including program selection, loaf size, and crust color settings.
The bread maker features an intuitive touch panel for easy operation. Key buttons include:
- SPEISEKARTE: Drücken Sie, um durch die 17 automatischen Programme zu blättern.
- BROT: Select 1.0 lb, 1.5 lb, or 2.0 lb loaf size.
- FARBE: Choose light, medium, or dark crust color.
- +/-: Den Verzögerungstimer anpassen.
- START/STOP/PAUSE: Start, pause, or stop the baking cycle.
Backvorgang:
- Zutaten hinzufügen: Add ingredients to the bread pan in the order specified by your recipe (typically liquids first, then dry ingredients, with yeast last). Ensure the kneading paddle is correctly installed.
- Programm auswählen: Press the MENU button to select the desired program (e.g., Basic, French, Whole Wheat, Gluten-Free). The bread maker offers 17 programs, including options for dough, jam, and yogurt.
- Wählen Sie die Brotgröße und die Krustenfarbe: Use the LOAF and COLOR buttons to set your preferences.
- Automatischer Nussspender: If your recipe includes nuts or fruits, place them in the automatic nut dispenser. The dispenser will release them into the dough at the optimal time during the kneading cycle.
- Mit dem Backen beginnen: Press the START/STOP/PAUSE button to begin the cycle. The bread maker will automatically knead, rise, and bake.
- Verzögerungstimer (optional): To delay the start of the baking process, use the +/- buttons to set the desired delay time (up to 15 hours).
- Warmhaltefunktion: After baking, the bread maker will automatically switch to a 1-hour keep warm function to maintain freshness.
- Brot entfernen: Once the cycle is complete, unplug the bread maker. Using the heat-resistant glove, carefully remove the bread pan. Invert the pan to release the bread onto a wire rack to cool. Use the hook to remove the kneading paddle if it remains embedded in the bread.

Image: A visual representation of the bread maker's automated process, from adding ingredients and selecting a program to the machine kneading the dough and producing a finished loaf.

Image: This graphic illustrates the 15-hour delay timer and 1-hour keep warm functions, enabling users to schedule baking for fresh bread at their convenience, such as in the morning.
Pflege und Wartung
Proper care and maintenance will extend the life of your KBS Bread Maker.
- Reinigung der Brotbackform und des Knethakens: After each use, remove the bread pan and kneading paddle. Wash them with warm, soapy water. The ceramic nonstick coating is designed for easy cleaning. Avoid abrasive cleaners or scouring pads that could damage the nonstick surface. These parts can be machine washed.
- Reinigung der Außenseite: Wischen Sie die Außenseite des Brotbackautomaten mit einem weichen, fusselfreien Tuch ab.amp Mit einem Tuch abwischen. Keine scharfen Chemikalien oder Scheuermittel verwenden. Das Hauptgerät niemals in Wasser oder andere Flüssigkeiten tauchen.
- Reinigung des Deckels und ViewFenster: Wipe the inside of the lid and the viewSchaufenster mit Anzeigeamp Stoff. Bei hartnäckigen Flecken ein mildes Waschmittel verwenden.
- Lagerung: Ensure the bread maker is clean and completely dry before storing. Store it in a cool, dry place.

Abbildung: Ein Querschnitt view highlighting the five layers of the healthy ceramic bread pan, designed for superior nonstick performance and durability, processed at 3,000°F.
Anleitung zur Fehlerbehebung
Sollten Sie Probleme mit Ihrem Brotbackautomaten haben, beachten Sie bitte die folgenden häufig auftretenden Probleme und Lösungen:
| Problem | Mögliche Ursache | Lösung |
|---|---|---|
| Der Teig geht nicht auf | Expired yeast, incorrect water temperature, too much salt/sugar, wrong flour type. | Check yeast expiration date. Use water between 105-115°F (40-46°C). Ensure correct ingredient measurements. Use bread flour for best results. |
| Das Brot ist zu fest/schwer. | Too much flour, not enough liquid, low room temperature. | Measure ingredients precisely. Increase liquid slightly if dough appears too dry. Ensure room temperature is not too cold. |
| Brot fällt beim Backen zusammen. | Zu viel Flüssigkeit, zu viel Hefe, hohe Luftfeuchtigkeit. | Reduce liquid slightly. Reduce yeast amount. Avoid opening the lid during baking. |
| Knethaken steckte im Brot fest | Häufiges Vorkommen. | Nachdem das Brot etwas abgekühlt ist, kann der Rührarm mithilfe des mitgelieferten Hakens vorsichtig entfernt werden. |
| Maschine startet nicht | Nicht angeschlossen, Stromausfalltage, incorrect program selection. | Ensure power cord is securely plugged in. Check household circuit breaker. Re-select program and press START. |
Produktspezifikationen
| Besonderheit | Detail |
|---|---|
| Marke | KBS |
| Modellnummer | MBF-011 |
| Farbe | Edelstahl |
| Technische Daten | 9.8"T x 13.6"B x 12.2"H |
| Artikelgewicht | 14.7 Pfund |
| Wastage | 710 watts (Dual Heaters) |
| Anzahl der Programme | 17 (including Gluten-Free, French, Whole Wheat, Sourdough, Pizza Dough, Jam, Yogurt, Cake) |
| Laibgrößen | 1 lb, 1.5 lb, 2 lb |
| Krustenfarben | Hell, Mittel, Dunkel |
| Brotmaterial | Ceramic Nonstick (PTFE/PFOA/lead-free) |
| Timerfunktion | 15-Stunden-Verzögerungstimer |
| Warmhaltefunktion | 1-hour automatic keep warm |
| Notstromversorgung bei Stromausfall | 15 Мinuten |
| Zertifizierungen | ETL, FCC |
| Ursprungsland | China |

Image: The control panel displaying the 17 automatic programs, including options for various bread types, dough, jam, and yogurt.

Image: This graphic illustrates the three available loaf sizes (1lb, 1.5lb, 2lb) and three crust color options (light, medium, dark) that can be selected on the bread maker.
Garantie und Kundendienst
KBS stands behind the quality of its products. The KBS Bread Maker comes with a 3 Jahre Kundendienst and free lifetime technical assistance.
The product is certified by ETL and FCC, ensuring high safety and quality standards.
For any inquiries, technical support, or warranty claims, please contact our customer service team. We aim to respond to all inquiries within 12 hours.
For further assistance, please visit the official KBS Store: KBS Official Store