Einführung
This manual provides detailed instructions for the installation, operation, and maintenance of your Orion Cobalt Series CBA1500.2 2-Channel Class A/B Car Audio Amplifier. To ensure optimal performance and longevity of your amplifier, please read this manual thoroughly before installation and use. Keep this manual for future reference.
Sicherheitshinweise
WARNUNG: Dieses Produkt enthält Chemikalien, von denen bekannt ist, dass sie Krebs, Geburtsfehler oder andere reproduktive Schäden verursachen.
- Vor Beginn jeglicher Installationen muss immer der Minuspol der Fahrzeugbatterie abgeklemmt werden.
- Stellen Sie sicher, dass alle Kabel ordnungsgemäß verlegt und befestigt sind, um Beschädigungen oder Kurzschlüsse zu vermeiden.
- Use appropriate gauge wiring for power and ground connections to handle the ampAktueller Stromverbrauch des Verstärkers.
- Installieren Sie die ampDer Verstärker sollte an einem Ort aufgestellt werden, der eine ausreichende Belüftung ermöglicht, um eine Überhitzung zu vermeiden.
- Vermeiden Sie die Montage der ampVerstärker in Bereichen, die Feuchtigkeit oder starken Vibrationen ausgesetzt sind.
- Wenn Sie sich bei irgendeinem Teil des Installationsprozesses unsicher sind, holen Sie sich professionelle Hilfe.
Produkt überview
The Orion Cobalt Series CBA1500.2 is a high-efficiency 2-channel Class A/B amplifier designed for car audio systems, delivering up to 1500 Watts of output power. It features adjustable low/high pass filters, bass boost, and a MOSFET power supply for reliable performance.
AmpVerstärkerkomponenten
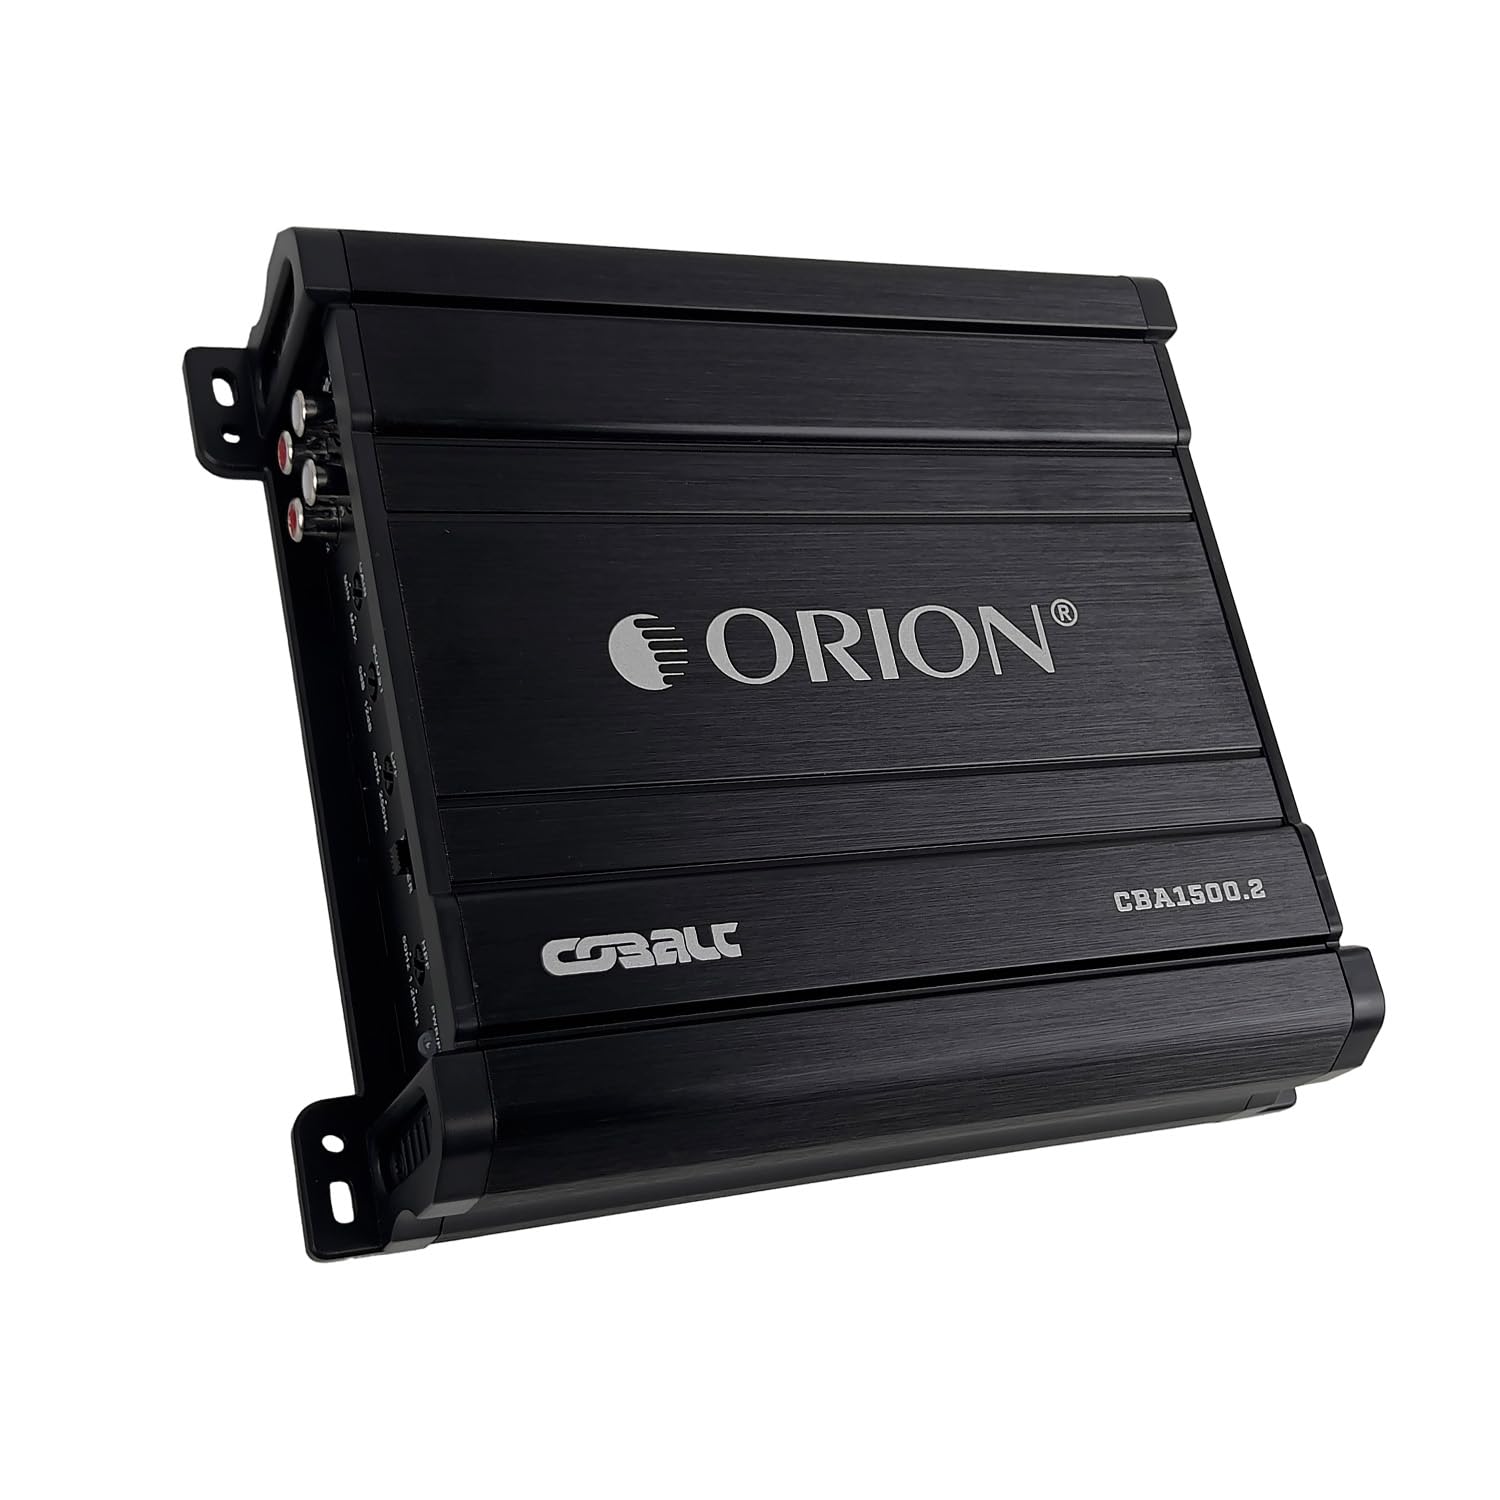
Abbildung 1: Spitze view of the Orion Cobalt Series CBA1500.2 ampVerstärker, Showcasing das Markenlogo und die Modellnummer.

Abbildung 2: Hinteren view der amplifier, showing the power, ground, remote, and speaker output terminals, along with the fuse.
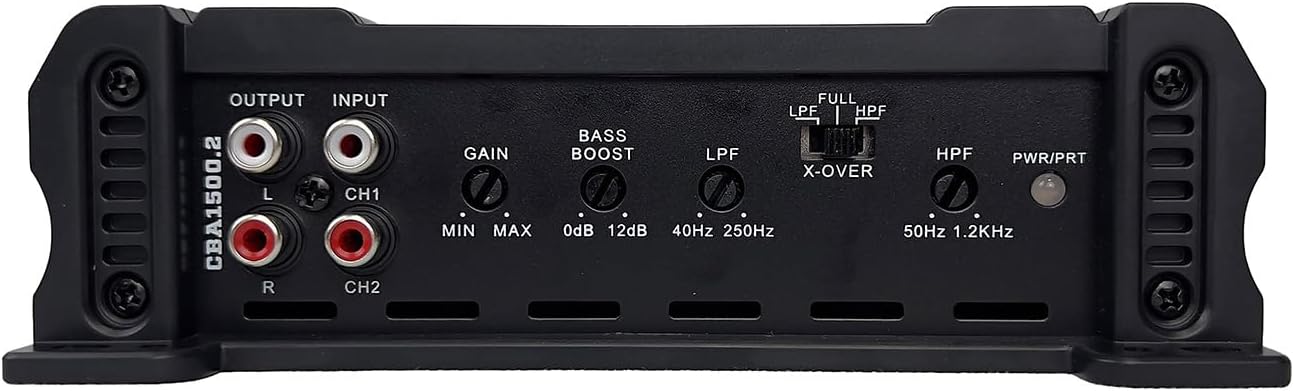
Abbildung 3: Front view der amplifier's control panel, featuring RCA inputs/outputs, gain, bass boost, LPF, X-OVER, HPF, and power/protection indicators.
Interne Schaltung
Video 1: An official video from ORION CAR AUDIO demonstrating the internal components and features of the Orion Cobalt CBA1500.2 amplifier, highlighting its MOSFET power supply and precision engineering.
Setup und Installation
Eine fachgerechte Installation ist entscheidend für die Leistung und Sicherheit Ihres Produkts. ampVerstärker. Befolgen Sie diese Schritte sorgfältig.
- Montageort: Choose a dry, well-ventilated location for the amplifier. Ensure it is securely mounted to prevent movement during vehicle operation. Avoid mounting directly on carpet or in enclosed spaces without airflow.
- Stromverkabelung: Run a power cable (minimum 8-gauge, preferably 4-gauge for optimal performance) directly from the positive terminal of the vehicle's battery to the amplifier's +12V terminal. Install an in-line fuse holder within 18 inches of the battery.
- Erdungsverdrahtung: Connect a ground cable (same gauge as the power cable) from the ampVerbinden Sie den GND-Anschluss des Verstärkers mit einer sauberen, unlackierten Metalloberfläche am Fahrzeugchassis. Stellen Sie eine sichere elektrische Verbindung sicher.
- Ferneinschaltung: Connect a remote turn-on wire (18-gauge) from your head unit's remote output to the ampDer REM-Anschluss des Verstärkers. Dieses Kabel signalisiert den ampVerstärker zum Ein- und Ausschalten mit Ihrem Autoradio.
- Audioeingang (RCA): Connect RCA cables from your head unit's RCA outputs to the amplifier's INPUT (CH1 and CH2) terminals.
- Lautsprecheranschlüsse: Verbinden Sie Ihre Lautsprecher mit dem amplifier's speaker output terminals (CH1 and CH2). Ensure correct polarity (+ to + and - to -). This amplifier is 2 Ohm stable. For bridged operation, refer to the markings on the amplifier's speaker terminal block.
- Anfangseinstellungen: Before powering on, set the GAIN control to minimum, BASS BOOST to 0dB, and the X-OVER switch to the desired setting (LPF, HPF, or FULL).
- Batterie wieder anschließen: Once all connections are secure and verified, reconnect the vehicle's battery negative terminal.
Bedienungsanleitung
After successful installation, follow these steps to configure and operate your ampschwerer.
- Einschalten: Schalten Sie die Zündung und das Autoradio Ihres Fahrzeugs ein. amplifier's power indicator (PWR) should illuminate. If the protection indicator (PRT) illuminates, refer to the troubleshooting section.
- Kontrolle erlangen: Slowly increase the GAIN control on the amplifier while playing music at a moderate volume from your head unit. Adjust the gain until you hear clear, undistorted sound. Avoid setting the gain too high, as this can lead to distortion and speaker damage.
- Bassverstärkung: The BASS BOOST control allows you to enhance low frequencies. Start at 0dB and gradually increase to achieve desired bass response. Excessive bass boost can cause distortion.
- Crossover-Einstellungen:
- LPF (Tiefpassfilter): Use this setting for subwoofers. It allows only frequencies below the set point (40Hz-250Hz) to pass through.
- HPF (Hochpassfilter): Use this setting for full-range speakers or tweeters. It allows only frequencies above the set point (50Hz-1.2KHz) to pass through.
- FULL (Full Range): This setting allows all frequencies to pass through the ampschwerer.
Wartung
Regular maintenance ensures your amplifier continues to perform reliably.
- Reinigung: Reinigen Sie regelmäßig die Außenseite des amplifier with a soft, dry cloth. Do not use harsh chemicals or abrasive cleaners. Ensure ventilation openings are free from dust and debris.
- Verbindungsprüfung: Annually, inspect all power, ground, remote, RCA, and speaker connections. Ensure they are tight and free from corrosion.
- Sicherungswechsel: Wenn das amplifier does not power on, check the fuse located on the amplifier's rear panel (Figure 2). Replace with a fuse of the exact same type and rating.
Fehlerbehebung
Sollten Sie Probleme mit Ihrem ampBei häufig auftretenden Problemen und deren Lösungen konsultieren Sie bitte die untenstehende Tabelle.
| Problem | Mögliche Ursache | Lösung |
|---|---|---|
| Amplifier does not turn on (PWR LED off) | No power, ground, or remote signal; blown fuse. | Check all power, ground, and remote connections. Verify the in-line fuse near the battery and the fuse on the ampschwerer. |
| Amplifier turns on but no sound | RCA cables disconnected/damaged; speaker wires disconnected/shorted; gain too low. | Check RCA connections from head unit. Inspect speaker wiring for shorts or disconnections. Increase gain slowly. |
| Verzerrter Ton | Gain set too high; bass boost too high; improper crossover settings; damaged speakers. | Reduce gain and/or bass boost. Adjust crossover settings. Test with different speakers if possible. |
| Amplifier overheats (PRT LED on) | Insufficient ventilation; impedance too low; prolonged high-volume use. | Sorgen Sie für ausreichende Luftzirkulation um das/die/den/das amplifier. Verify speaker impedance is within the amplifier's stable range (2 Ohm minimum). Reduce volume or allow ampabkühlen lassen. |
| Noise/Hissing sound | Poor grounding; RCA cable interference; engine noise. | Ensure ground connection is clean and secure. Reroute RCA cables away from power wires. Consider an RCA filter if noise persists. |
Technische Daten
Technical specifications for the Orion Cobalt Series CBA1500.2 ampschwerer.
| Besonderheit | Spezifikation |
|---|---|
| Modellnummer | COBALT CBT-1500.2 |
| Anzahl der Kanäle | 2 |
| Ausgangsleistung (max.) | 1500 Watt |
| RMS-Leistung bei 2 Ohm | 125W x 2 |
| RMS-Leistung bei 4 Ohm | 60W x 2 |
| Frequenzgang | 10Hz - 30KHz |
| Bass Boost | 0 dB - 12 dB |
| Tiefpassfilter (LPF) | 40Hz - 250Hz |
| Hochpassfilter (HPF) | 50Hz - 1.2KHz |
| Mindestvorrat Voltage | 9 Volt |
| Maximales Versorgungsvolumentage | 16 Volt (DC) |
| Abmessungen (L x B x H) | 10 x 8 x 3 Zoll |
| Artikelgewicht | 3.21 Pfund |
| Material | Aluminium oder Stahl |
| Netzteiltyp | MOSFET |
Garantie und Support
For warranty information, technical support, or service inquiries regarding your Orion Cobalt Series CBA1500.2 amplifier, please contact ORION CAR AUDIO directly. Refer to the official ORION webDie aktuellsten Kontaktdaten und Garantiebedingungen finden Sie auf unserer Website oder in Ihren Kaufunterlagen.
Hersteller: ORION
Verkäufer: ORION CAR AUDIO


