1. Einleitung
Vielen Dank für Ihren Einkauf.asing the H.KOENIG HF320 Ice Cream Maker and GSX12 Juicer combination. This manual provides essential information for the safe and efficient use of your appliances. Please read these instructions carefully before first use and retain them for future reference.
2. Wichtige Sicherheitshinweise
- Lesen Sie vor der Verwendung des Geräts alle Anweisungen.
- Do not immerse the motor unit of either appliance in water or other liquids.
- Stellen Sie sicher, dass die LautstärketagDie auf dem Gerät angegebene e entspricht Ihrer örtlichen Netzvoltage vor dem Anschließen.
- Bei der Benutzung von Geräten durch oder in der Nähe von Kindern ist eine genaue Aufsicht erforderlich.
- Ziehen Sie den Stecker aus der Steckdose, wenn das Gerät nicht benutzt wird, bevor Sie Teile montieren oder demontieren und bevor Sie es reinigen.
- Vermeiden Sie den Kontakt mit beweglichen Teilen.
- Betreiben Sie kein Gerät, dessen Kabel oder Stecker beschädigt ist, oder wenn das Gerät eine Fehlfunktion aufweist oder auf sonstige Weise beschädigt wurde.
- Die Verwendung von Zubehör, das vom Hersteller nicht empfohlen oder verkauft wird, kann zu Bränden, Stromschlägen oder Verletzungen führen.
- Nicht im Freien verwenden.
- Lassen Sie das Kabel nicht über die Kante eines Tisches oder einer Theke hängen und berühren Sie keine heißen Oberflächen.
- Nicht auf oder in die Nähe eines heißen Gas- oder Elektrobrenners oder in einen beheizten Ofen stellen.
- Always ensure the appliance is properly assembled before operation.
- Verwenden Sie das Gerät nur für den vorgesehenen Zweck.
3. Produktüberschreitungview
3.1 H.KOENIG HF320 Ice Cream Maker
The HF320 is a compressor ice cream maker designed for quick preparation of homemade ice cream, sorbet, and frozen yogurt. It features an LCD screen and an automatic stop function.

Bild: Vorderseite view of the H.KOENIG HF320 Ice Cream Maker, showing the control panel, LCD screen, and transparent lid.

Image: Close-up of a hand adjusting the control knob on the H.KOENIG HF320 Ice Cream Maker.
3.2 H.KOENIG GSX12 Juicer
The GSX12 is a slow juicer designed for efficient juice extraction with a silent system and an inox casing. It includes a juice cup and a pulp container.

Image: The H.KOENIG GSX12 Juicer fully assembled with its juice cup and pulp container.
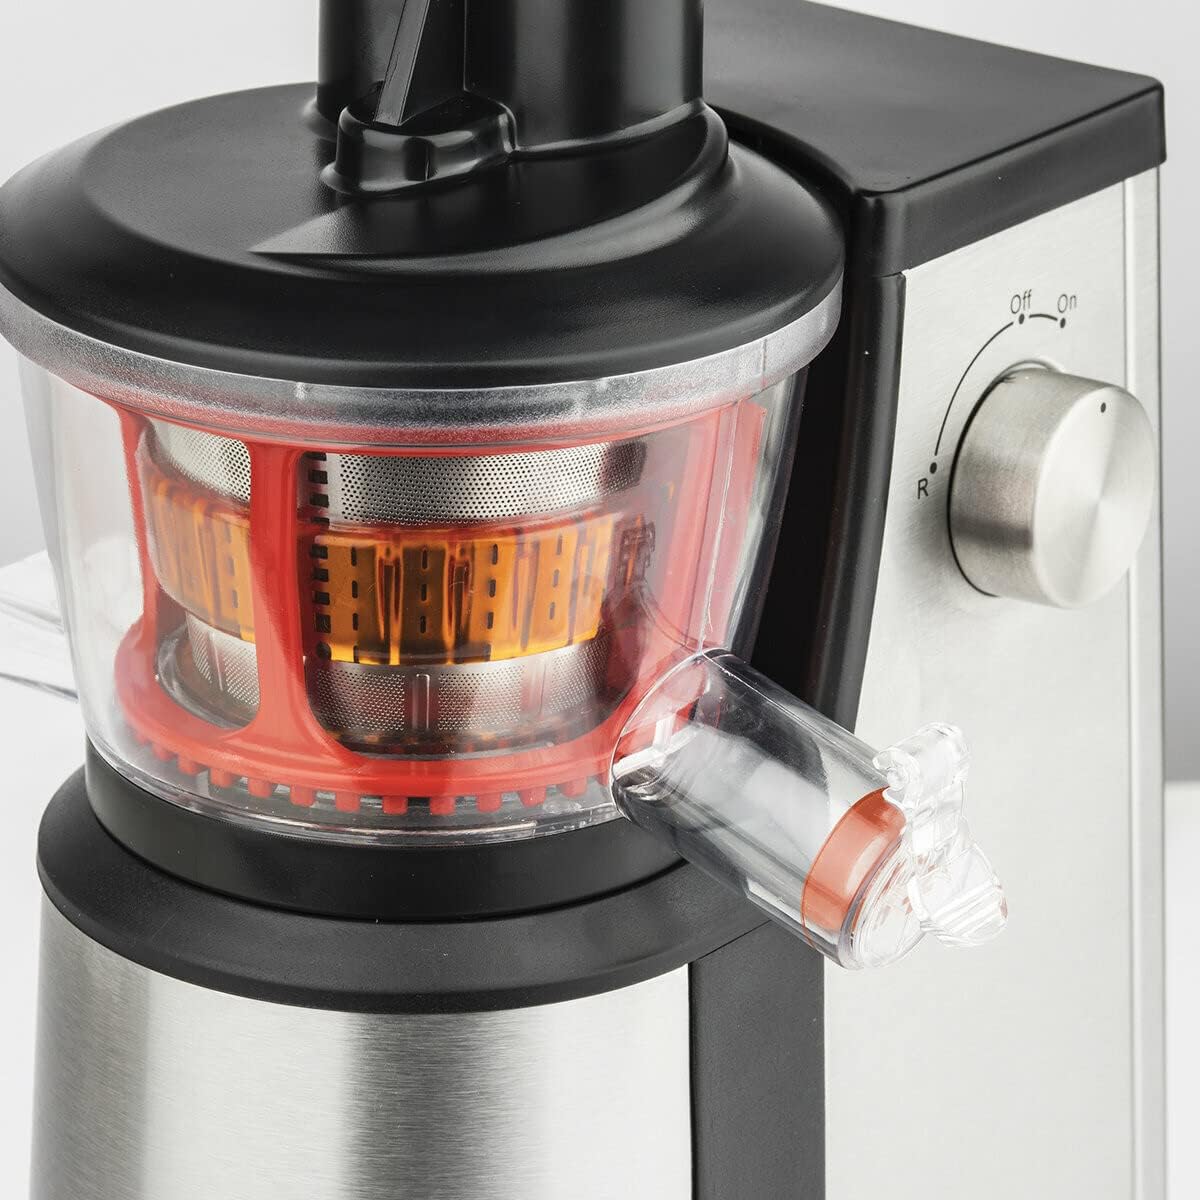
Bild: Nahaufnahme view of the H.KOENIG GSX12 Juicer's transparent extraction chamber, showing the internal filter and auger.
4. Einrichtung
4.1 Setting up the HF320 Ice Cream Maker
- Packen Sie alle Komponenten aus und entfernen Sie sämtliches Verpackungsmaterial.
- Place the ice cream maker on a stable, flat, and dry surface.
- Ensure the removable aluminum bowl is clean and dry before placing it into the main unit.
- Insert the mixing paddle into the bowl, ensuring it is properly seated.
- Place the transparent lid on top of the bowl and secure it.
- Schließen Sie das Gerät an eine geerdete Steckdose an.
4.2 Setting up the GSX12 Juicer
- Packen Sie alle Komponenten aus und entfernen Sie sämtliches Verpackungsmaterial.
- Stellen Sie den Motorsockel auf eine stabile, ebene und trockene Oberfläche.
- Assemble the juicing components: place the juice bowl onto the motor base, then insert the filter and auger.
- Secure the lid onto the juice bowl.
- Positionieren Sie den Saftbecher unter dem Saftauslauf und den Tresterbehälter unter dem Tresterauslauf.
- Schließen Sie das Gerät an eine geerdete Steckdose an.
5. Bedienung
5.1 Operating the HF320 Ice Cream Maker
- Prepare your ice cream mixture according to your recipe. Ensure the mixture is chilled before adding it to the machine.
- Pour the chilled mixture into the removable aluminum bowl. Do not fill above the maximum fill line.
- Den transparenten Deckel gut verschließen.
- Select the desired program or set the timer using the control panel and knob. The LCD screen will display the settings.
- Press the start button to begin the churning process. The machine will automatically stop when the cycle is complete.
- Once finished, unplug the appliance and remove the ice cream using a plastic or wooden spatula to avoid scratching the bowl.
5.2 Operating the GSX12 Juicer
- Wash fruits and vegetables thoroughly. Cut them into pieces that fit the feeding chute. Remove any hard pits or large seeds.
- Ensure the juice cup and pulp container are correctly positioned.
- Schalten Sie den Entsafter mit dem Netzschalter ein.
- Slowly feed the prepared ingredients into the feeding chute. Use the food pusher to gently guide them down. Do not force ingredients.
- Der Entsafter extrahiert den Saft in den Saftbecher und trennt das Fruchtfleisch vom Tresterbehälter.
- After juicing, turn the appliance OFF and unplug it from the power outlet.
6. Wartung und Reinigung
6.1 Cleaning the HF320 Ice Cream Maker
- Ziehen Sie vor der Reinigung immer den Stecker aus der Steckdose.
- Remove the mixing paddle and the removable aluminum bowl.
- The removable aluminum bowl is dishwasher safe. Alternatively, wash it with warm, soapy water and dry thoroughly.
- Wash the mixing paddle and lid with warm, soapy water and rinse.
- Wipe the main unit (motor base) with a damp Tuch. Tauchen Sie das Hauptgerät nicht in Wasser.
- Stellen Sie sicher, dass alle Teile vollständig trocken sind, bevor Sie sie wieder zusammenbauen oder lagern.
6.2 Cleaning the GSX12 Juicer
- Ziehen Sie vor der Reinigung immer den Stecker aus der Steckdose.
- Disassemble all removable parts: lid, auger, filter, juice bowl, juice cup, and pulp container.
- Spülen Sie alle abnehmbaren Teile sofort nach Gebrauch unter fließendem Wasser ab, um ein Austrocknen des Zellstoffs zu verhindern.
- Use a cleaning brush (if provided) to clean the filter screen thoroughly.
- Waschen Sie alle abnehmbaren Teile mit warmem Seifenwasser.
- Wischen Sie die Motorbasis mit adamp Tuch. Tauchen Sie den Motorsockel nicht in Wasser.
- Trocknen Sie alle Teile gründlich ab, bevor Sie sie wieder zusammenbauen oder lagern.
7. Fehlerbehebung
| Problem | Mögliche Ursache | Lösung |
|---|---|---|
| Eismaschine: Gerät startet nicht. | Nicht angeschlossen; Deckel nicht richtig verschlossen; Stromausfalltage. | Check power connection; ensure lid is correctly placed; check household power. |
| Eismaschine: Die Mischung gefriert nicht. | Mischung nicht vorgekühlt; zu viel Mischung; Umgebungstemperatur zu hoch. | Ensure mixture is very cold; do not exceed max fill line; use in a cool room. |
| Entsafter: Gerät startet nicht. | Nicht angeschlossen; Teile nicht korrekt montiert; Stromausfalltage. | Check power connection; ensure all parts are securely locked; check household power. |
| Entsafter: Geringe Saftausbeute oder zu viel Fruchtfleisch. | Ingredients fed too quickly; filter clogged; ingredients too soft. | Feed ingredients slowly; clean the filter; for soft fruits, alternate with harder ones. |
| Entsafter: Gerät stoppt während des Betriebs. | Overload protection activated; chute jammed. | Turn off, unplug, and let cool for 30 minutes. Clear any jams before restarting. |
8. Spezifikationen
8.1 H.KOENIG HF320 Ice Cream Maker
- Leistung: 180 W
- Kapazität: 2 Liters (for up to 10 people)
- Schüsselmaterial: Removable Aluminum
- Merkmale: Rapid preparation, LCD screen, Automatic stop, Keep-cold function
- Farbe: Silber und Schwarz
- Nettogewicht: 12.2 kg
- Pflegehinweise: Dishwasher safe (bowl)
8.2 H.KOENIG GSX12 Juicer
- Leistung: 400 W
- Kapazität: 1 Liter (Juice Cup)
- Gehäusematerial: Edelstahl
- Merkmale: Silent system, Pulp container included
- Farbe: Silber und Schwarz
- Pflegehinweise: Hand wash removable parts
9. Garantie und Support
This H.KOENIG product comes with a 2 Jahr Garantie covering parts and labor for return to the workshop. Please retain your proof of purchase for warranty claims. For support or service, please contact your retailer or the H.KOENIG customer service department.


