1. Einleitung
The Easy@Home Fingertip Pulse Oximeter EHP035 is designed for non-invasive spot-check measurement of functional oxygen saturation of arterial hemoglobin (SpO2) and pulse rate. This device is intended for sports and aviation use only and is not for medical diagnosis or treatment. It provides quick and accurate readings, making it suitable for individuals who need to monitor their oxygen levels and heart rate during activities such as climbing, hiking, or cycling.

Image: The Easy@Home Fingertip Pulse Oximeter EHP035, a compact white device with an OLED display showing SpO2 and pulse rate readings.

Image: A banner displaying the Easy@Home Fingertip Pulse Oximeter with text "Monitor Your Health at Your Fingertips".
2. Sicherheitshinweise
Wichtiger Hinweis: This oximeter is for sports or aviation use only and is NOT intended for medical use. It is not a medical device and should not be used for diagnosis or treatment of any medical condition. Consult a healthcare professional for any health concerns.
- Halten Sie das Gerät von Kleinkindern fern.
- Verwenden Sie das Oximeter nicht in einer MRT- oder CT-Umgebung.
- Das Oximeter darf nicht in Situationen verwendet werden, die sterile Bedingungen erfordern.
- Avoid using the device on the same finger for extended periods to prevent discomfort or injury.
- Ensure the finger is clean and dry before use.
3. Packungsinhalt
Bitte überprüfen Sie beim Auspacken, ob alle unten aufgeführten Artikel vorhanden und unbeschädigt sind:
- One Easy@Home Fingertip Pulse Oximeter (EHP035)
- One Lanyard
- Ein Tragepaket
- Zwei AAA-Batterien
- Benutzerhandbuch (dieses Dokument)

Image: The pulse oximeter with its carrying case and lanyard, highlighting its portability.
4. Produktmerkmale
The Easy@Home EHP035 Pulse Oximeter offers several key features for effective monitoring:
- Genau und zuverlässig: Measures Heart Rate, SpO2, and Pulse Intensity within 8 seconds. Displays readings in waveforms (plethysmograph) and numbers, along with a bar graph for visual indication.
- Einfach zu bedienen: Einfache Ein-Knopf-Bedienung.
- Multi-Direction and Multi-Mode Display: Features a bright OLED display that shows readings in four directions and seven display modes.
- Einstellbare Helligkeit: Ten brightness levels available.
- Geringer Stromverbrauch: Operates continuously for over 24 hours on two AAA batteries. Automatic power-off after 8 seconds of non-use.
Image: A close-up of the oximeter's OLED display, pointing out the Pulse Bar, Battery Low Indication, and Perfusion Index.


Image: Icons representing Oxygen Saturation (SpO2), Pulse Rate (PR), and Perfusion Index (PI), which are key measurements provided by the device.
5. Einrichtung: Batterieeinbau
Before first use, install the two AAA batteries provided:
- Suchen Sie die Abdeckung des Batteriefachs auf der Rückseite des Geräts.
- Schieben Sie die Abdeckung in Pfeilrichtung ab.
- Insert the two AAA batteries, ensuring the positive (+) and negative (-) terminals match the diagrams inside the compartment.
- Setzen Sie die Abdeckung des Batteriefachs wieder ein, indem Sie sie zurückschieben, bis sie einrastet.
Das Gerät ist jetzt einsatzbereit.
6. Bedienungsanleitung
Befolgen Sie diese Schritte, um eine Messung durchzuführen:
- Step 1: Open and Insert Finger
Open the clip of the pulse oximeter and insert one of your fingers (preferably the index, middle, or ring finger) into the rubber opening. Ensure your finger is fully inserted and resting on the sensor.

Image: A hand demonstrating how to open the oximeter clip and insert a finger.
- Step 2: Press ON Button
Press the "ON" button located on the front of the device. The OLED display will activate.

Image: A person using the oximeter, illustrating its ease of use and quick measurement.
- Step 3: Remain Still and Read Results
Keep your hand and finger still during the measurement process. The device will automatically begin measuring. After a few seconds (typically within 8 seconds), your SpO2 and pulse rate readings will be displayed on the screen.
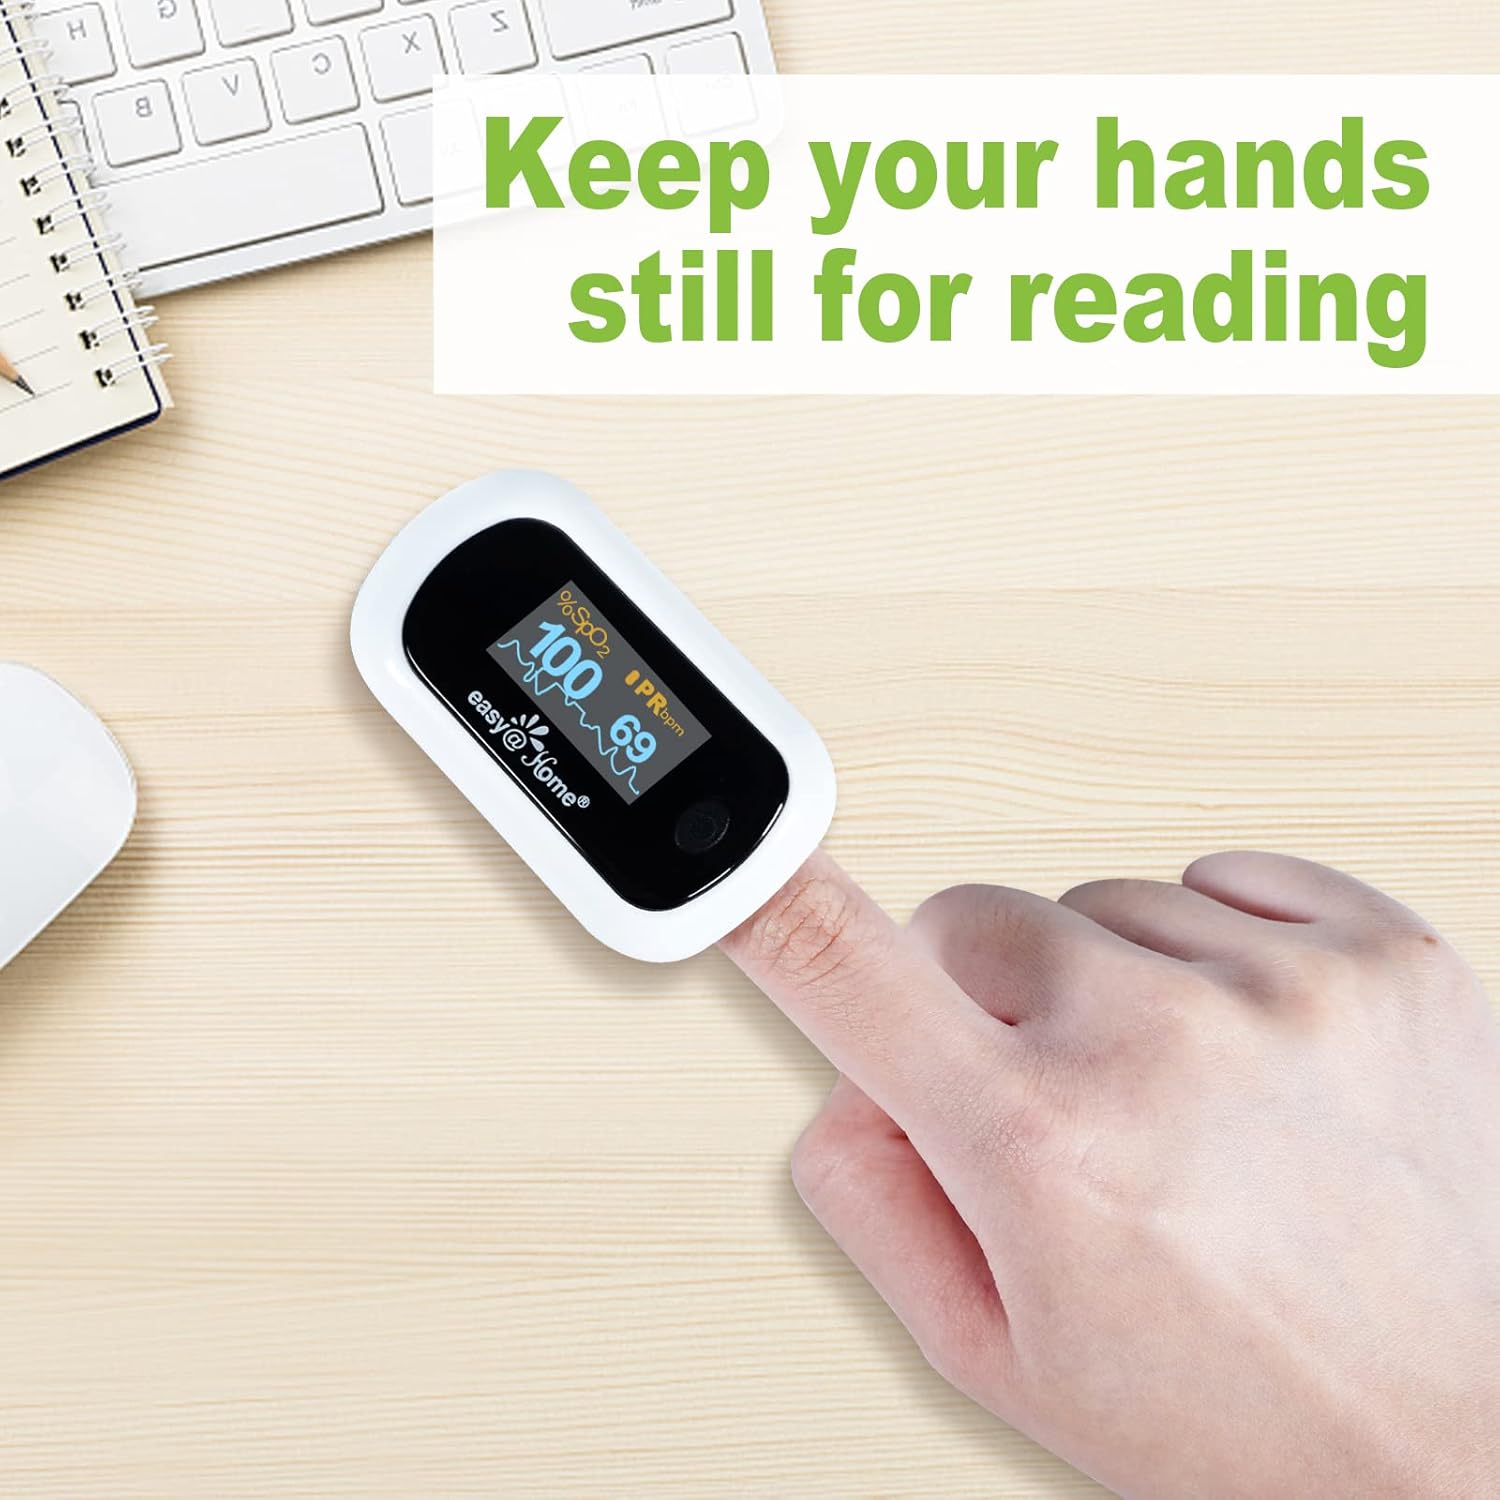
Image: A hand with the oximeter on a finger, emphasizing the need to remain still for accurate readings.
The device will automatically power off after 8 seconds of non-use to conserve battery life.
7. Anzeigeeinstellungen
The EHP035 features a rotatable OLED display with multiple viewing modes and adjustable brightness:
- Changing Display Direction: The display automatically rotates to show readings in four directions, adapting to your viewVorzug.
- Anzeigemodus ändern: The device offers seven display modes. Briefly press the power button while the device is on to cycle through these modes.
- Anpassen der Helligkeit: Hold down the power button for a longer duration (approximately 1-2 seconds) to access and adjust the 10 available brightness levels. Release the button when the desired brightness is reached.


Image: Illustrations showing the multi-directional display feature and the adjustable brightness levels of the OLED screen.
8. Wartung und Lagerung
- Reinigung: Wipe the surface of the oximeter with a soft cloth dampened with medical alcohol (75% ethanol) before and after each use. Do not immerse the device in water or other cleaning solutions.
- Lagerung: Bewahren Sie das Gerät an einem kühlen, trockenen Ort auf, geschützt vor direkter Sonneneinstrahlung, extremen Temperaturen und hoher Luftfeuchtigkeit. Wenn das Gerät längere Zeit nicht benutzt wird, entfernen Sie die Batterien, um ein Auslaufen zu verhindern.
- Batteriewechsel: Tauschen Sie die Batterien aus, sobald die Anzeige für niedrigen Batteriestand erscheint.
9. Fehlerbehebung
| Problem | Mögliche Ursache | Lösung |
|---|---|---|
| No display after pressing ON button | Die Batterien sind leer oder falsch eingelegt. | Check battery orientation (+/-). Replace with new batteries. |
| SpO2 or PR values are unstable | Finger not inserted properly; patient movement; weak pulse. | Reinsert finger correctly. Remain still during measurement. Try a different finger. |
| "Finger Out" or "Error" message | Finger not detected or sensor obstruction. | Ensure finger is fully inserted and clean. Avoid nail polish or artificial nails. |
| Display ist dunkel | Die Helligkeitseinstellung ist niedrig. | Adjust brightness by holding down the power button. |
10. Spezifikationen
- Modell: EHP035
- Measuring Range SpO2: 35 % bis 100 %
- Measuring Range PR: 25 BPM ~250 BPM
- Energieverbrauch: Low, automatic power-off
- Akkulaufzeit: Ungefähr 24 Stunden Dauerbetrieb
- Energiequelle: 2 x AAA-Batterien
- Artikelgewicht: 3.2 Unzen
- Paketabmessungen: 3.74 x 2.56 x 2.05 Zoll
- Farbe: Weiß
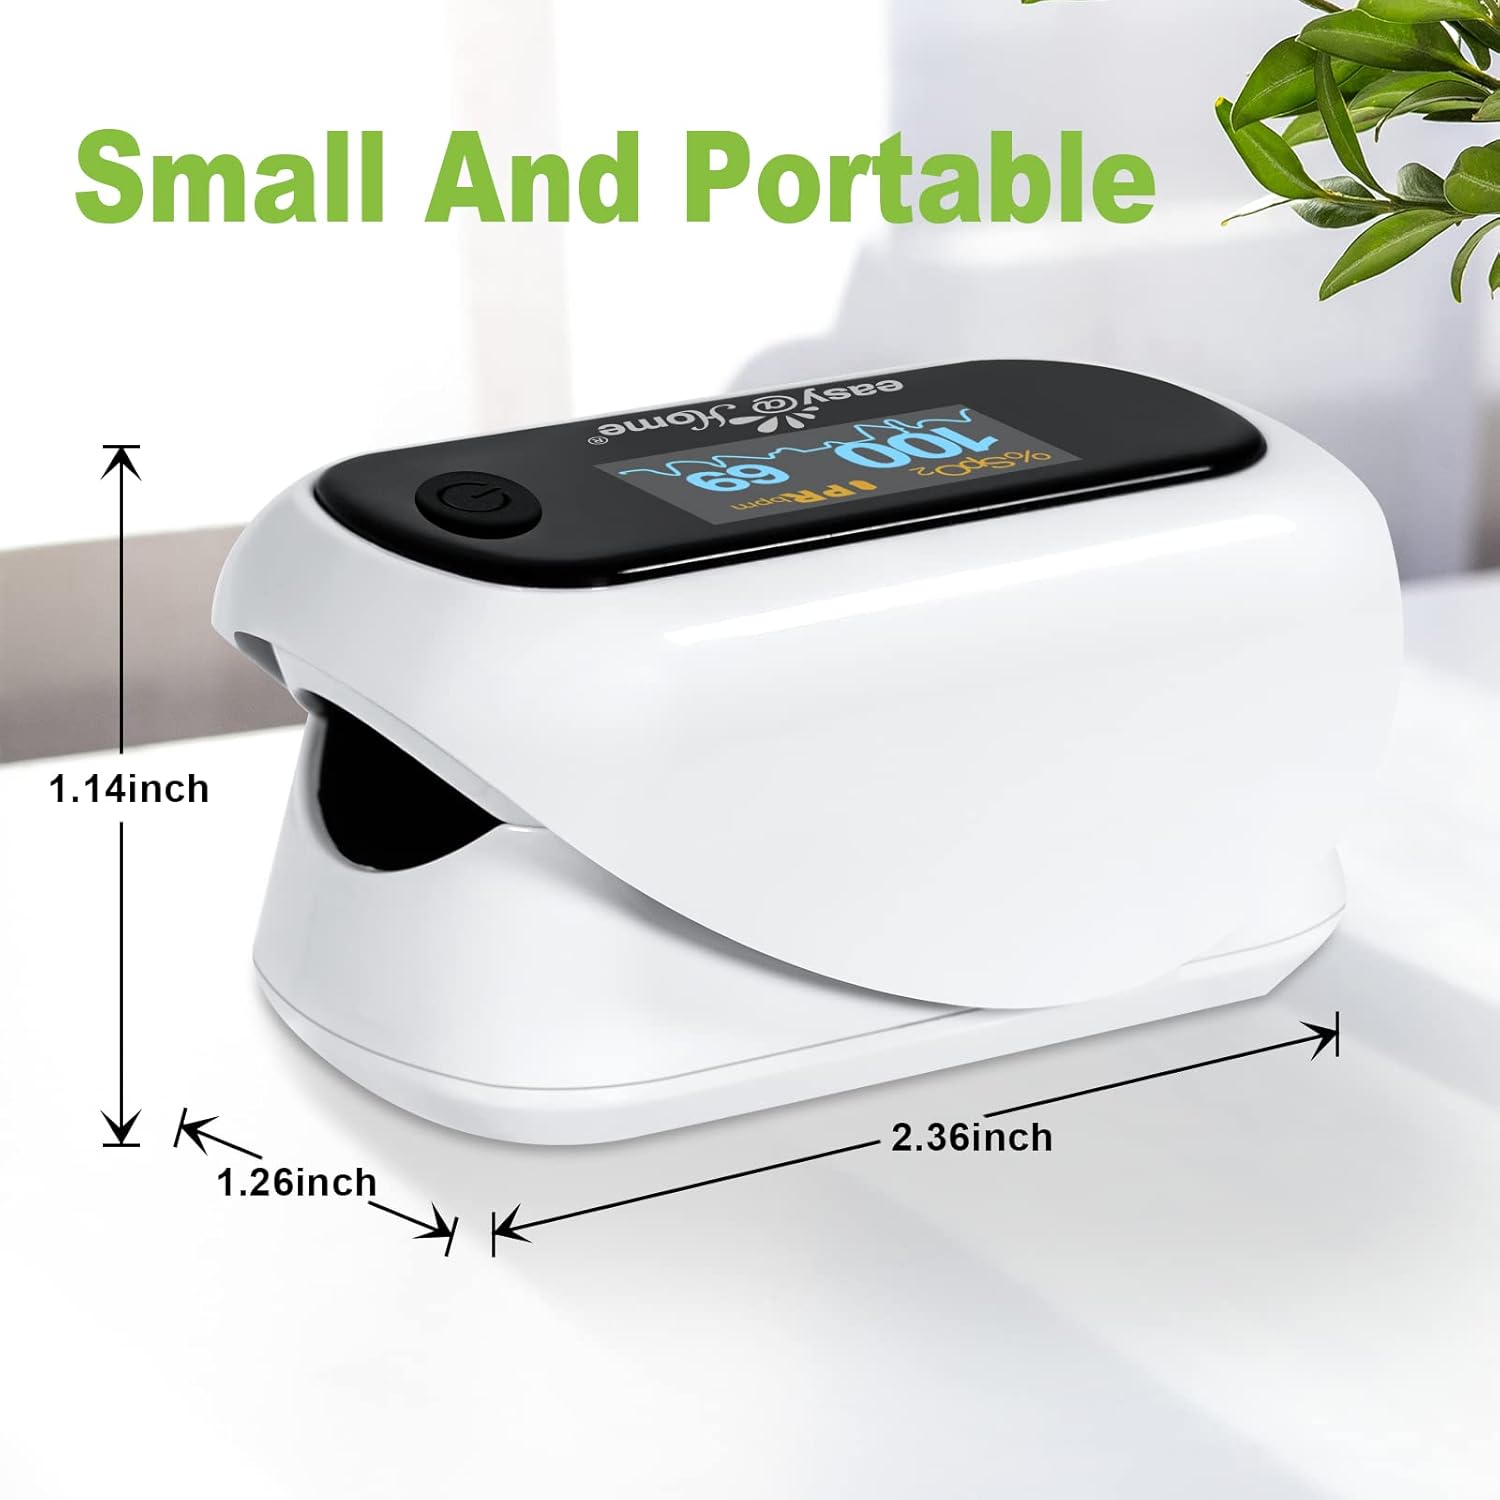
Image: The Easy@Home Fingertip Pulse Oximeter with its dimensions (1.14 inches height, 1.26 inches width, 2.36 inches length) indicated.
11. Garantie und Support
Easy@Home provides US technical telephone support for this product. For assistance, please refer to the contact information provided with your purchase or visit the official Easy@Home website. Specific warranty details may vary; please retain your proof of purchase for warranty claims.
Für weitere Informationen oder Unterstützung besuchen Sie bitte die Easy@Home Store.