Wichtige Sicherheitsvorkehrungen
When using electrical appliances, basic safety precautions should be followed to reduce the risk of burns, electric shock, fire, injury to persons, or exposure to excessive microwave energy. These include:
- Lesen Sie alle Anweisungen sorgfältig durch, bevor Sie das Gerät in Betrieb nehmen.
- Do not operate the microwave oven if it has a damaged cord or plug, if it is malfunctioning, or if it has been damaged or dropped.
- Versuchen Sie nicht, das Gerät selbst zu warten oder zu reparieren. Wenden Sie sich zur Überprüfung, Reparatur oder Justierung an qualifiziertes Servicepersonal.
- Do not use the microwave oven for purposes other than its intended use for heating food.
- Erhitzen Sie keine Flüssigkeiten oder andere Lebensmittel in verschlossenen Behältern, da diese explodieren könnten.
- Vor der Inbetriebnahme ist stets sicherzustellen, dass der Glasdrehteller und der Rollenring korrekt positioniert sind.
- Bei der Benutzung des Geräts durch oder in der Nähe von Kindern ist eine genaue Aufsicht erforderlich.
- This product is not for sale in California.
Produkt überview
The GLACER Retro Countertop Microwave Oven is a compact appliance designed for efficient food heating. It features a 0.7 cubic feet capacity and 700 watts of cooking power, suitable for various kitchen environments. The oven includes multiple power levels, pre-programmed cooking settings, an LED display, and a child lock function for safety.

Image: The GLACER Retro Countertop Microwave Oven, showcasing its compact size and retro design on a kitchen counter.
Hauptmerkmale:
- 5 Microwave Power Levels: Offers adjustable power from 100% to 20% for diverse cooking requirements.
- Removable Glass Turntable: Gewährleistet eine gleichmäßige Wärmeverteilung für gleichbleibende Kochergebnisse.
- LED-Digitalanzeige: Provides clear visibility of time, cooking settings, and remaining cooking duration.
- Auto Reminder Function: Emits a beep sound upon completion of the cooking cycle.
- Auto-cook Preset Programs: Facilitates one-touch cooking for popular food items.
- Kindersicherung: Prevents unintended operation, enhancing household safety.
- Retro-Design: Features a classic aesthetic with rounded buttons and a curved handle.
Packungsinhalt
Upon unpacking, please verify that the following items are included and in good condition:
- 1 x GLACER Retro Countertop Microwave Oven
- 1 x Glass Turntable Plate
- 1 x Rollenring
- 1 x Bedienungsanleitung (evtl. nicht in deutscher Sprache).
Aufstellen
1. Wahl eines Standorts:
- Place the oven on a flat, stable surface capable of safely supporting its weight.
- Ensure adequate ventilation by leaving at least 4 inches (10 cm) of clear space around the sides, back, and top of the oven.
- Halten Sie den Backofen von Wärmequellen, Dampf und spritzenden Flüssigkeiten fern.
- Do not obstruct the air vents located on the oven.
2. Elektrische Anforderungen:
- The microwave oven requires a standard 120V, 60Hz AC electrical outlet with a dedicated circuit.
- Avoid using extension cords or multi-outlet adapters with this appliance.
3. Turntable Installation:
- Place the roller ring securely in the circular indentation on the oven cavity floor.
- Position the glass turntable plate on top of the roller ring, ensuring it rests firmly on the center hub.

Abbildung: Innenraum view of the microwave oven, showing the glass turntable and roller ring correctly installed.
Bedienungsanleitung
Systemsteuerung überview:

Bild: Detailliert view of the control panel, highlighting the LED display, function buttons, and the Time/Weight knob.
- LED-Anzeige: Shows current time, cooking settings, and operational status.
- Micro Power Button: Used to select desired microwave power levels.
- Express Button: Initiates quick cooking at full power for preset durations.
- Clock/Defrost Button: Sets the clock or selects defrost mode (Time Defrost or Weight Defrost).
- Auto Cooking Button: Accesses pre-programmed cooking menus for common food items.
- Instant/Start Button: Starts cooking, adds 30 seconds to a cooking cycle, or initiates quick 30-second cooking.
- Pause-/Abbrechen-Schaltfläche: Stops cooking, clears current settings, or activates/deactivates the child lock.
- Zeit-/Gewichtsknopf: Adjusts cooking time, sets weight for defrosting, or navigates auto-cook menu options.
1. Einstellen der Uhr:
- Drücken Sie die Clock/Defrost Drücken Sie die Taste einmal. Die Stundenanzeige blinkt.
- Drehen Sie den Zeit-/Gewichtsknopf um die richtige Uhrzeit einzustellen.
- Drücken Clock/Defrost Und wieder. Die Minutenziffern blinken.
- Drehen Sie den Zeit-/Gewichtsknopf um die richtigen Minuten einzustellen.
- Drücken Clock/Defrost one more time to confirm the time setting.
2. Basic Microwave Cooking (Time Cook):
- Stellen Sie die Speisen in einen mikrowellengeeigneten Behälter und legen Sie ihn in den Ofen. Schließen Sie die Tür fest.
- Drehen Sie den Zeit-/Gewichtsknopf um die gewünschte Garzeit einzustellen.
- Drücken Sie die Mikroenergie button repeatedly to select a power level (P100 for 100%, P80 for 80%, P60 for 60%, P40 for 40%, P20 for 20%).
- Drücken Sofort/Start um mit dem Kochen zu beginnen.
3. Auto Cooking Programs:
The oven features 8 default auto-cook menus for convenient preparation of common foods:

Image: Visual representation of the 8 auto cooking functions available on the microwave oven.
- Drücken Sie die Automatisches Kochen button. The display will show 'A-1'.
- Drehen Sie den Zeit-/Gewichtsknopf to cycle through the menu options (A-1: Popcorn, A-2: Beverage, A-3: Potato, A-4: Meat, A-5: Reheat, A-6: Pizza, A-7: Vegetable, A-8: Fish).
- Drücken Automatisches Kochen again to confirm your selected menu.
- Drehen Sie den Zeit-/Gewichtsknopf to select the appropriate weight or quantity for the food item (if applicable for the chosen menu).
- Drücken Sofort/Start to begin the auto-cooking process.
4. Auftauen:
The oven provides both time-based and weight-based defrosting options.
Zeit Auftauen:
- Drücken Sie die Clock/Defrost Drücken Sie die Taste zweimal. Im Display erscheint „dEF2“.
- Drehen Sie den Zeit-/Gewichtsknopf die gewünschte Auftauzeit einstellen.
- Drücken Sofort/Start mit dem Auftauen beginnen.
Gewicht Abtauung:
- Drücken Sie die Clock/Defrost Drücken Sie die Taste einmal. Im Display erscheint „dEF1“.
- Drehen Sie den Zeit-/Gewichtsknopf to set the weight of the food in the specified range (refer to the oven's internal guide for weight units).
- Drücken Sofort/Start mit dem Auftauen beginnen.
5. Express Cooking:
For quick heating at 100% power:
- Drücken Sie die Äußern button repeatedly to select a quick cooking time (e.g., 30 seconds, 1 minute, 1 minute 30 seconds). The oven will start immediately.
- Alternativ drücken Sie Sofort/Start to add 30 seconds to an ongoing cooking cycle or to initiate a 30-second cooking cycle at 100% power if no other settings are entered.
6. Kindersicherung:
To prevent unsupervised operation, particularly by children, activate the child safety lock:
- Zum Aktivieren: Die Taste gedrückt halten Anhalten/Abbrechen Die Taste 3 Sekunden lang gedrückt halten. Auf dem Display erscheint eine Sperranzeige.
- Zum Deaktivieren: Halten Sie die Taste gedrückt. Anhalten/Abbrechen button for 3 seconds again. The lock indicator will disappear from the display.
Wartung und Reinigung
Regular cleaning and maintenance are essential to ensure the longevity and optimal performance of your microwave oven.
1. Cleaning the Oven Interior:
- Den Innenraum mit einem Tuch abwischen.amp cloth immediately after each use to remove food splatters and spills.
- For stubborn stains, place a bowl of water with a few slices of lemon inside and microwave for 2-3 minutes. The steam will help loosen the stains, making them easier to wipe away.
- Do not use abrasive cleaners, steel wool, or harsh scouring pads, as these can damage the interior surface.
2. Cleaning the Turntable and Roller Ring:
- Remove the glass turntable and the roller ring from the oven cavity.
- Wash them in warm, soapy water or place them in the dishwasher.
- Rinse thoroughly and ensure they are completely dry before returning them to the oven.
3. Reinigung des Außenbereichs:
- Wischen Sie die Außenflächen mit einem weichen, damp Tuch.
- Avoid allowing water to enter the ventilation openings.
- Regularly clean the oven door and door seal to ensure proper closure and efficient operation.
Fehlerbehebung
If you encounter issues with your microwave oven, refer to the following common problems and their potential solutions:
| Problem | Mögliche Ursache | Lösung |
|---|---|---|
| Der Ofen startet nicht | Power cord not firmly plugged in; Oven door not closed properly; Household fuse blown or circuit breaker tripped; Child lock activated. | Ensure the power plug is securely inserted into the outlet; Close the oven door firmly; Check your household fuse or reset the circuit breaker; Deactivate the child lock by holding the Pause/Cancel button for 3 seconds. |
| Essen wird nicht erhitzt | Oven door not closed properly; Cooking time or power level set too low. | Ensure the oven door is completely closed; Increase the cooking time or select a higher power level. |
| Plattenspieler dreht sich nicht | Glass turntable or roller ring not positioned correctly; Obstruction under the turntable. | Verify that the turntable and roller ring are properly seated on the center hub; Remove any food debris or obstructions from beneath the turntable. |
| Display shows error or erratic numbers | Vorübergehende elektronische Störung. | Unplug the oven from the power outlet for approximately 5 minutes, then plug it back in. If the problem persists, contact customer support. |
Technische Daten
| Besonderheit | Detail |
|---|---|
| Marke | GLÄSER |
| Modellnummer | B0854K55S3 |
| Kapazität | 0.7 Cubic Feet (20 L) |
| Ausgangsleistung | 700 Watt |
| Nennvolumentage | 120 V |
| Frequenz | 60 Hz |
| Anzahl der Leistungsstufen | 5 |
| Material | Steel, Glass (Inner Material: Stainless Steel) |
| Produktabmessungen (T x B x H) | 14" x 18" x 10" |
| Gewicht | 23 Pfund |
| Installationstyp | Arbeitsplatte |
| Steuerungstyp | Buttons, Knob |
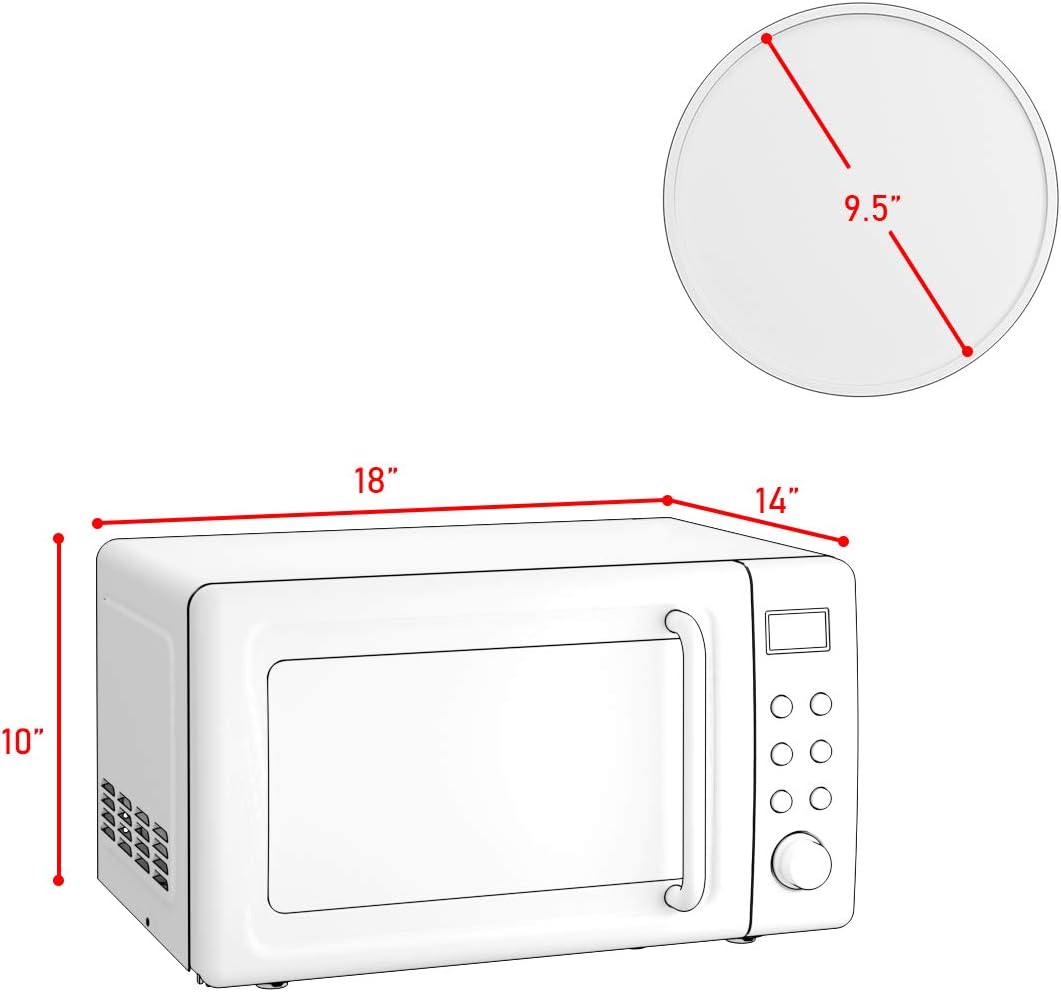
Image: Dimensional diagram of the microwave oven, indicating its length, width, and height for placement reference.
Garantie und Support
Garantieinformationen:
This GLACER microwave oven is covered by a 6 Monate Garantie from the original date of purchase. This warranty specifically covers manufacturing defects under normal household use. It does not extend to damage resulting from misuse, accidental damage, unauthorized alterations, or repairs performed by non-authorized personnel.
Kundendienst:
For technical assistance, to inquire about warranty claims, or for any general questions regarding your GLACER microwave oven, please contact GLACER customer support. Refer to your purchase documentation or the official GLACER webDie aktuellsten Kontaktinformationen finden Sie auf dieser Webseite.
When contacting customer support, please have your product model number (B0854K55S3) and the date of purchase readily available to expedite service.