1. Einführung und Endeview
The ESX INFOTAINMENT VN1015-MA-DAB-4G is an advanced Android-based naviceiver designed for vehicle integration, offering a comprehensive multimedia and navigation experience. This unit features a 10.1-inch anti-glare multi-angle touchscreen, Android operating system, 4G/LTE connectivity, DAB+ digital radio, and Google Maps navigation. It supports Bluetooth hands-free calling and audio streaming, USB and MicroSD media playback, and includes inputs for rearview cameras and auxiliary devices.
Zu den Hauptmerkmalen gehören:
- 10.1-inch high-resolution, anti-glare multi-angle touchscreen.
- Android Operating System for versatile app usage.
- Integrated 4G/LTE dongle for mobile internet (requires optional SIM card).
- DAB+ digital radio reception with station logos and AM/FM radio with RDS.
- Google Maps navigation (online and offline capabilities).
- Bluetooth hands-free system with audio streaming.
- Multiple connectivity options: 2x USB ports, 1x MicroSD slot, 1x camera input, 2x video outputs, 1x AUX/video input, 1x AUX/audio input.
- Support for steering wheel controls (optional adapter may be required).
2. Einrichtung und Installation
Proper installation is crucial for the optimal performance of your ESX VN1015-MA-DAB-4G naviceiver. It is highly recommended that installation be performed by a qualified professional to ensure correct wiring and vehicle compatibility.
2.1. Komponentenidentifikation
Familiarize yourself with the various ports and connections on the rear of the unit before installation.
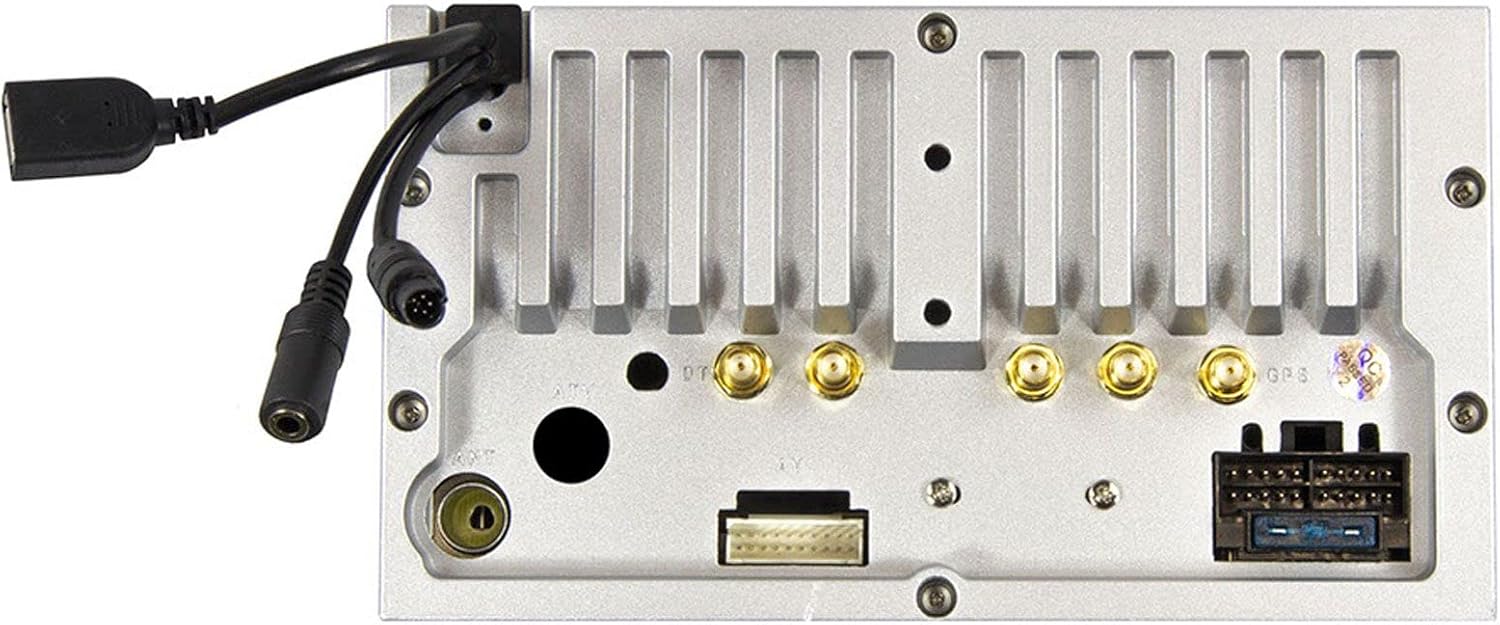
Abbildung 2.1: Hinteren view of the ESX VN1015-MA-DAB-4G unit, illustrating the power harness, antenna inputs, USB ports, and auxiliary connections.
2.2. Kabelverbindungen
- Stromversorgung: Connect the main power harness to your vehicle's electrical system, ensuring correct positive, negative, and accessory (ACC) connections.
- Lautsprecherausgänge: Connect your vehicle's speakers to the corresponding outputs on the naviceiver.
- Antennenanschlüsse: Connect the FM/AM antenna. For DAB+ digital radio, connect the included DAB+ antenna to the designated port.
- GPS-Antenne: Schließen Sie die GPS-Antenne an und montieren Sie sie an einem Ort mit freiem Blick view des Himmels für optimalen Signalempfang.
- USB-Anschlüsse: Connect external USB devices for media playback or smartphone connectivity.
- Mikrofon: Connect the external microphone (VNA-MIC-AND, optional) for improved hands-free call quality.
- Hinterenview Kamera: Schließen Sie eine Rückseite anview camera to the dedicated camera input. Ensure the reverse trigger wire is correctly connected for automatic display switching.
- Videoausgänge: Utilize the two video outputs for connecting external monitors.
- AUX-Eingänge: Connect external audio/video sources to the AUX/video and AUX/audio inputs.
- 4G/LTE Dongle: If using mobile internet via 4G/LTE, insert a compatible SIM card into the optional 4G/LTE dongle and connect it to a USB port.
- Lenkradsteuerung: If your vehicle supports steering wheel controls, an optional adapter may be required to integrate this functionality.
2.3. Erste Inbetriebnahme
After all connections are secure, turn on your vehicle's ignition. The naviceiver should power on. Follow any on-screen prompts for initial setup, such as language selection and time zone.
3. Bedienungsanleitung
This section details the primary functions and operations of your ESX VN1015-MA-DAB-4G naviceiver.
3.1. Grundlegende Bedienelemente und Benutzeroberfläche
The unit features a responsive touchscreen and physical buttons for common functions.

Abbildung 3.1: The main screen showing the radio interface with frequency display and control buttons.
- Netzschalter: Press and hold to turn the unit on/off. A short press may mute audio or put the unit into standby.
- Lautstärkeregelung: Audioausgangspegel anpassen.
- Home "Button: Kehrt zum Android-Startbildschirm zurück.
- Zurück-Schaltfläche: Navigates back one step in menus or applications.
- Kamerataste: Direct access to the camera input display (e.g., rearview Kamera).
3.2. Android-Betriebssystem
The naviceiver runs on an Android operating system, allowing access to various applications and customization options.

Abbildung 3.2: The applications screen, displaying various pre-installed and user-installed Android apps.
- App-Launcher: Access all installed applications from the app drawer.
- Widgets: Customize your home screen with widgets for quick access to information or functions.
- Einstellungen: Adjust system settings, network connections, display, audio, and more.
- Internetverbindung: Connect to the internet via a WiFi hotspot (from a compatible smartphone) or by inserting a SIM card into the 4G/LTE dongle.
3.3. Radio Functions (AM/FM/DAB+)
The unit supports both analog and digital radio broadcasts.
- Band Auswahl: Switch between AM, FM, and DAB+ bands.
- Stimmung: Manually tune or use the auto-scan function to find available stations.
- Voreinstellungen: Speichern Sie Ihre Lieblingssender für den Schnellzugriff.
- RDS (FM): Radio Data System displays station information (e.g., station name, song title).
- DAB+ Funktionen: Enjoy higher quality digital audio and view station logos where available.
3.4. Bluetooth-Konnektivität
Pair your smartphone for hands-free communication and audio streaming.
- Paarung: Enable Bluetooth on your smartphone and search for the naviceiver. Select the unit and confirm the pairing code.
- Freisprechen: Make and receive calls directly from the naviceiver screen.
- Audio-Streaming: Play music from your smartphone wirelessly through the naviceiver.
3.5. Navigation (Google Maps)
Utilize Google Maps for turn-by-turn navigation.

Abbildung 3.3: The navigation interface showing a map with a selected destination.
- Online-Navigation: Requires an active internet connection (WiFi hotspot or 4G/LTE).
- Offline-Karten: Download maps for specific regions to use navigation without an internet connection.
- Einreise ins Ziel: Enter addresses or points of interest using the touchscreen keyboard.
3.6. Medienwiedergabe
Audio und Video abspielen files aus verschiedenen Quellen.
- USB: Connect USB drives containing media files.
- MicroSD: Insert a MicroSD card into the dedicated slot for media or navigation data.
- Unterstützte Formate: The unit supports a wide range of audio and video formats. Refer to the system settings for a complete list.
3.7. Kameraeingang
The naviceiver automatically displays the rearview camera feed when the vehicle is in reverse, or manually via the camera button.

Abbildung 3.4: Hinterenview Kameraanzeige mit dynamischen Parkleitlinien.
- Automatische Aktivierung: When connected correctly, the rearview camera image appears automatically when shifting into reverse.
- Parkrichtlinien: Adjustable parking lines assist with maneuvering.
4. Wartung
Regular maintenance ensures the longevity and optimal performance of your naviceiver.
- Bildschirmreinigung: Verwenden Sie ein weiches, fusselfreies Tuch, um den Touchscreen vorsichtig abzuwischen. Bei hartnäckigen Flecken etwas nachhelfen.ampReinigen Sie das Tuch mit Wasser oder einem für Bildschirme geeigneten Reiniger. Vermeiden Sie aggressive Chemikalien oder Scheuermittel.
- Software-Updates: Prüfen Sie regelmäßig über die Systemeinstellungen oder die Website des Herstellers, ob Software-Updates verfügbar sind. webWebsite. Aktualisierungen können die Leistung verbessern, Funktionen hinzufügen und Fehler beheben.
- Allgemeine Pflege: Setzen Sie das Gerät keinen extremen Temperaturen, direkter Sonneneinstrahlung über längere Zeiträume oder übermäßiger Feuchtigkeit aus. Stellen Sie sicher, dass alle Verbindungen fest sitzen.
5. Fehlerbehebung
This section addresses common issues you might encounter with your ESX VN1015-MA-DAB-4G naviceiver.
| Problem | Mögliche Ursache | Lösung |
|---|---|---|
| Gerät lässt sich nicht einschalten. | Keine Stromversorgung; Sicherung durchgebrannt; Falsche Verkabelung. | Check vehicle's fuse box and the unit's power connections. Ensure ACC wire is receiving power. |
| Kein Ton. | Volume too low; Mute activated; Incorrect speaker wiring; Audio source issue. | Increase volume. Check if mute is active. Verify speaker connections. Try a different audio source. |
| GPS signal loss or inaccurate navigation. | GPS-Antenne blockiert oder nicht angeschlossen; veraltete Karten. | Stellen Sie sicher, dass die GPS-Antenne freie Sicht hat. view des Himmels und ist sicher verbunden. Aktualisieren Sie die Karten gegebenenfalls. |
| Probleme mit der Bluetooth-Verbindung. | Gerät nicht im Kopplungsmodus; Störungen; Gerät nicht auffindbar. | Ensure both devices are in pairing mode. Restart both devices. Check Bluetooth settings on the naviceiver. |
| Touchscreen reagiert nicht. | System freeze; Software error. | Perform a soft reset (refer to the unit's specific reset procedure, often a small reset button). If persistent, a factory reset might be needed (data loss may occur). |
| DAB+ radio not receiving stations. | DAB+ antenna not connected or faulty; Poor signal area. | Check DAB+ antenna connection. Ensure the antenna is correctly installed. Try rescanning for stations in a different location. |
If you encounter issues not listed here or if the suggested solutions do not resolve the problem, please contact ESX customer support or your authorized dealer.
6. Spezifikationen
Below are the technical specifications for the ESX VN1015-MA-DAB-4G Naviceiver:
| Besonderheit | Detail |
|---|---|
| Marke | ESX |
| Modell | VN1015-MA-DAB-4G |
| Bildschirmgröße | 10.1 Zoll (25.6 cm) |
| Anzeigetyp | High-resolution, anti-glare multi-angle touchscreen |
| Betriebssystem | Android |
| RAM | 4 GB |
| Flash-Speicher | 64 GB |
| Konnektivität | Bluetooth, USB, 4G/LTE (via dongle), WiFi (via hotspot) |
| Radio-Tuner | AM/FM with RDS, DAB+ Digital Radio |
| Navigation | Google Maps (online/offline) |
| Eingänge | 1x Camera Input, 1x AUX/Video Input, 1x AUX/Audio Input, 2x USB Ports, 1x MicroSD Slot |
| Ausgaben | 2x Video Outputs, Pre-amplified outputs (Front/Rear/Subwoofer) |
| Kontrollmethode | Touch-Screen |
| Kompatible Geräte | Smartphone |
7. Garantie und Support
Your ESX VN1015-MA-DAB-4G naviceiver comes with a Certificate of Authenticity. For specific warranty terms and conditions, please refer to the documentation provided with your purchase or contact your authorized ESX dealer.
For technical support, troubleshooting assistance beyond this manual, or inquiries regarding parts and service, please contact your point of purchase or visit the official ESX webWebsite mit Kontaktinformationen zum Kundenservice.


