Einführung
Vielen Dank für Ihren Einkauf.asing the Mesqool Projection Alarm Clock. This manual provides comprehensive instructions for setting up, operating, and maintaining your new alarm clock. Please read this manual carefully before use to ensure proper function and to maximize your experience with the product.
Hauptmerkmale
- 180° Adjustable Projector: Projects ultra-clear time onto a wall or ceiling with a 1.6-9.8ft (0.5-3m) optimum projection distance. Features a focus ring for clarity adjustment and a projection flip function.
- Doppelwecker mit Schlummerfunktion: Set two independent alarms with a large, easy-to-press snooze button for an extra 9 minutes of sleep.
- Einstellbare Alarmlautstärke: Alarm volume (Level 1-5) can be adjusted from 76dB to 106dB, with a progressive increase to gently wake you.
- 7.5'' Large LED Display: Super-clear time display visible across the room, with 5 levels of brightness dimmer to protect your eyes.
- USB Ladeanschluss: Built-in 5V/1.0A USB output interface for convenient charging of mobile devices.
- Batterie-Backup: Requires 2 AAA batteries (not included) to retain time and alarm settings during power outages, ensuring alarms still trigger.
- 12/24-Stunden-Zeitformat & Sommerzeit: Easily switch between 12-hour and 24-hour time formats and activate Daylight Saving Time (DST) with a dedicated button.
- Easy-to-Set: Simple and intuitive buttons for straightforward setup and operation.
Packungsinhalt
- Mesqool Projektionswecker
- 5V/2A Netzteil
- Bedienungsanleitung
Produkt überview
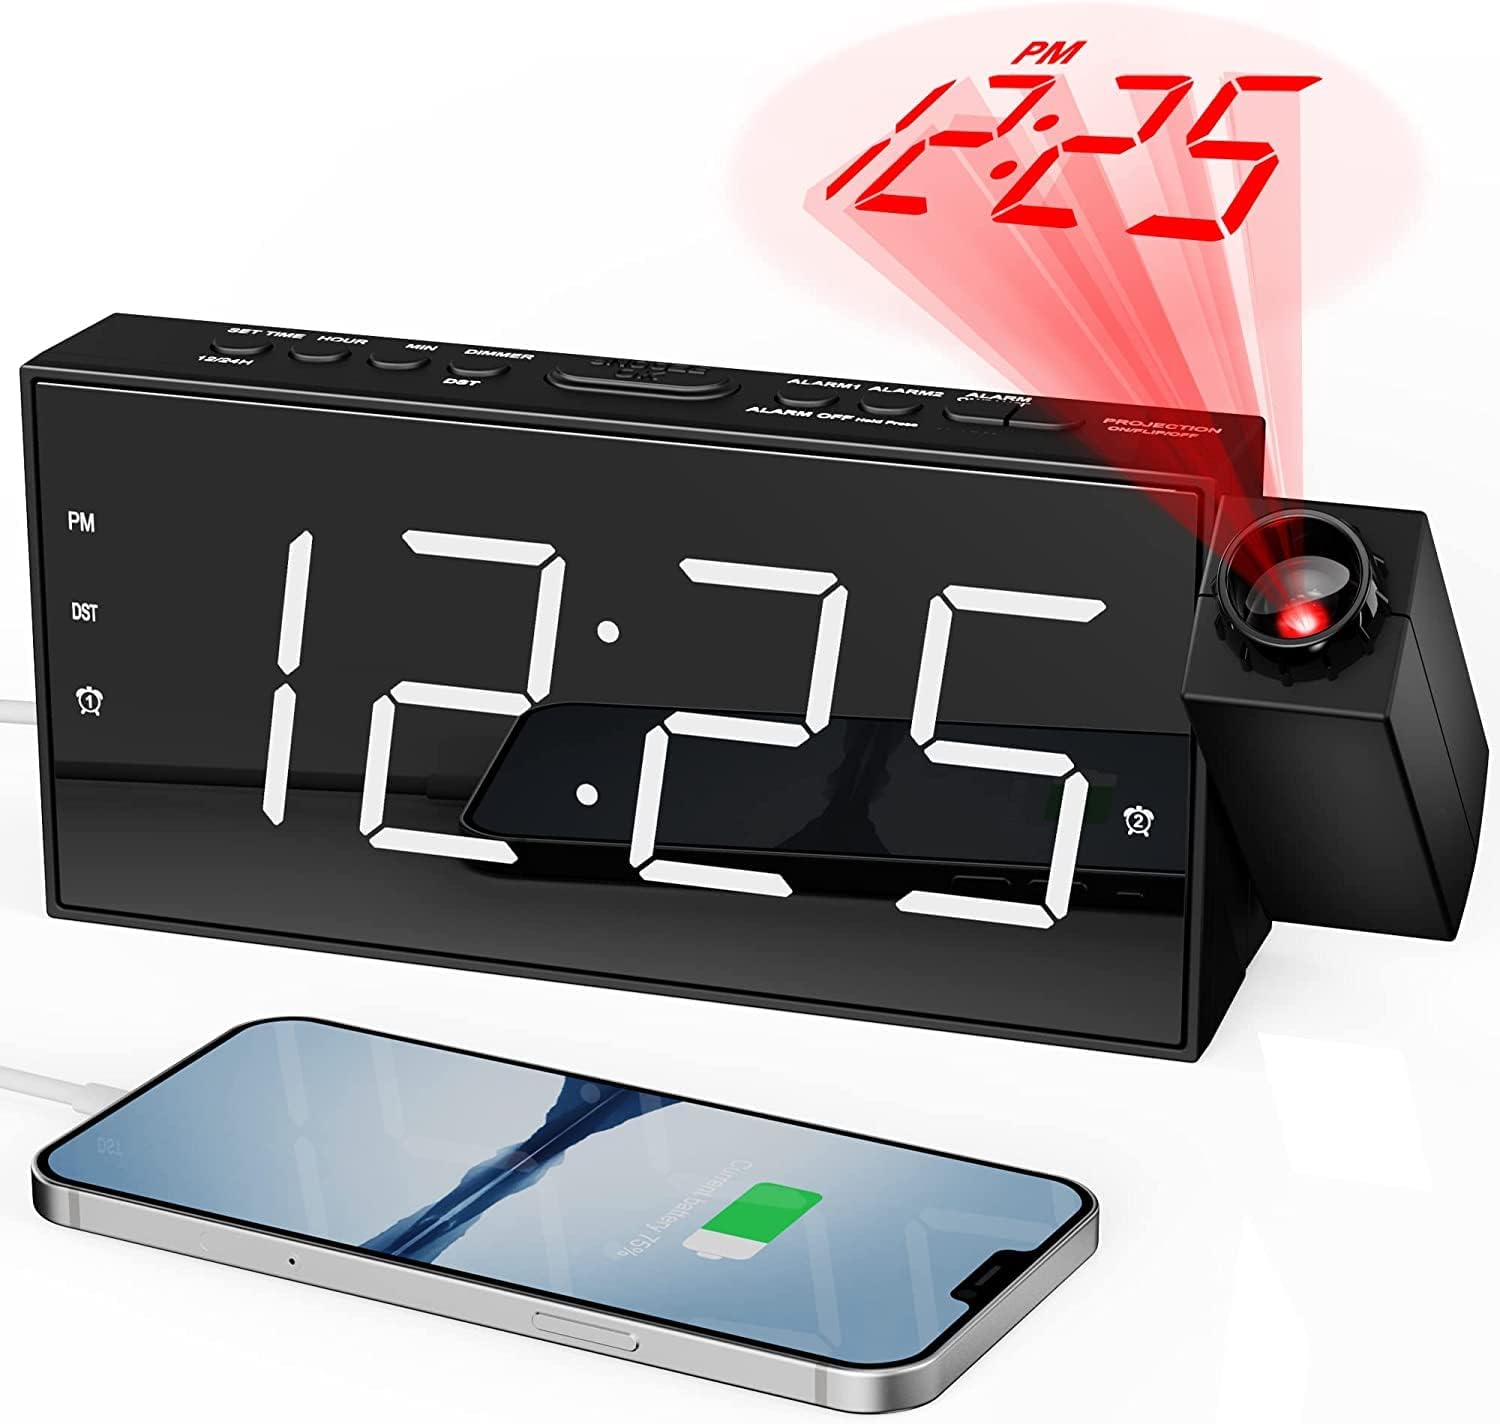
Front view of the Mesqool Projection Alarm Clock, showing the large LED display, the rotatable projector, and a phone connected to the USB charging port.
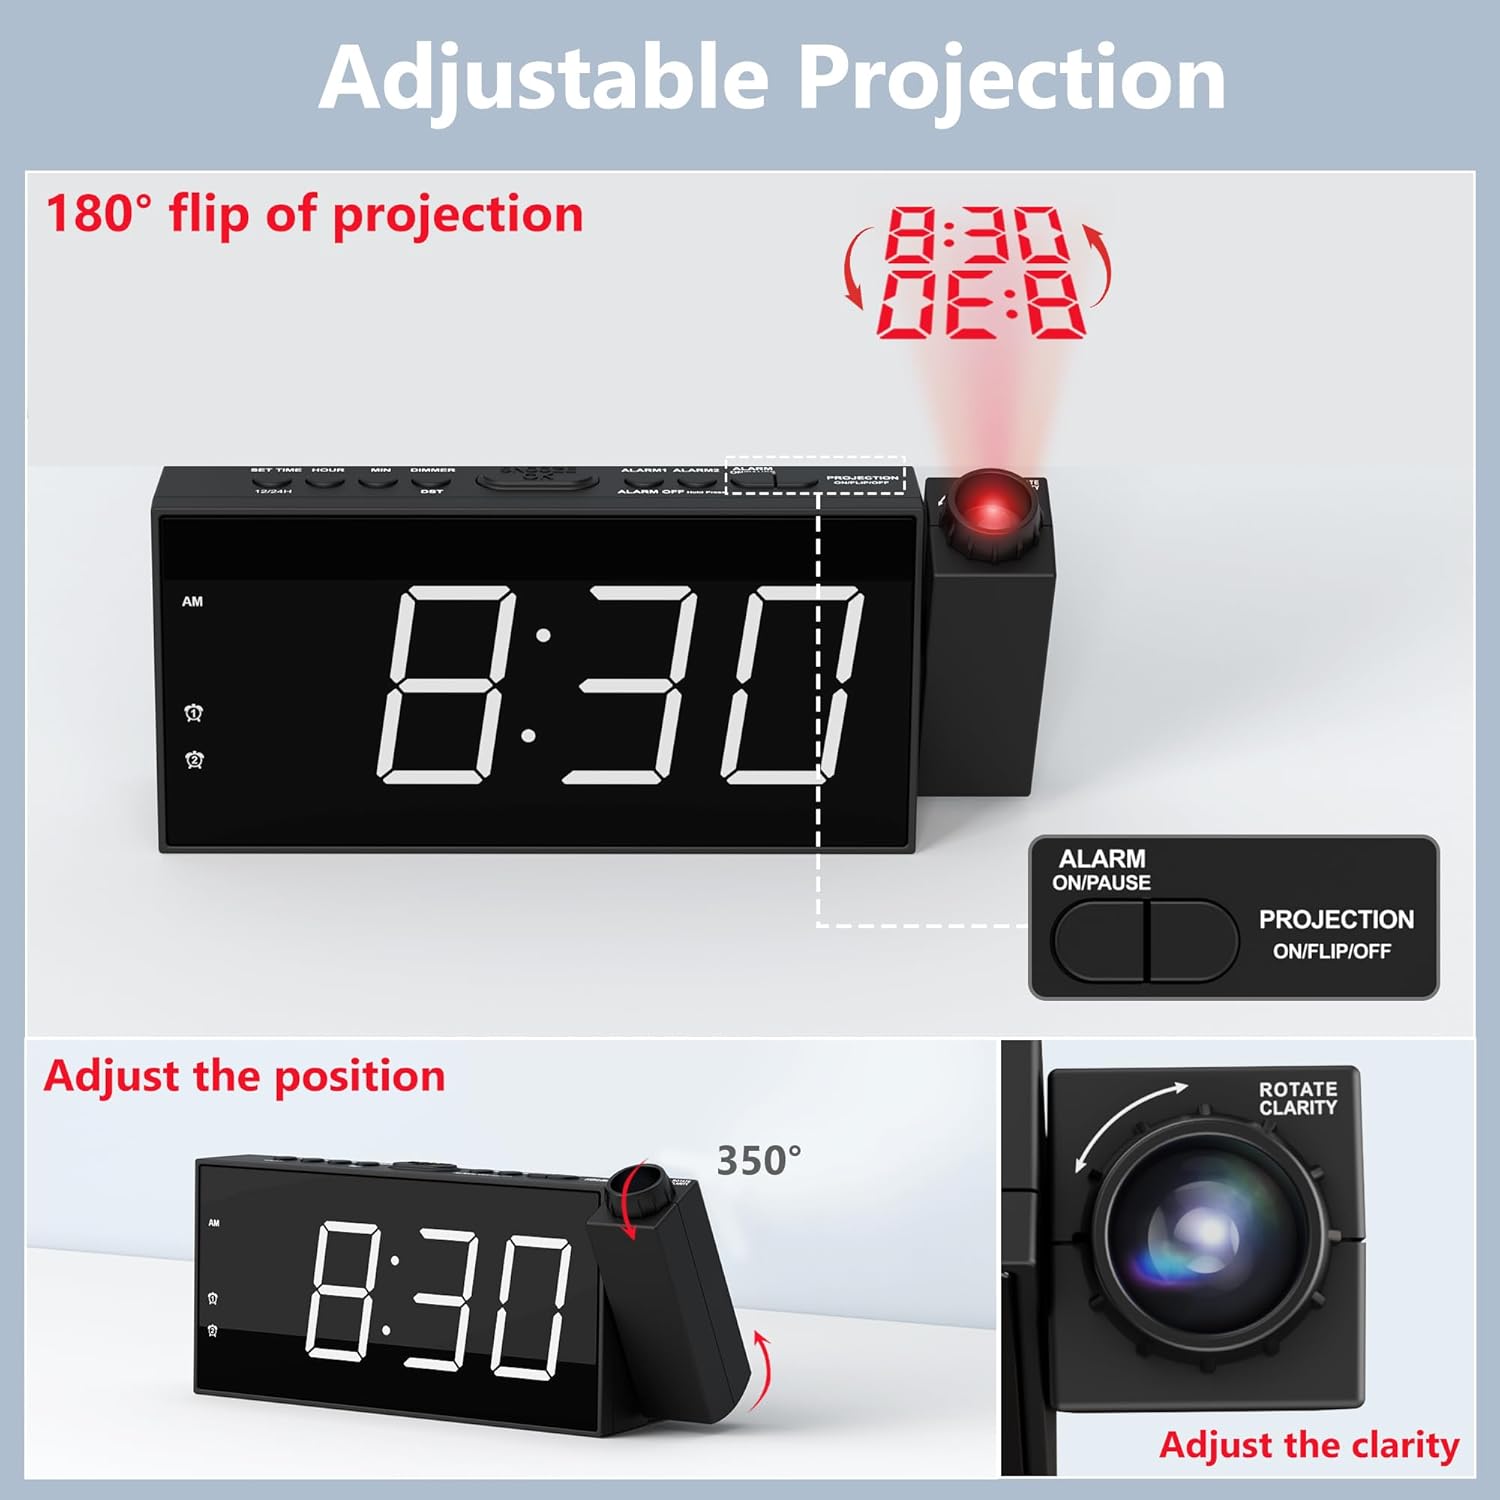
Detaillierte view of the adjustable projection feature, illustrating the 180° rotation, projection flip, and the focus ring for clarity adjustment.

Illustration of the 7.5-inch LED display with its 5-level brightness dimmer and options for 12-hour, 24-hour, and DST time formats.

Depiction of the dual alarm functionality, the convenient snooze button, and the 5 adjustable alarm volume levels (76dB-106dB).

Hinteren view of the clock highlighting the battery backup compartment and the USB charging port for external devices.

A visual guide demonstrating the four steps to operate and adjust the projection feature, including rotation, flipping, focusing, and brightness adjustment.
Aufstellen
1. Stromanschluss
Connect the provided 5V/2A power adapter to the DC IN port on the back of the alarm clock and plug the adapter into a standard electrical outlet (100-240V). The clock display will light up.
2. Batterie-Backup-Installation
Open the battery compartment on the back of the clock. Insert 2 AAA batteries (not included) according to the polarity markings (+/-). These batteries serve as a backup to retain time and alarm settings during a power outage. The clock requires AC power for full functionality, including the display and projection.
3. Erstzeiteinstellung
- Drücken und halten Sie die Taste „ZEIT EINSTELLEN“ oben auf der Uhr. Die Stundenziffern beginnen zu blinken.
- Verwenden Sie die Tasten "+" oder "-", um die Stunde einzustellen.
- Press "SET TIME" again to confirm the hour and move to minute setting. The minute digits will flash.
- Verwenden Sie die Tasten "+" oder "-", um die Minuten einzustellen.
- Press "SET TIME" one more time to save the time setting and exit.
4. 12/24H Time Format
To switch between 12-hour and 24-hour time formats, long press the "12/24H" button on the top of the clock. In 12-hour format, "AM" or "PM" indicators will be displayed.
5. Sommerzeit (DST)
To activate or deactivate the Daylight Saving Time (DST) function, simply press the "DST" button on the top of the clock. The time will adjust by one hour forward or backward accordingly.
Bedienungsanleitung
1. Einstellen von Alarmen (Alarm 1 & Alarm 2)
- Press and hold the "ALARM 1" or "ALARM 2" button (depending on which alarm you want to set). The hour digits for that alarm will flash.
- Verwenden Sie die Tasten "+" oder "-", um die Alarmzeit einzustellen.
- Press the respective alarm button again to confirm the hour and move to minute setting. The minute digits will flash.
- Verwenden Sie die Tasten "+" oder "-", um die Alarmminuten einzustellen.
- Press the alarm button one more time to save the alarm setting. The alarm icon will appear on the display, indicating the alarm is active.
- To turn an alarm ON or OFF, short press the corresponding "ALARM 1" or "ALARM 2" button. The alarm icon will appear or disappear.
2. Einstellen der Alarmlautstärke
When an alarm is sounding, or during alarm setup, use the "V+" or "V-" buttons on the side of the clock to adjust the alarm volume from Level 1 (76dB) to Level 5 (106dB). The alarm sound will progressively increase in volume when it triggers.
3. Die Schlummerfunktion verwenden
When the alarm sounds, press the large "SNOOZE/OK" button on the top of the clock to temporarily silence the alarm for 9 minutes. The alarm will sound again after 9 minutes. To turn off the alarm completely, press any other button (e.g., ALARM ON/PAUSE) or let it ring for its full duration.
4. Projektionsfunktion
- Projektion aktivieren/deaktivieren: Press the "PROJECTION ON/FLIP/OFF" button on the top of the clock to turn the projection ON or OFF.
- Projektionswinkel anpassen: Manually rotate the projector lens unit up to 180° to direct the time display onto your desired surface (wall or ceiling).
- Flipping Projection: If the projected time appears upside down, short press the "PROJECTION ON/FLIP/OFF" button to flip the orientation of the projected image.
- Adjusting Projection Clarity (Focus): Rotate the focus ring around the projector lens to achieve a clear and sharp projected image.
- Anpassen der Projektionshelligkeit: Press the "PROJECTION DIMMER" button repeatedly to cycle through 5 levels of projection brightness.
5. Helligkeit des Displays
Press the "DIMMER" button repeatedly to cycle through 5 levels of LED display brightness, allowing you to adjust it to your comfort level, especially at night.
6. USB-Ladeanschluss
The USB charging port (5V/1.0A output) on the back of the clock can be used to charge your mobile devices, such as smartphones and tablets. Simply connect your device's USB charging cable to this port.
Wartung
Reinigung
To clean the clock, gently wipe the surface with a soft, dry cloth. Do not use abrasive cleaners, waxes, or solvents as they may damage the finish. Keep the projector lens clean for optimal clarity.
Batteriewechsel
Wenn die Uhr während eines Stromausfalls die Zeit- oder Alarmeinstellungen verlierttage, it may be time to replace the AAA backup batteries. Ensure the clock is connected to AC power before replacing batteries to avoid losing current settings.
Fehlerbehebung
| Problem | Mögliche Ursache | Lösung |
|---|---|---|
| Clock display is off / No power. | Netzteil nicht angeschlossen oder defekt. | Ensure the power adapter is securely plugged into the clock and a working electrical outlet. Check the outlet with another device. |
| Der Alarm ertönt nicht. | Alarm nicht aktiviert oder falsch eingestellt. | Verify that the alarm is set and activated (alarm icon visible). Check the alarm time. Ensure volume is not set to minimum. |
| Die prognostizierte Zeitangabe ist unscharf oder unklar. | Der Projektionsfokus muss angepasst werden. | Rotate the focus ring around the projector lens until the image is clear. Ensure projection distance is within 1.6-9.8ft. |
| Die geplante Zeitangabe steht auf dem Kopf. | Projection orientation needs flipping. | Short press the "PROJECTION ON/FLIP/OFF" button to flip the projected image. |
| Die Uhr verliert Zeit bei Stromausfalltage. | Die Notstrombatterien sind defekt oder nicht installiert. | Legen Sie 2 neue AAA-Batterien ein oder ersetzen Sie die vorhandenen. |
| Der USB-Ladeanschluss funktioniert nicht. | Gerät nicht kompatibel oder Kabel defekt. | Stellen Sie sicher, dass die Uhr an das Stromnetz angeschlossen ist. Versuchen Sie es mit einem anderen USB-Kabel oder Gerät. |
Technische Daten
| Marke | Mesqool |
| Modellnummer | CR1001F |
| Anzeigetyp | Digitale LED |
| Stromquelle | Kabelgebundenes Elektrogerät (Wechselstrom 100-240 V) |
| Batterie-Backup | 2 x AAA-Batterien (nicht im Lieferumfang enthalten) |
| USB-Ausgang | 5 V/1.0 A |
| Projektionsabstand | 1.6 - 9.8 Fuß (0.5 - 3 m) |
| Alarm-Lautstärkebereich | 76 dB - 106 dB (5 Stufen) |
| Technische Daten | 7.99 Zoll B x 3.58 Zoll H |
| Artikelgewicht | 8.5 Unzen |
| Material | Acrylnitril-Butadien-Styrol (Kunststoff) |
Garantie und Support
Garantieinformationen
Mesqool provides an 18-month warranty for this product. This warranty covers manufacturing defects and issues arising from normal use. Please retain your proof of purchase for warranty claims.
Kundenservice
For any questions, concerns, or technical assistance regarding your Mesqool Projection Alarm Clock, please contact our customer support team. You can find our support email address in this User Manual or on the product packaging. We are committed to providing prompt and helpful assistance.


