1. Wichtige Sicherheitshinweise
Lesen Sie alle Sicherheitshinweise, Anweisungen, Abbildungen und technischen Daten, die diesem Elektrowerkzeug beiliegen. Die Nichtbeachtung der unten aufgeführten Anweisungen kann zu Stromschlag, Brand und/oder schweren Verletzungen führen.
Allgemeine Sicherheitshinweise für Elektrowerkzeuge
- Sicherheit am Arbeitsplatz: Keep the work area clean and well-lit. Cluttered or dark areas invite accidents. Do not operate power tools in explosive atmospheres, such as in the presence of flammable liquids, gases, or dust. Power tools create sparks which may ignite the dust or fumes. Keep children and bystanders away while operating a power tool. Distractions can cause you to lose control.
- Elektrische Sicherheit: Power tool plugs must match the outlet. Never modify the plug in any way. Do not use any adapter plugs with earthed (grounded) power tools. Unmodified plugs and matching outlets will reduce risk of electric shock. Avoid body contact with earthed or grounded surfaces, such as pipes, radiators, ranges, and refrigerators. There is an increased risk of electric shock if your body is earthed or grounded. Do not expose power tools to rain or wet conditions. Water entering a power tool will increase the risk of electric shock. Do not abuse the cord. Never use the cord for carrying, pulling, or unplugging the power tool. Keep cord away from heat, oil, sharp edges, or moving parts. Damaged or entangled cords increase the risk of electric shock. When operating a power tool outdoors, use an extension cord suitable for outdoor use. Use of a cord suitable for outdoor use reduces the risk of electric shock. If operating a power tool in a damp Wenn ein Stromausfall unvermeidlich ist, verwenden Sie eine Stromversorgung mit Fehlerstromschutzschalter (RCD). Die Verwendung eines RCD verringert das Risiko eines Stromschlags.
- Persönliche Sicherheit: Stay alert, watch what you are doing, and use common sense when operating a power tool. Do not use a power tool while you are tired or under the influence of drugs, alcohol, or medication. A moment of inattention while operating power tools may result in serious personal injury. Use personal protective equipment. Always wear eye protection. Protective equipment such as a dust mask, non-skid safety shoes, hard hat, or hearing protection used for appropriate conditions will reduce personal injuries. Prevent unintentional starting. Ensure the switch is in the off-position before connecting to power source and/or battery pack, picking up or carrying the tool. Carrying power tools with your finger on the switch or energizing power tools that have the switch on invites accidents. Remove any adjusting key or wrench before turning the power tool on. A wrench or a key left attached to a rotating part of the power tool may result in personal injury. Do not overreach. Keep proper footing and balance at all times. This enables better control of the power tool in unexpected situations. Dress properly. Do not wear loose clothing or jewelry. Keep your hair and clothing away from moving parts. Loose clothes, jewelry, or long hair can be caught in moving parts. If devices are provided for the connection of dust extraction and collection facilities, ensure these are connected and properly used. Use of dust collection can reduce dust-related hazards. Do not let familiarity gained from frequent use of tools allow you to become complacent and ignore tool safety principles. A careless action can cause severe injury within a fraction of a second.
- Verwendung und Pflege von Elektrowerkzeugen: Do not force the power tool. Use the correct power tool for your application. The correct power tool will do the job better and safer at the rate for which it was designed. Do not use the power tool if the switch does not turn it on and off. Any power tool that cannot be controlled with the switch is dangerous and must be repaired. Disconnect the plug from the power source and/or remove the battery pack, if detachable, from the power tool before making any adjustments, changing accessories, or storing power tools. Such preventative safety measures reduce the risk of starting the power tool accidentally. Store idle power tools out of the reach of children and do not allow persons unfamiliar with the power tool or these instructions to operate the power tool. Power tools are dangerous in the hands of untrained users. Maintain power tools and accessories. Check for misalignment or binding of moving parts, breakage of parts, and any other condition that may affect the power tool’s operation. If damaged, have the power tool repaired before use. Many accidents are caused by poorly maintained power tools. Keep cutting tools sharp and clean. Properly maintained cutting tools with sharp cutting edges are less likely to bind and are easier to control. Use the power tool, accessories, and tool bits, etc. in accordance with these instructions, taking into account the working conditions and the work to be performed. Use of the power tool for operations different from those intended could result in a hazardous situation. Keep handles and grasping surfaces dry, clean, and free from oil and grease. Slippery handles and grasping surfaces do not allow for safe handling and control of the tool in unexpected situations.
- Verwendung und Pflege des Akkuwerkzeugs: Recharge only with the charger specified by the manufacturer. A charger that is suitable for one type of battery pack may create a risk of fire when used with another battery pack. Use power tools only with specifically designated battery packs. Use of any other battery packs may create a risk of injury and fire. When battery pack is not in use, keep it away from other metal objects, like paper clips, coins, keys, nails, screws, or other small metal objects, that can make a connection from one terminal to another. Shorting the battery terminals together may cause burns or a fire. Under abusive conditions, liquid may be ejected from the battery; avoid contact. If contact accidentally occurs, flush with water. If liquid contacts eyes, additionally seek medical help. Liquid ejected from the battery may cause irritation or burns. Do not use a battery pack or tool that is damaged or modified. Damaged or modified batteries may exhibit unpredictable behavior resulting in fire, explosion, or risk of injury. Do not expose a battery pack or tool to fire or excessive temperature. Exposure to fire or temperature above 130 °C (265 °F) may cause explosion. Follow all charging instructions and do not charge the battery pack or tool outside the temperature range specified in the instructions. Charging improperly or at temperatures outside the specified range may damage the battery and increase the risk of fire.
- Service: Lassen Sie Ihr Elektrowerkzeug von einer qualifizierten Fachkraft warten und verwenden Sie nur identische Ersatzteile. Dadurch wird sichergestellt, dass die Sicherheit des Elektrowerkzeugs erhalten bleibt. Reparieren Sie niemals beschädigte Akkupacks. Die Wartung von Batteriepacks sollte nur vom Hersteller oder autorisierten Dienstleistern durchgeführt werden.
2. Packungsinhalt
Packen Sie alle Artikel sorgfältig aus und vergewissern Sie sich, dass Sie Folgendes erhalten haben:
- 1 x WORKPRO 20V Cordless Drill Driver
- 1 x WORKPRO 20V Cordless Impact Driver
- 2 x 20 V 2.0 Ah Lithium-Ionen-Akkus
- 1 x Fast Charger (2.4A)
- 10 x Schraubendreher-Bits
- 6 x Spiralbohrer
- 2 x Belt Hooks
- 1 x Bedienungsanleitung (evtl. nicht in deutscher Sprache).

Image: The complete WORKPRO 20V Cordless Drill and Impact Driver Combo Kit, including both tools, two batteries, a charger, and various drill and screwdriver bits.
3. Produktüberschreitungview
The WORKPRO 20V Cordless Drill and Impact Driver Combo Kit provides versatile solutions for drilling and fastening tasks. This kit includes a drill driver with adjustable torque and a powerful impact driver, both powered by 20V lithium-ion batteries.
Hauptmerkmale
- 20-V-Akku-Bohrschrauber: Features 18+1 torque settings and two speed ranges (0-360 RPM and 0-1300 RPM) for various drilling and screwing applications. Equipped with a 10mm keyless chuck for easy accessory changes.
- 20V Cordless Impact Driver: Delivers up to 130Nm of torque with a maximum speed of 2600 RPM and an impact frequency of 0-3500 IPM. Features a 6.35mm (1/4") hexagonal quick-release chuck for rapid bit changes.
- 2.0Ah Lithium-ion Batteries: Two rechargeable 20V 2.0Ah batteries provide extended runtime. Integrated indicator lights display remaining battery capacity.
- Schnellladegerät: A 2.4A fast charger allows for a full battery charge in approximately 60 minutes.
- Ergonomisches Design: Soft rubber non-slip handles ensure comfortable use during prolonged operation.
- Integrierte LED-Leuchten: Both tools feature LED work lights to illuminate the work area, enhancing visibility and safety in dark conditions.
- Belt Hooks: Included belt hooks allow for convenient carrying and storage of the tools.

Abbildung: Ein interner view highlighting the powerful 20-volt motor in both the drill driver (25 Nm max torque) and the impact driver (130 Nm max torque).
4. Einrichtung
4.1 Laden der Batterie
- Schließen Sie das Schnellladegerät an eine normale Steckdose an.
- Slide the 20V 2.0Ah Lithium-ion battery into the charger until it clicks into place.
- The charger's indicator light will show the charging status. A full charge typically takes about 60 minutes.
- Sobald der Akku vollständig aufgeladen ist, nehmen Sie ihn aus dem Ladegerät.

Image: A WORKPRO 20V 2.0Ah Lithium-ion battery being charged on the 2.4A fast charger, illustrating the 1-hour fast charging capability.
4.2 Einsetzen und Entfernen des Akkus
- So installieren Sie: Align the battery with the base of the tool handle and slide it in until it locks securely.
- So entfernen Sie: Press the battery release button (located on the side of the battery) and slide the battery out of the tool.
4.3 Installing and Removing Drill Bits (Drill Driver)
- Stellen Sie aus Sicherheitsgründen sicher, dass das Gerät ausgeschaltet und der Akku entfernt ist.
- Rotate the 10mm keyless chuck counter-clockwise to open the jaws.
- Insert the drill bit into the chuck, ensuring it is centered.
- Rotate the chuck clockwise to tighten the jaws firmly around the bit.
- So entfernen Sie: Rotate the chuck counter-clockwise to loosen and remove the bit.

Image: Visual guide demonstrating how to quickly change bits on the drill driver by rotating the chuck to loosen and tighten.
4.4 Installing and Removing Screwdriver Bits (Impact Driver)
- Stellen Sie aus Sicherheitsgründen sicher, dass das Gerät ausgeschaltet und der Akku entfernt ist.
- Pull the quick-release collar of the 6.35mm (1/4") hexagonal chuck forward.
- Insert the screwdriver bit into the chuck.
- Release the collar to lock the bit in place. Pull on the bit to ensure it is secure.
- So entfernen Sie: Pull the quick-release collar forward and pull the bit out.

Bild: Eine Nahaufnahme view showing the 10mm keyless chuck of the drill driver and the 6.5mm (1/4") hexagonal chuck of the impact driver, along with their bright LED lights for visibility.
4.5 Adjusting Torque (Drill Driver)
The drill driver features an 18+1 position torque adjustment ring. Rotate the ring to select the desired torque setting. Lower settings are for driving small screws or working with soft materials, while higher settings are for larger screws or harder materials. The 'drill' symbol setting is for drilling applications, providing maximum torque.
4.6 Selecting Speed (Both Tools)
Both the drill driver and impact driver feature a 2-speed transmission switch, typically located on top of the tool. Position 1 (low speed) is for higher torque applications and controlled drilling/driving. Position 2 (high speed) is for faster drilling or driving with less torque.
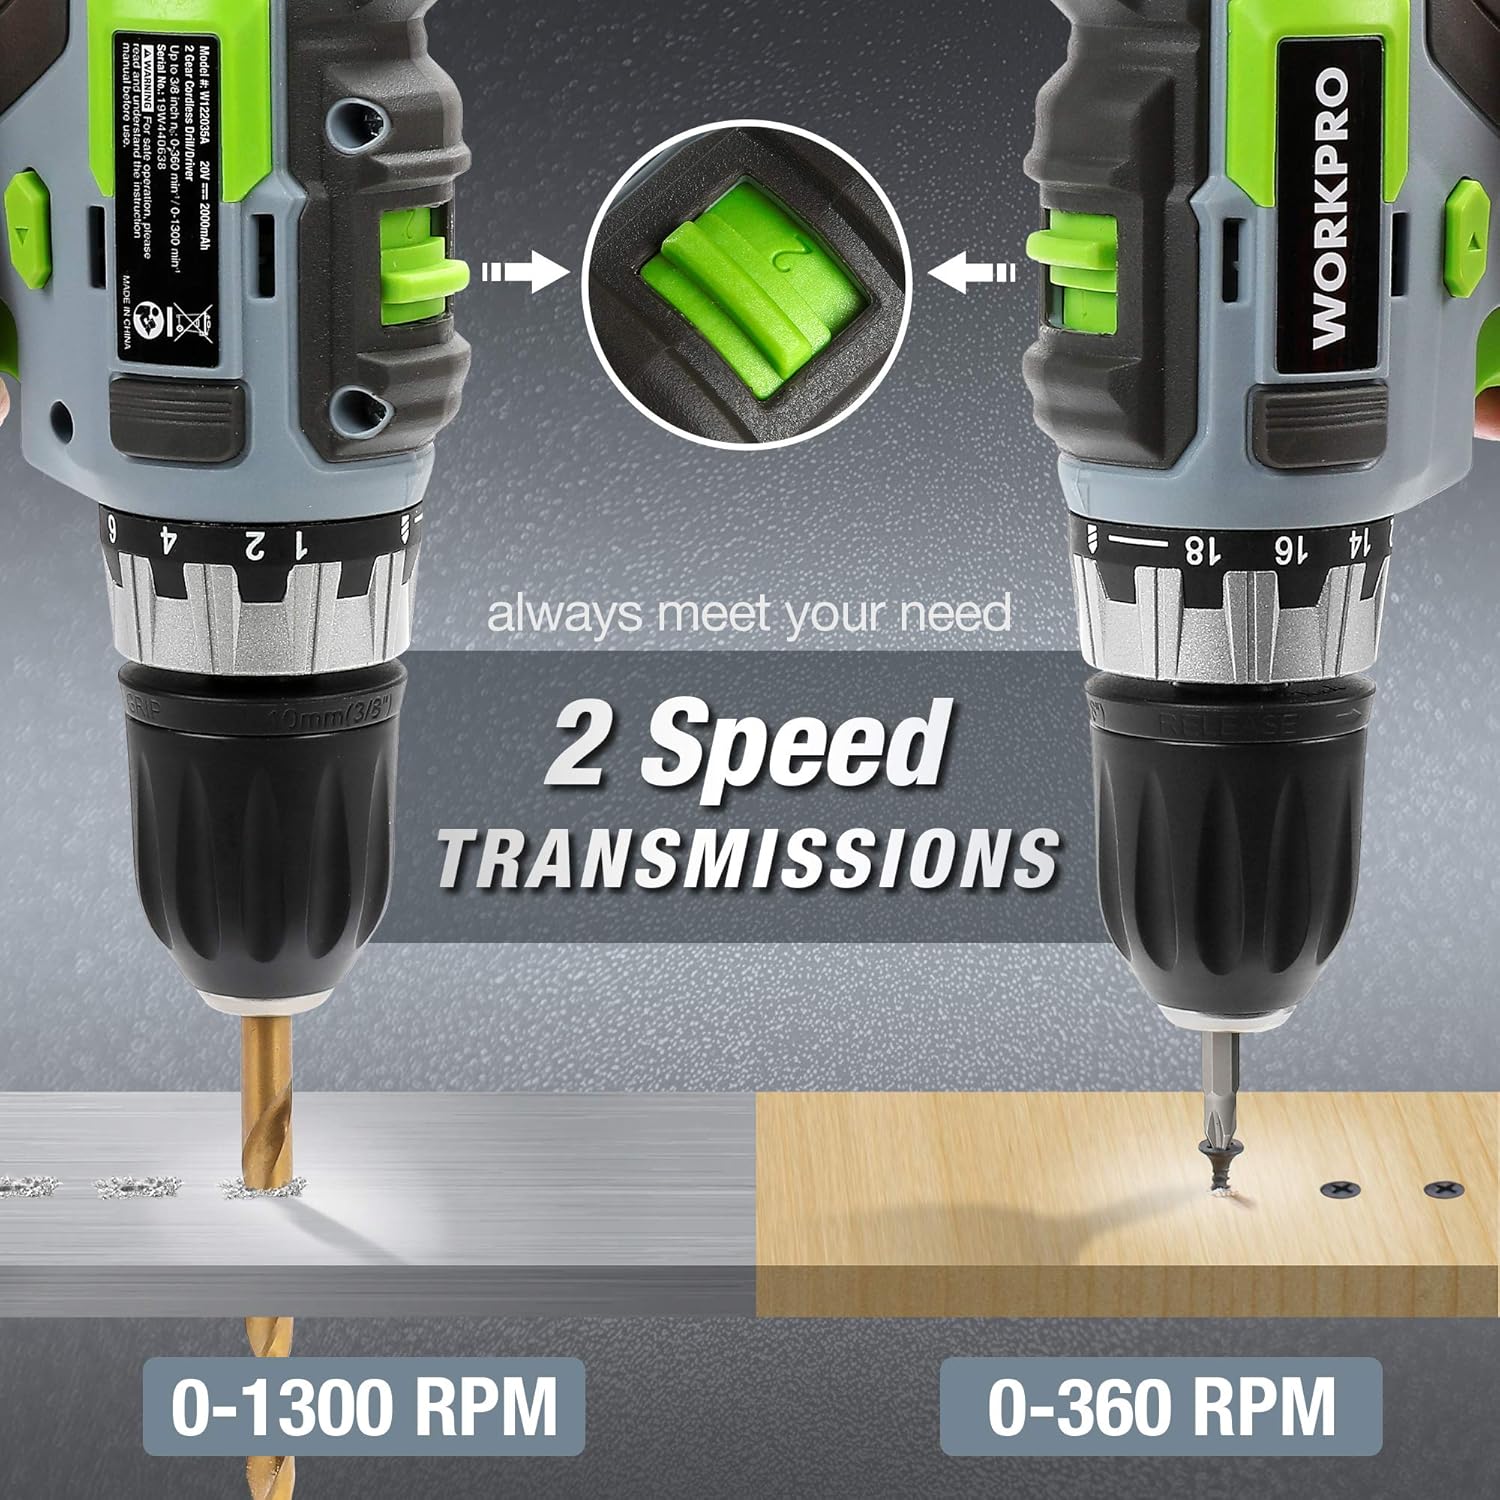
Image: Both the WORKPRO drill driver and impact driver illustrating their 2-speed transmission settings, with the drill driver operating at 0-1300 RPM and the impact driver at 0-360 RPM for different tasks.
5. Bedienung
5.1 Ein-/Ausschalten
To start the tool, press the trigger switch. The tool speed is variable depending on how far the trigger is pressed. To stop the tool, release the trigger switch.
5.2 Vorwärts-/Rückwärtsschalter
A forward/reverse selector switch is located above the trigger. Push the lever to the left for forward rotation (drilling and screwing). Push the lever to the right for reverse rotation (removing screws or freeing a stuck drill bit). Center the switch for the lock position, which prevents accidental starting.

Image: A diagram illustrating the forward, reverse, and lock positions of the rotation control switch on the WORKPRO drill driver, with instructions for each setting.
5.3 Verwendung der LED-Arbeitsleuchte
Both tools are equipped with an LED work light that activates when the trigger is pressed, illuminating the work surface for improved visibility in dimly lit areas.

Image: The WORKPRO impact driver in use, with its integrated LED work light brightly illuminating the fastening point, demonstrating its utility in dark environments.
5.4 Bohrtechniken
- Das Werkstück muss stets so befestigt werden, dass es sich nicht bewegen kann.
- Select the appropriate drill bit and speed setting for the material.
- Start drilling at a low speed to create a pilot hole, then increase speed as needed.
- Üben Sie gleichmäßigen, stetigen Druck aus. Wenden Sie keine Gewalt an.
- Bei tiefen Bohrlöchern sollte der Bohrer regelmäßig herausgezogen werden, um Bohrspäne zu entfernen.
5.5 Screwing Techniques
- Wählen Sie den passenden Schraubendreher-Bit für den Schraubenkopf.
- For the drill driver, adjust the torque setting to prevent over-tightening or stripping screws.
- For the impact driver, its high torque is suitable for driving long or stubborn screws.
- Apply firm, steady pressure to keep the bit engaged with the screw head.

Image: A collage showing the WORKPRO drill driver and impact driver being used in various applications, including drilling into wood and metal, and driving screws.
5.6 Using the Belt Hook
The included belt hooks can be attached to either tool for convenient temporary storage on a belt or workbench edge, allowing for hands-free movement between tasks.

Image: Demonstrates the 1-hour fast charging of the 2.0Ah Li-ion battery and the convenient belt hook feature for carrying the tool.
6. Wartung
Regelmäßige Wartung gewährleistet optimale Leistung und verlängert die Lebensdauer Ihrer Werkzeuge.
6.1 Reinigung
- Vor der Reinigung immer die Batterie abklemmen.
- Verwenden Sie ein weiches,amp Verwenden Sie ein Tuch, um die Außenseite des Werkzeugs abzuwischen. Verwenden Sie keine scharfen Chemikalien oder Scheuermittel.
- Entfernen Sie Staub und Schmutz aus den Lüftungsöffnungen mit Druckluft oder einer weichen Bürste.
- Keep the chucks clean and free of debris to ensure proper bit retention.
6.2 Batteriepflege
- Lagern Sie Batterien an einem kühlen, trockenen Ort, geschützt vor direkter Sonneneinstrahlung und extremen Temperaturen.
- Batterien sollten nicht über längere Zeit im entladenen Zustand gelagert werden. Laden Sie sie regelmäßig auf, wenn sie nicht verwendet werden.
- Avoid dropping or physically damaging batteries.
6.3 Speicherung
- Store the tools and batteries in a secure, dry location, out of reach of children.
- Ensure batteries are removed from the tools before storage.
7. Fehlerbehebung
If you encounter issues with your WORKPRO tools, refer to the following common problems and solutions:
| Problem | Mögliche Ursache | Lösung |
|---|---|---|
| Werkzeug startet nicht | Battery not charged or improperly installed; Forward/Reverse switch in lock position; Faulty switch. | Charge battery and ensure it is securely installed; Move switch out of lock position; Contact customer support for switch replacement. |
| Stromausfall während des Betriebs | Batterie schwach; Überlastungsschutz aktiviert. | Recharge battery; Reduce load on the tool, allow it to cool down. |
| Bit slips or wobbles in chuck | Chuck not tightened properly; Bit shank is dirty or damaged; Incorrect bit size. | Retighten chuck firmly; Clean or replace bit; Use correct bit size. |
| Akku wird nicht geladen | Ladegerät nicht angeschlossen; Akku oder Ladegerät defekt; Akku zu heiß/kalt. | Ensure charger is plugged in; Try another battery/charger if available; Allow battery to reach room temperature before charging. Contact customer support if problem persists. |
8. Spezifikationen
| Besonderheit | Spezifikation |
|---|---|
| Marke | ARBEITSPRO |
| Modellnummer | W004578A |
| Bandtage | 20 Volt (DC) |
| Akku-Typ | Lithium-Ionen |
| Batteriekapazität | 2.0 Ah (2 Stück enthalten) |
| Ladegerät AmpAlter | 2.4 A (Fast Charger) |
| Drehmoment des Bohrschraubers | 25 Nm (18+1 settings) |
| Drill Driver Speed | 0–360 U/min/0–1300 U/min |
| Bohrfuttergröße | 10 mm Schnellspannbohrfutter |
| Drehmoment des Schlagschraubers | 130 Nm |
| Schlagschrauber-Geschwindigkeit | 0-2600 U/min |
| Impact Driver Impact Frequency | 0-3500 Bilder/Minute |
| Schlagschrauber-Bohrfuttergröße | 6.35mm (1/4") Hexagonal Quick-Release Chuck |
| Produktabmessungen (L x B x H) | 22.5 x 17 x 6 cm |
| Artikelgewicht | 4 Kilogramm |
| Material | Plastik |
| UPC | 820909766186 |
9. Garantie und Support
WORKPRO products are manufactured to high-quality standards. For warranty information, technical support, or service inquiries, please refer to the warranty card included with your purchase or visit the official WORKPRO webBitte bewahren Sie Ihren Kaufbeleg für eventuelle Garantieansprüche auf.


