1. Einleitung
This manual provides detailed instructions for the operation and maintenance of your CAMMHD C9 Body Camera. Please read this manual thoroughly before using the device to ensure proper function and to maximize its capabilities. The CAMMHD C9 is a compact and versatile body-worn camera designed for reliable audio and video recording in various environments, featuring 1296p resolution, IR night vision, and a 2.0-inch LCD for playback.
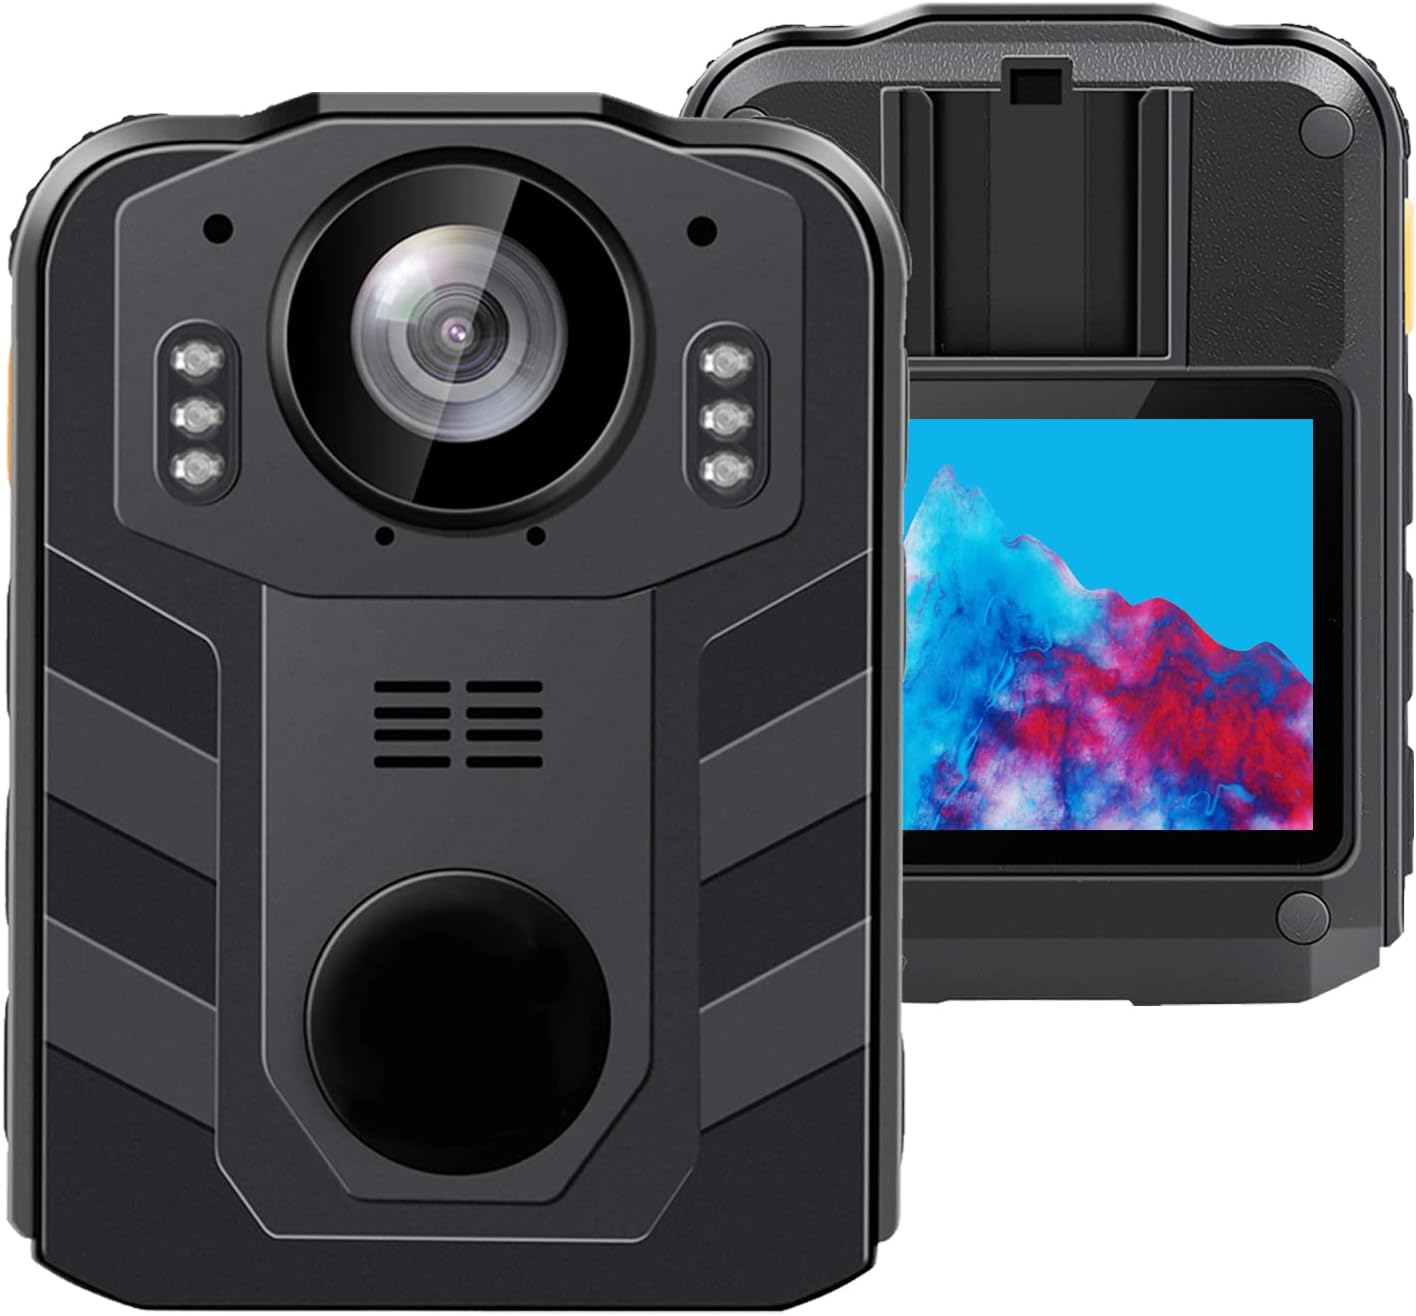
Abbildung 1.1: Vorder- und Rückseite view of the CAMMHD C9 Body Camera.
2. Packungsinhalt
Überprüfen Sie, ob alle Artikel in Ihrem Paket vorhanden sind:
- CAMMHD C9 Body Camera
- USB-Kabel
- Benutzerhandbuch (dieses Dokument)
3. Produktüberschreitungview
Machen Sie sich mit den Komponenten und Bedienelementen der Kamera vertraut.
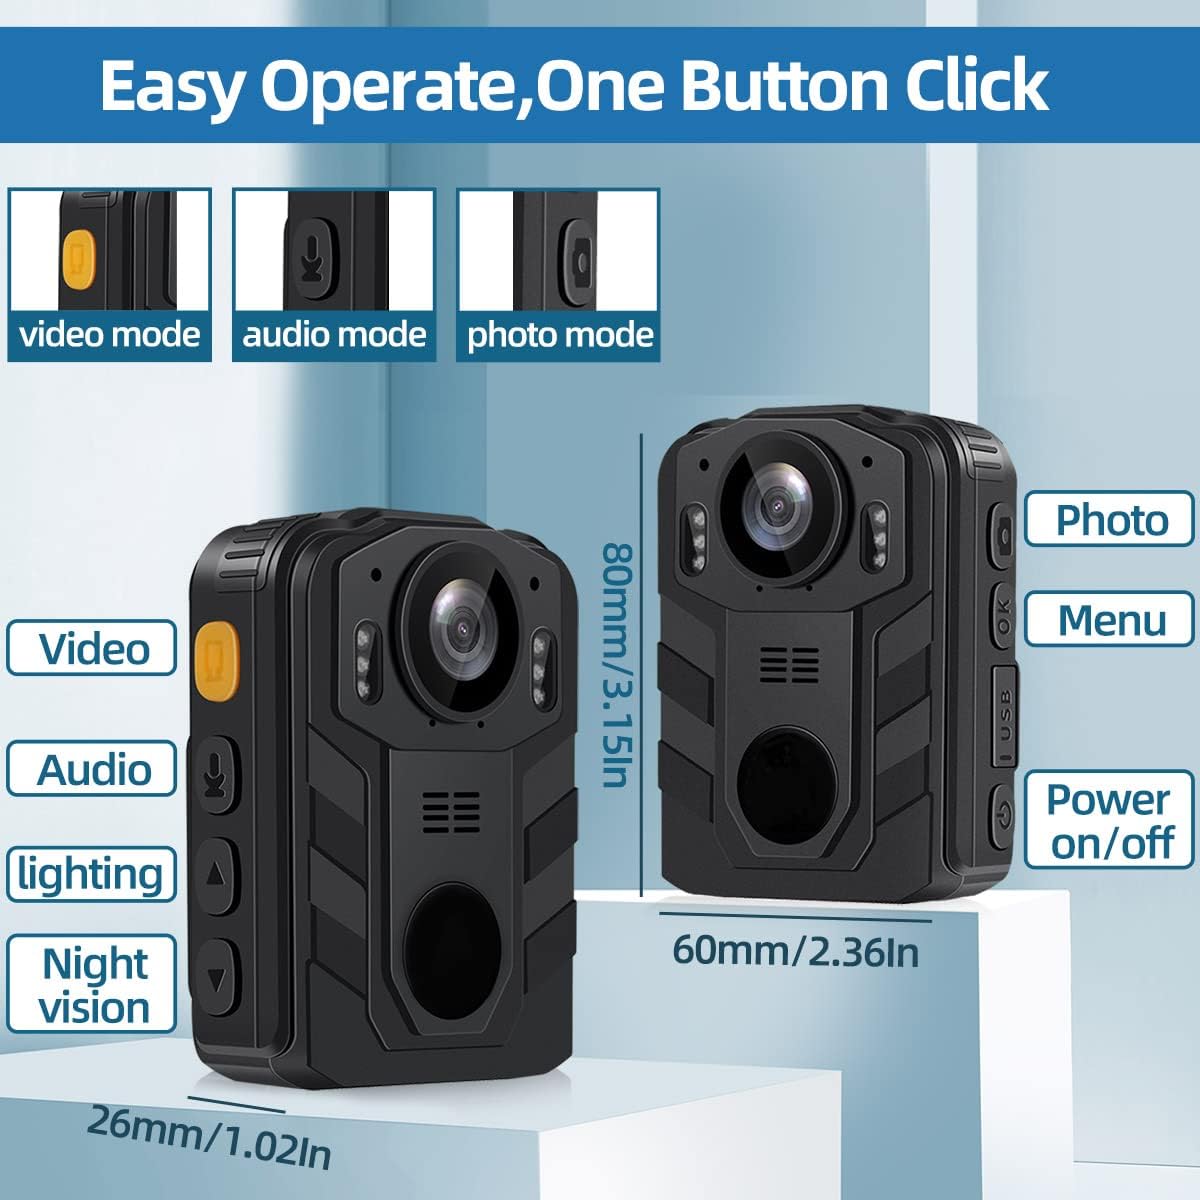
Image 3.1: CAMMHD C9 Body Camera with key features and dimensions highlighted.
3.1. Tastenfunktionen
- Ein- / Ausschalter: Zum Ein- oder Ausschalten des Geräts drücken und halten.
- Videotaste: Drücken Sie, um die Videoaufnahme zu starten/stoppen.
- Audio-Taste: Press to start/stop audio-only recording.
- Foto-Button: Press to capture a still image.
- Menü-/OK-Taste: Access the menu, confirm selections.
- Auf-/Ab-Navigationstasten: Navigieren Sie durch die Menüoptionen.
- USB-Anschluss: Zum Aufladen und zur Datenübertragung.
4. Einrichtung
4.1. Laden des Akkus
Before first use, fully charge the camera's internal 3000mAh battery. Connect the camera to a USB power adapter (not included) or a computer's USB port using the provided USB cable. The charging indicator light will show the charging status. A full charge typically takes approximately 5 hours and provides up to 8 hours of recording time.
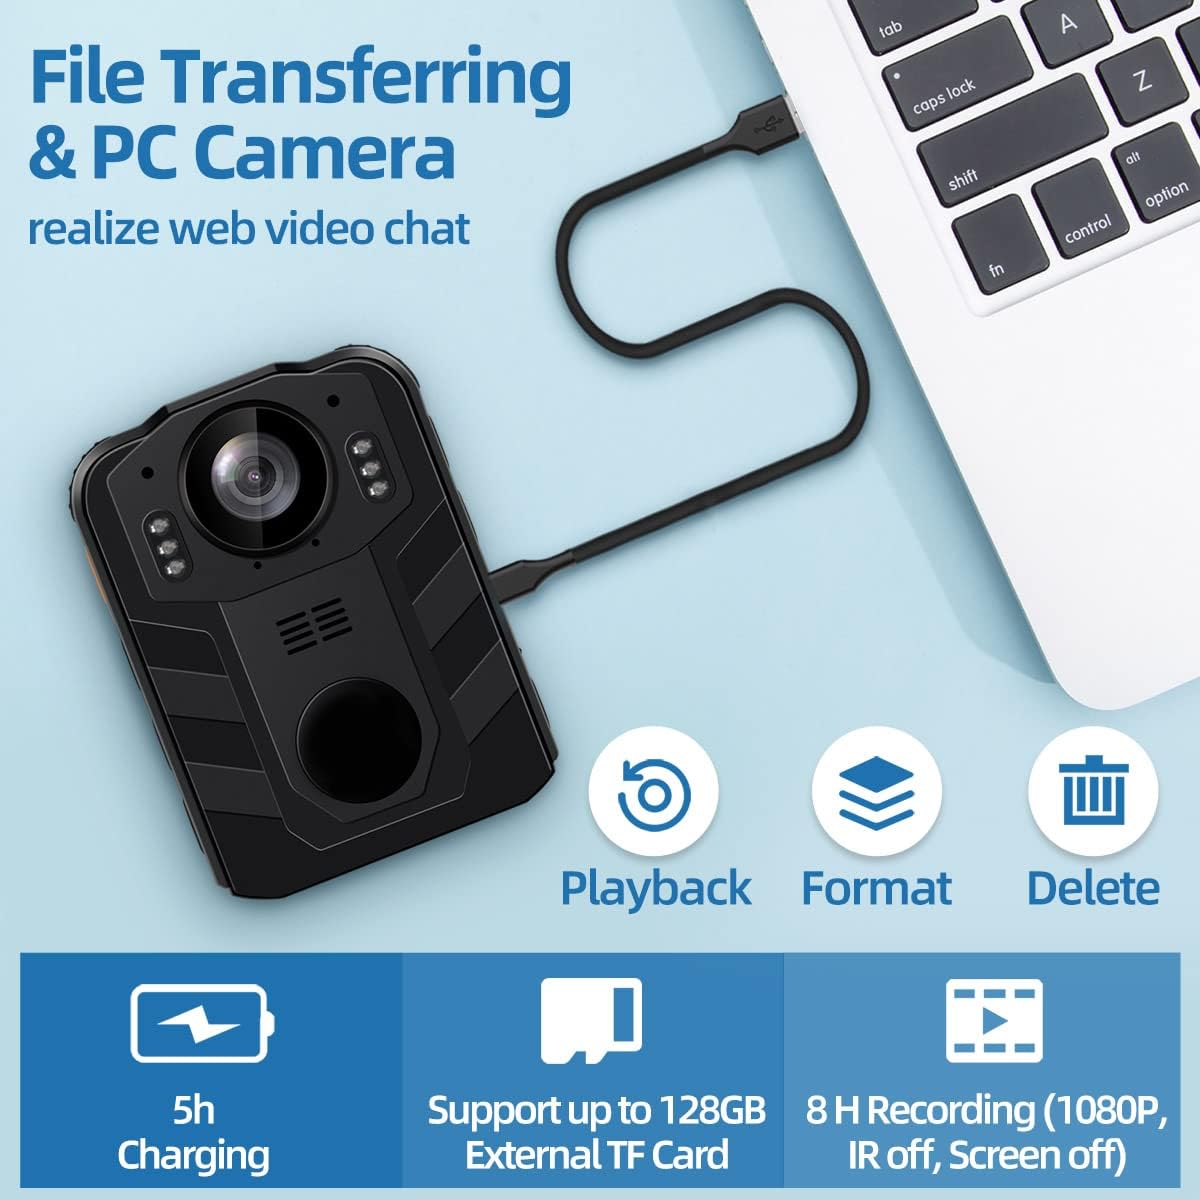
Image 4.1: Battery capacity and estimated usage/charging times.

Image 4.2: Methods for charging the camera and connecting to a computer.
4.2. Einlegen einer SD-Karte
The CAMMHD C9 Body Camera supports external SD cards up to 512GB. To insert an SD card:
- Stellen Sie sicher, dass die Kamera ausgeschaltet ist.
- Locate the SD card slot, usually on the side or bottom of the device.
- Gently insert the SD card with the metal contacts facing the correct direction until it clicks into place.
- Zum Entfernen die Karte leicht hineindrücken, bis sie herausspringt.
After inserting the SD card, you may need to select 'External card' in the camera's settings menu for storage. Refer to the video below for menu navigation examples.
Video 4.1: Demonstrates navigating the camera's menu, including selecting the SD card option for storage. This video shows the 'SD Card' option being highlighted and set to 'External card'.
5. Bedienungsanleitung
5.1. Ein-/Ausschalten
- So schalten Sie das Gerät ein: Halten Sie den Ein-/Ausschalter gedrückt, bis der Bildschirm aufleuchtet.
- So schalten Sie das Gerät aus: Halten Sie den Ein-/Ausschalter gedrückt, bis sich das Gerät ausschaltet.
5.2. Videoaufnahme
Drücken Sie im Hauptbildschirm die Taste Video-Schaltfläche once to start video recording. A recording indicator (e.g., a red dot or flashing icon) will appear on the screen. Press the Video-Schaltfläche again to stop recording. Videos are saved automatically.
5.3. Audio aufnehmen
Drücken Sie im Hauptbildschirm die Taste Audio-Taste once to start audio-only recording. An audio recording indicator will be visible. Press the Audio-Taste again to stop recording. Audio fileDie Dateien werden automatisch gespeichert.
5.4. Fotos aufnehmen
Drücken Sie im Hauptbildschirm die Taste Foto-Schaltfläche once to capture a still image. The screen may flash briefly to indicate a photo has been taken.
5.5. Nachtsicht (IR)
The camera features infrared (IR) night vision for recording in low-light conditions. The IR function can be set to automatic or manual activation via the camera's menu. When active, the camera will record in black and white.
Image 5.1: Illustrates the difference between day and night vision recording modes.
5.6. Menünavigation
Drücken Sie die Menü/OK-Taste to access the camera's settings menu. Use the Auf-/Ab-Navigationstasten to scroll through options. Press the Menü/OK-Taste to select an option or confirm a setting. Press the Netzschalter , um das Menü zu verlassen.
6. Erweiterte Funktionen
6.1. Loop-Aufnahme
The CAMMHD C9 supports loop recording. When enabled, the camera will continuously record. Once the memory card is full, the oldest files will be overwritten by new recordings. This ensures continuous operation without manual deletion of old files. The duration of each loop segment can typically be adjusted in the settings menu.
6.2. PC Camera Mode
The camera can function as a PC camera (webcam) when connected to a computer. Connect the camera to your computer using the USB cable. Select the 'PC Camera' option on the camera's screen if prompted. Your computer should recognize the device as a webNocken.

Image 6.1: The camera connected to a laptop, illustrating file transfer and PC camera functionality.
6.3. File Überweisen
To transfer recorded videos, audio, and photos to a computer:
- Schließen Sie die Kamera mit dem mitgelieferten USB-Kabel an Ihren Computer an.
- Die Kamera sollte auf Ihrem Computer als Wechseldatenträger angezeigt werden.
- Öffnen Sie das Laufwerk, um auf Ihre Daten zuzugreifen und sie zu kopieren. files.
Alternatively, you can remove the SD card from the camera and insert it into a card reader connected to your computer for direct file Zugang.

Image 6.2: Two methods for transferring files: direct USB connection or using an SD card reader.
7. Wartung
- Reinigung: Reinigen Sie das Kameragehäuse mit einem weichen, trockenen Tuch. Verwenden Sie für das Objektiv ein spezielles Objektivreinigungstuch und eine entsprechende Reinigungslösung. Vermeiden Sie aggressive Chemikalien.
- Lagerung: Bewahren Sie die Kamera an einem kühlen, trockenen Ort fern von direkter Sonneneinstrahlung und extremen Temperaturen auf.
- Batteriepflege: Um eine optimale Akkulaufzeit zu gewährleisten, sollte der Akku nicht häufig vollständig entladen werden. Bei längerer Lagerung sollte der Akku alle paar Monate auf etwa 50 % aufgeladen werden.
8. Fehlerbehebung
- Kamera lässt sich nicht einschalten: Stellen Sie sicher, dass der Akku geladen ist. Schließen Sie das Gerät an eine Stromquelle an und versuchen Sie es erneut.
- Aufzeichnung nicht möglich: Check if an SD card is inserted and properly formatted. Ensure there is sufficient storage space.
- Schlechte Videoqualität: Ensure the lens is clean. Check recording resolution settings in the menu.
- Computer erkennt Kamera nicht: Try a different USB port or cable. Ensure the camera is in the correct mode (e.g., Mass Storage or PC Camera) if prompted.
9. Spezifikationen
| Besonderheit | Spezifikation |
|---|---|
| Marke | CAMMHD |
| Modellnummer | C9 |
| Auflösung der Videoaufnahme | 1296p |
| Videoaufnahmeformat | MPEG 4 |
| Bildschirmgröße | 2 Zoll |
| Besondere Merkmale | Nachtsicht |
| Konnektivitätstechnologie | Wireless (Note: Product description mentions wireless, but typically refers to data transfer, not live streaming) |
| Objektivtyp | Weitwinkel |
| Wasserbeständigkeit | Wasserfest |
| Batterie | 1 Lithium-Ionen-Akku (im Lieferumfang enthalten), 3000 mAh |
| Artikelgewicht | 1.03 Pfund |
| Technische Daten | 2.24 x 0.98 x 3.15 Zoll |
| Maximale Speicherunterstützung | 512GB (External TF Card) |
10. Garantie und Support
For warranty information or technical support, please refer to the product packaging or contact CAMMHD customer service through the retailer where the product was purchased. Keep your purchase receipt as proof of purchase.


