1. Einleitung
Thank you for choosing the OSD Black 300W Subwoofer Amplifier, Model BK-SAM300. This amplifier is designed to provide powerful and precise low-frequency amplification for passive subwoofers, enhancing your home theater or audio system experience. With its robust Class AB output stage and versatile connectivity options, the BK-SAM300 delivers deep, impactful bass for movies, music, and games.
This manual provides detailed instructions for the proper installation, operation, and maintenance of your subwoofer ampVerstärker. Bitte lesen Sie die Anleitung vor Gebrauch sorgfältig durch und bewahren Sie sie zum späteren Nachschlagen auf.
2. Sicherheitshinweise
WARNUNG: Um das Risiko von Feuer oder Stromschlag zu verringern, setzen Sie dieses Gerät weder Regen noch Feuchtigkeit aus.
- Lesen Sie alle Anweisungen vor der Inbetriebnahme des ampschwerer.
- Bewahren Sie dieses Handbuch zum späteren Nachschlagen auf.
- Heed all warnings on the amplifier and in this manual.
- Befolgen Sie alle Anweisungen.
- Verwenden Sie dieses Gerät nicht in der Nähe von Wasser.
- Nur mit trockenem Tuch reinigen.
- Die Lüftungsöffnungen dürfen nicht blockiert werden. Die Installation muss gemäß den Anweisungen des Herstellers erfolgen.
- Installieren Sie das Gerät nicht in der Nähe von Wärmequellen wie Heizkörpern, Heizregistern, Öfen oder anderen Geräten (einschließlich ampKonverter (Lüfter), die Wärme erzeugen.
- Machen Sie den Sicherheitszweck des polarisierten oder geerdeten Steckers nicht zunichte. Ein polarisierter Stecker hat zwei Stifte, von denen einer breiter als der andere ist. Ein geerdeter Stecker hat zwei Stifte und einen dritten Erdungsstift. Der breite Stift oder der dritte Stift dienen Ihrer Sicherheit. Wenn der mitgelieferte Stecker nicht in Ihre Steckdose passt, wenden Sie sich an einen Elektriker, um die veraltete Steckdose auszutauschen.
- Schützen Sie das Netzkabel vor Beschädigungen oder Beschädigungen durch Fußgänger, insbesondere an den Steckern, Steckdosen und an der Stelle, an der es aus dem Gerät austritt.
- Verwenden Sie nur vom Hersteller angegebene Zusatzgeräte/Zubehör.
- Trennen Sie das Gerät bei Gewitter oder längerer Nichtbenutzung vom Stromnetz.
- Überlassen Sie alle Wartungsarbeiten qualifiziertem Servicepersonal. Eine Wartung ist erforderlich, wenn das Gerät auf irgendeine Weise beschädigt wurde, z. B. wenn das Netzkabel oder der Stecker beschädigt sind, Flüssigkeit in das Gerät verschüttet wurde oder Gegenstände hineingefallen sind, das Gerät Regen oder Feuchtigkeit ausgesetzt war, nicht normal funktioniert oder fallengelassen wurde.
3. Packungsinhalt
Bitte kreuzen Sie das Kästchen für die folgenden Elemente an:
- OSD Schwarzer 300W Subwoofer Amplifier (BK-SAM300)
- Netzkabel
- Benutzerhandbuch (dieses Dokument)
4. Produktüberschreitungview
4.1 Bedienelemente auf der Vorderseite
The front panel of the BK-SAM300 features essential controls for power and audio adjustments.

Abbildung 4.1: Vorder- und Rückseite View of the BK-SAM300 Amplifier. This image displays both the front panel with its controls and the rear panel with all input/output connections.
- Netzschalter: Schaltet die um ampVerstärker ein- oder ausgeschaltet.
- Phase Control (0° - 180°): Adjusts the phase of the subwoofer output relative to the main speakers. This helps to ensure that the subwoofer's sound waves align correctly with those of the main speakers, preventing cancellation or reinforcement issues at the crossover frequency.
- FREQ (Crossover Frequency) Control: Sets the upper frequency limit for the subwoofer. Frequencies above this setting will be filtered out. Adjustable from approximately 40Hz to 120Hz.
- Lautstärkeregelung: Adjusts the overall output level of the subwoofer amplifier. Use this to balance the subwoofer's volume with the rest of your audio system.
4.2 Anschlüsse und Bedienelemente auf der Rückseite
The rear panel houses all the input and output connections, along with additional settings for advanced configuration.
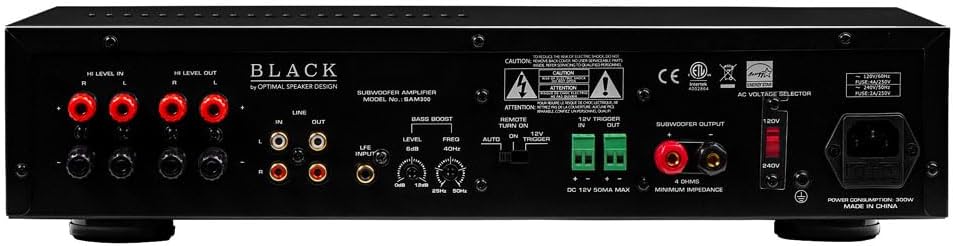
Figure 4.2: Rear Panel of the BK-SAM300 Amplifier. This image provides a detailed view of all input and output terminals, including Hi Level, Line, LFE, Bass Boost, 12V Trigger, and Subwoofer Output.
- HI LEVEL IN (Speaker Level Input): Connects directly to the speaker outputs of your receiver or amplifier. Use this if your receiver does not have a dedicated subwoofer output or LFE output.
- HI LEVEL OUT (Speaker Level Output): Passes the full-range audio signal from the HI LEVEL IN to your main speakers.
- LINE IN (RCA Input): Standard RCA stereo inputs for connecting to the pre-out or line-out of your receiver or audio source.
- LINE OUT (RCA Output): Passes the audio signal from the LINE IN to another ampVerstärker oder Audiogerät.
- LFE INPUT (RCA Input): Dedicated input for connecting to the LFE (Low-Frequency Effects) output of an AV receiver. This bypasses the amplifier's internal crossover, relying on the receiver's bass management.
- BASS BOOST (Level & Freq):
- Level (0dB to 12dB): Adjusts the intensity of the bass boost.
- Freq (25Hz to 50Hz): Selects the center frequency at which the bass boost is applied.

Figure 4.3: Detail of Bass Boost Controls. This image highlights the Level and Freq knobs for fine-tuning the bass boost.
- REMOTE TURN ON (Manual, Auto, 12V Trigger): Wählt die aus ampEinschaltmodus des Verstärkers.
- Manual: Amplifier is turned on/off manually via the front panel power button.
- Auto: Amplifier automatically turns on when an audio signal is detected and enters standby mode when no signal is present for a period.
- 12-V-Trigger-Ein/Ausgang: Ermöglicht die amplifier to be turned on/off by a 12V DC trigger signal from a compatible receiver or control system.
- SUBWOOFER OUTPUT (Binding Posts): Connects to your passive subwoofer using speaker wire. Ensure correct polarity (+ to + and - to -). The ampDer Verstärker ist bis zu einer Impedanz von 4 Ohm stabil.

Figure 4.4: Detail of Subwoofer Output and 12V Trigger. This image shows the binding posts for subwoofer connection and the 12V trigger terminals.
- AC VOLTAGE SELECTOR (120V/240V): Wählt die entsprechende Eingangslautstärke austage für Ihre Region. Ensure this is set correctly before plugging in the ampschwerer.
- Wechselstromeingang: Dient zum Anschließen des mitgelieferten Netzkabels.
5. Einrichtung
5.1 Platzierung
Platzieren Sie die amplifier in a location that allows for adequate ventilation. Avoid enclosed spaces or stacking other components directly on top of the amplifier. Keep it away from direct sunlight, heat sources, and moisture. Ensure it is placed on a stable, level surface.
5.2 Anschließen der Ampschwerer
Choose one of the following connection methods based on your audio system's capabilities:
Method A: Using LFE Input (Recommended for AV Receivers with Subwoofer Output)
- Connect an RCA cable from the LFE or Subwoofer Pre-Out jack on your AV receiver to the LFE-EINGANG jack on the BK-SAM300.
- Schließen Sie Ihren passiven Subwoofer an den/die/das an. SUBWOOFER-AUSGANG binding posts on the BK-SAM300 using appropriate gauge speaker wire. Ensure correct polarity (+ to + and - to -).
- Proceed to Section 5.3 for power connection.
Method B: Using Line Level Inputs (for Stereo Receivers or Pre-Outs)
- Connect RCA cables from the Pre-Out or Line-Out jacks of your receiver/pre-amplifier zu den LINE IN (Left and Right) jacks on the BK-SAM300.
- Schließen Sie Ihren passiven Subwoofer an den/die/das an. SUBWOOFER-AUSGANG binding posts on the BK-SAM300 using appropriate gauge speaker wire. Ensure correct polarity (+ to + and - to -).
- Proceed to Section 5.3 for power connection.
Method C: Using High Level Inputs (for Receivers without Dedicated Subwoofer/Pre-Outs)
- Connect speaker wires from the main speaker outputs of your receiver/amplifier zu den HI LEVEL IN (Left and Right) binding posts on the BK-SAM300. Ensure correct polarity.
- (Optional) If you wish to pass the signal through to your main speakers, connect speaker wires from the HOCH LEVEL OUT binding posts on the BK-SAM300 to your main speakers.
- Schließen Sie Ihren passiven Subwoofer an den/die/das an. SUBWOOFER-AUSGANG binding posts on the BK-SAM300 using appropriate gauge speaker wire. Ensure correct polarity (+ to + and - to -).
- Proceed to Section 5.3 for power connection.
5.3 Stromanschluss
- Bevor Sie das Netzkabel anschließen, stellen Sie sicher, dass AC VOLTAGE AUSWAHL Der Schalter auf der Rückseite ist auf die richtige Lautstärke eingestellt.tage for your region (120V or 240V). Incorrect setting can damage the unit.
- Schließen Sie das mitgelieferte Netzkabel an den Wechselstromeingang auf der Rückseite des ampschwerer.
- Stecken Sie das andere Ende des Netzkabels in eine geeignete Wandsteckdose.
6. Bedienungsanleitung
6.1 Ein-/Ausschalten
The BK-SAM300 offers three power-on modes:
- Manueller Modus: Legen Sie die FERNBEDIENUNG EINSCHALTEN switch to "Manual". Press the front panel Netzschalter zum Einschalten der amplifier ein oder aus.
- Automatikmodus: Legen Sie die FERNBEDIENUNG EINSCHALTEN switch to "Auto". The amplifier will automatically turn on when an audio signal is detected at the inputs and will enter standby mode after approximately 15-20 minutes of no audio signal.
- 12V Trigger Mode: Connect a 12V DC trigger cable from your source component (e.g., AV receiver) to the 12V TRIGGER IN terminal. Set the FERNBEDIENUNG EINSCHALTEN switch to "12V Trigger". The amplifier will power on/off with the source component.
6.2 Einstellen der Bedienelemente
Optimal sound quality depends on proper adjustment of the amplifier's controls to match your subwoofer and listening environment.
- GAIN (Volume): Start with the GAIN control at its minimum setting. Play some audio with significant bass content. Slowly increase the GAIN until the subwoofer's output blends seamlessly with your main speakers. Avoid setting the gain too high, as this can lead to distortion.
- FREQ (Crossover Frequency):
- Bei Verwendung des LFE-EINGANG, this control is bypassed. Set your AV receiver's subwoofer crossover frequency.
- Bei Verwendung LINE IN or HI LEVEL IN, adjust the FREQ control to blend the subwoofer's output with your main speakers. A good starting point is typically 80Hz-100Hz, but this may vary depending on the size and frequency response of your main speakers. Smaller main speakers usually require a higher crossover frequency.
- PHASE (0° - 180°): The phase control helps to ensure that the subwoofer's sound waves are in sync with your main speakers.
- Play music with a consistent bass line.
- While listening from your primary listening position, slowly adjust the PHASE control from 0° to 180°.
- Stop at the position where the bass sounds the loudest and most impactful. If the bass sounds weak or hollow, try adjusting the phase.
- BASS-BOOST: Use the BASS BOOST controls (Level and Freq) to fine-tune the low-frequency response.
- Frequenz: Select the specific low frequency (25Hz to 50Hz) you wish to boost.
- Ebene: Adjust the amount of boost (0dB to 12dB) at the selected frequency. Use sparingly to avoid muddy or boomy bass.
7. Wartung
- Reinigung: Trennen Sie den amplifier from power before cleaning. Use a soft, dry cloth to wipe down the exterior. Do not use liquid cleaners or aerosol sprays.
- Belüftung: Ensure that the ventilation openings are not blocked by dust or debris. Periodically check and clean if necessary to maintain proper airflow.
- Lagerung: Bei der Speicherung der ampWenn Sie den Verstärker über einen längeren Zeitraum nicht benutzen, trennen Sie ihn vom Stromnetz und lagern Sie ihn an einem kühlen, trockenen Ort, fern von direkter Sonneneinstrahlung und extremen Temperaturen.
8. Fehlerbehebung
| Problem | Mögliche Ursache | Lösung |
|---|---|---|
| Keine Energie / Amplifier schaltet sich nicht ein. |
|
|
| Kein Ton vom Subwoofer. |
|
|
| Distorted or muddy bass. |
|
|
| Summen oder Brummen. |
|
|
9. Spezifikationen
| Besonderheit | Detail |
|---|---|
| Modell | BK-SAM300 |
| Ausgangsleistung | 300 Watt (RMS) |
| Impedanzstabilität | 4-ohm Stable |
| Amplifier-Klasse | Klasse AB |
| Frequenzgang | 20Hz - 160Hz |
| Übergangsfrequenz | Adjustable 40Hz - 120Hz |
| Phasensteuerung | 0° - 180° Variable |
| Bass Boost | 25Hz - 50Hz, up to 12dB |
| Eingänge | Low-level (RCA), High-level (Speaker), LFE (RCA), 12V Trigger |
| Ausgaben | Subwoofer Output (Binding Posts), High-level Pass-through, 12V Trigger |
| Leistungsmodi | Manual, Auto-Sensing, 12V Trigger |
| Standby-Stromverbrauch | Weniger als 1 Watt |
| Abmessungen (B x H x T) | 17.25 x 3.75 x 13.88 Zoll (43.8 x 9.5 x 35.2 cm) |
| Gewicht | 20 Pfund (9.07 kg) |
| Gehäusematerial | Heavy-duty steel with brushed aluminum faceplate |
| Bandtage | Umschaltbar 120 V/240 V |
10. Garantie und Support
OSD Audio products are designed and manufactured to the highest quality standards. For specific warranty information regarding your BK-SAM300 Subwoofer Amplifier, please refer to the warranty card included with your product or visit the official OSD Audio webDie Garantiebedingungen decken in der Regel Material- und Verarbeitungsfehler bei normalem Gebrauch ab.
For technical support, troubleshooting assistance, or service inquiries, please contact OSD Audio customer support through their official website or the contact information provided with your purchase. Please have your model number (BK-SAM300) and purchase date ready when contacting support.
Online-Ressourcen: For the latest information, FAQs, and additional support, please visit the OSD-Audio webWebsite.


