1. Einleitung
Vielen Dank, dass Sie sich für O entschieden haben.urlife Kids Camera OU-630. This digital camera is designed for children, offering 1080p Full HD video recording, 12MP photo resolution, and a unique 60x macro magnification function for exploring the micro-world. It features a 3.5-inch large screen, various creative filters, games, and music playback. Please read this manual carefully to ensure proper use and maintenance of your camera.
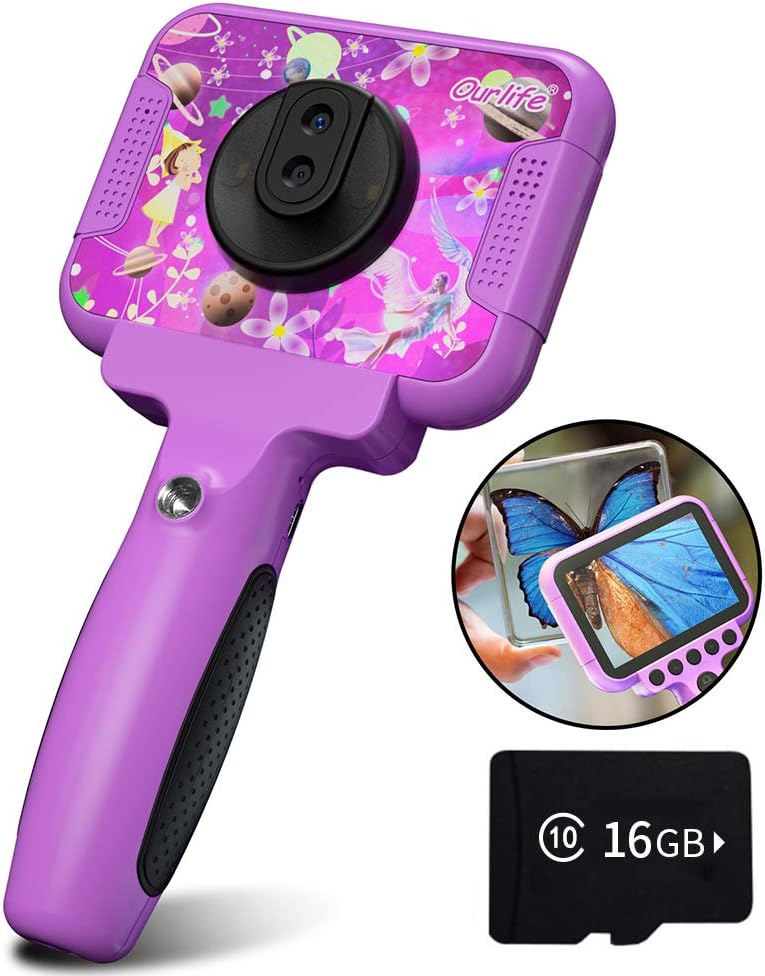
Image 1.1: The Ourlife Kids Camera OU-630, highlighting its design and macro capability.
2. Packungsinhalt
Bitte überprüfen Sie das Paket, um sicherzustellen, dass alle Artikel vorhanden sind:
- Kids Camera x 1
- 16 GB TF-Karte x 1
- Base Bracket x 1
- USB-Ladekabel x 1
- Benutzerhandbuch x 1
- Neck Lanyard x 1
- Handschlaufe x 1

Image 2.1: Contents of the Ourlife Kids Camera OU-630 package.
3. Produktüberschreitungview
Machen Sie sich mit den Komponenten und Bedienelementen der Kamera vertraut:
- Bildschirm: 3.5-Zoll-Farbbildschirm für viewFotos und Videos ansehen sowie Menüs bedienen.
- Hauptobjektiv: For standard photography and video.
- Makroobjektiv: Dedicated lens for 60x magnification.
- Bedientasten: M (Menu), Up, OK, Down, Power, Shutter/LED.
- Handhaben: Ergonomically designed for child-friendly grip.
- USB-Anschluss: Zum Aufladen und zur Datenübertragung.
- TF-Karten-Slot: Zum Einlegen der Speicherkarte.

Image 3.1: Key features and specifications of the Ourlife Kids Camera OU-630.
Tastenfunktionstabelle
| Taste | Kameramodus | Aufnahmemodus | Musikmodus | Spielmodus | Wiedergabemodus |
|---|---|---|---|---|---|
| M | Zurück zum Menü | ||||
| ▲ | Change filters/Frames Long press: Zoom in | Change filters/Frames | Vorheriges Lied | Nach links bewegen | Previous photo |
| OK | Long press: Open/Close LED light | OK | Choose music/story | OK | Abspielen / Pause |
| ▼ | Change filters/Frames Long press: Zoom out | Change filters/Frames | Nächstes Lied | Nach rechts bewegen | Nächstes Foto |
| ⏻ | Switch to Splicing mode | Zurück zum Menü | NULL | NULL | Löschen |
| ◎ | Foto aufnehmen | Zurück zum Menü | NULL | NULL | NULL |
Image 3.2: Detailed functions of each button across different modes.
4. Einrichtung
4.1. Aufladen der Kamera
Before first use, fully charge the camera. Connect the included USB charging cable to the camera's USB port and to a compatible USB power source (e.g., computer, wall adapter). The charging indicator light will show the charging status. A full charge provides approximately 3 hours of use.
4.2. Einlegen der TF-Karte
The camera requires a TF (MicroSD) card to store photos and videos. A 16GB TF card is included. Locate the TF card slot on the side of the camera. Gently insert the TF card with the metal contacts facing down until it clicks into place. To remove, push the card in again until it springs out.
5. Bedienungsanleitung
5.1. Ein-/Ausschalten
- Zum Einschalten halten Sie die Power button (⏻) bis der Bildschirm aufleuchtet.
- Halten Sie zum Ausschalten die Taste gedrückt Power button (⏻) bis sich der Bildschirm ausschaltet.
5.2. Menünavigation
Verwenden Sie die Nach oben (▲) Und Runter (▼) buttons to navigate through menu options. Press the OK-Taste Um die Auswahl zu bestätigen, drücken Sie die Taste M-Taste (Menü) to return to the previous menu or the main menu.
5.3. Fotos machen
- Wählen Sie im Hauptmenü die aus Kamerasymbol und drücke OK.
- Nutzen Sie den Bildschirm, um den Bildausschnitt festzulegen.
- Drücken Sie die Shutter button (◎) um ein Foto aufzunehmen.
- Verwenden Sie die Nach oben (▲) Und Runter (▼) buttons to change filters or frames. Long press Nach oben (▲) Zum Vergrößern lange drücken Runter (▼) herauszuzoomen.
5.4. Videos aufnehmen
- Wählen Sie im Hauptmenü die aus Videosymbol und drücke OK.
- Drücken Sie die Shutter button (◎) , um die Aufnahme zu starten.
- Drücken Sie die Shutter button (◎) erneut, um die Aufnahme zu stoppen.
- Verwenden Sie die Nach oben (▲) Und Runter (▼) buttons to change filters or frames during recording.
5.5. Macro Function
The camera features a dedicated macro lens for 60x magnification, ideal for observing small objects. The optimal focal length for macro photography is 20-40mm.
- To switch between the main lens and macro lens, long press the Shutter button (◎).
- When in macro mode, position the camera close to the subject (20-40mm distance).
- Use the included base bracket for stability during macro shots to prevent hand shake.
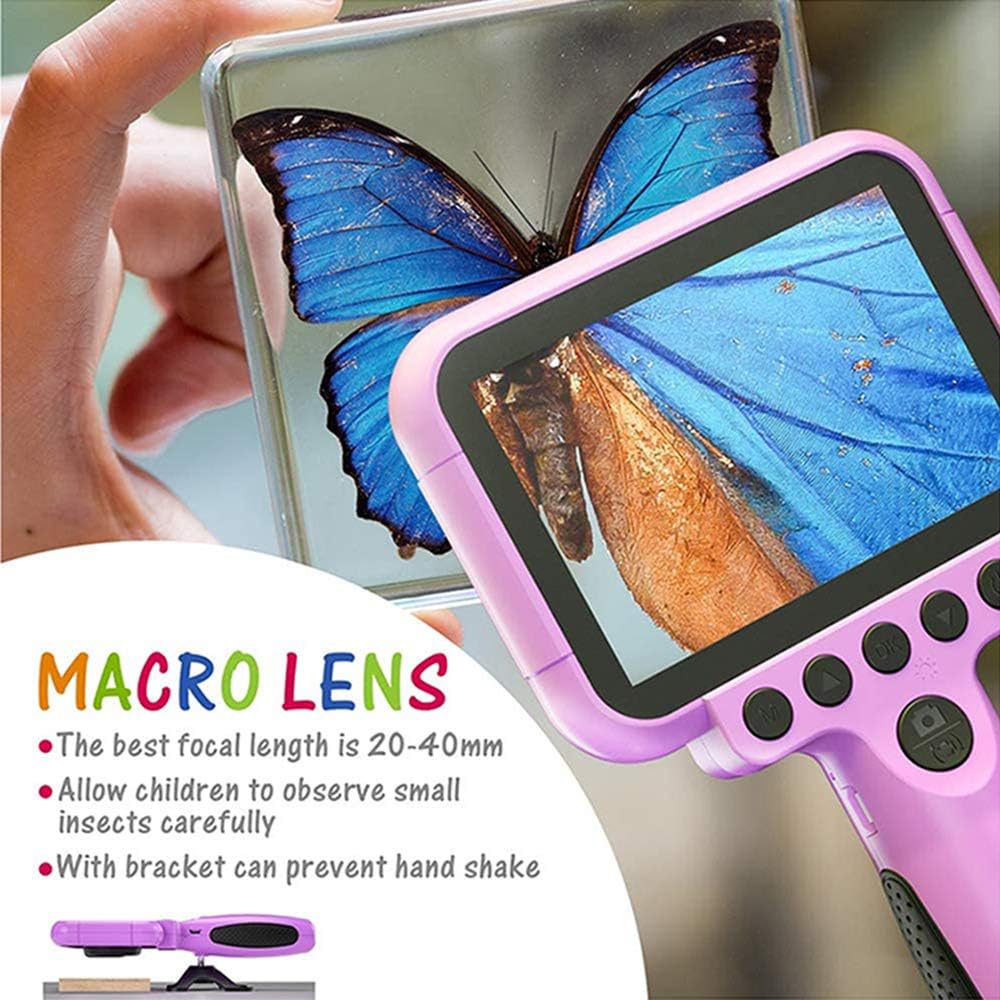
Image 5.1: Demonstrating the macro lens function for detailed observation.

Image 5.2: Switching between HD and Macro lenses.
5.6. Patchwork Mode (Splicing Mode)
This mode allows you to combine two separate photos into one. It includes various border patterns.
- In Camera Mode, press the Power button (⏻) to switch to Splicing (Patchwork) mode.
- Follow the on-screen prompts to take two photos that will be merged.
- Select from 9 available border patterns.

Image 5.3: Using the Patchwork Mode to combine images.
5.7. Musikmodus
The camera supports MP3 music playback. Store your favorite music files on the TF card. From the main menu, select the Musik-Symbol und drücke OKVerwenden Sie die Nach oben (▲) Und Runter (▼) buttons to select songs, and OK abspielen/pausieren.
5.8. Spiele
The camera includes pre-installed games for entertainment. From the main menu, select the Game icon und drücke OK. Use the navigation buttons to play.
5.9. Wiedergabemodus
Zu view your captured photos and videos, select the Photos/Video Playback icon aus dem Hauptmenü und drücken Sie OKVerwenden Sie die Nach oben (▲) Und Runter (▼) buttons to browse, and OK to play videos or view photos. To delete a file, drücken Sie die Power button (⏻) während viewes.
5.10. Einstellungen
Access camera settings by selecting the Symbol „Einstellungen“ from the main menu. Here you can adjust various parameters such as date/time, language, resolution, and more.
6. Wartung
- Halten Sie die Kamera sauber, indem Sie sie mit einem weichen, trockenen Tuch abwischen.
- Vermeiden Sie es, die Kamera extremen Temperaturen, direkter Sonneneinstrahlung oder Feuchtigkeit auszusetzen.
- Versuchen Sie nicht, die Kamera selbst zu zerlegen oder zu reparieren.
- Ensure the TF card is inserted correctly to prevent data loss.
- Charge the camera regularly to maintain battery health.
7. Fehlerbehebung
- Kamera lässt sich nicht einschalten: Stellen Sie sicher, dass der Akku geladen ist. Schließen Sie das Gerät an eine Stromquelle an und versuchen Sie es erneut.
- Kann keine Fotos/Videos aufnehmen: Check if a TF card is inserted and if it has sufficient storage space.
- Schlechte Bildqualität: Ensure the lens is clean. Check lighting conditions. For macro shots, ensure correct focal distance (20-40mm).
- Kamera friert ein: Durch Drücken und Halten des Netzschalters wird ein Neustart erzwungen.
- TF card error: Reinsert the TF card. If the issue persists, try formatting the card (this will erase all data) or use a different TF card.
8. Spezifikationen
| Besonderheit | Detail |
|---|---|
| Modellnummer | OU-630 |
| Effektive Standbildauflösung | 12 Megapixel |
| Videoauflösung | 1080p |
| Bildschirmgröße | 3.5 Zoll |
| Bildstabilisierung | Digitales |
| Objektivtyp | Macro (60x zoom) |
| Akku-Typ | 1 Lithium-Polymer (im Lieferumfang enthalten) |
| Konnektivitätstechnologie | USB |
| Unterstützte Medientypen | SD-Karte |
| Aufnahmemodi | Loop recording, Continuous shooting, Timed photo, Macro photography, Filter photos |
| Artikelabmessungen (T x B x H) | 3.94"T x 7.28"B x 0.79"H |
9. Garantie und Support
Dieses Ourlife Kids Camera OU-630 comes with a 12 Monate Garantie from the date of purchase. This warranty covers manufacturing defects and workmanship. It does not cover damage caused by misuse, accidents, unauthorized repairs, or normal wear and tear.
For technical support, warranty claims, or any questions regarding your product, please contact Ourlife customer service. Refer to the contact information provided on the product packaging or the official Ourlwenn webWebsite.


