1. Produktüberschreitungview
The NU Aqua Polypropylene Tankless Water Purification Unit is designed to provide clean, purified drinking water directly from your faucet. This advanced tankless reverse osmosis system offers high capacity and efficient filtration for both residential and small business use.
Zu den Hauptmerkmalen gehören:
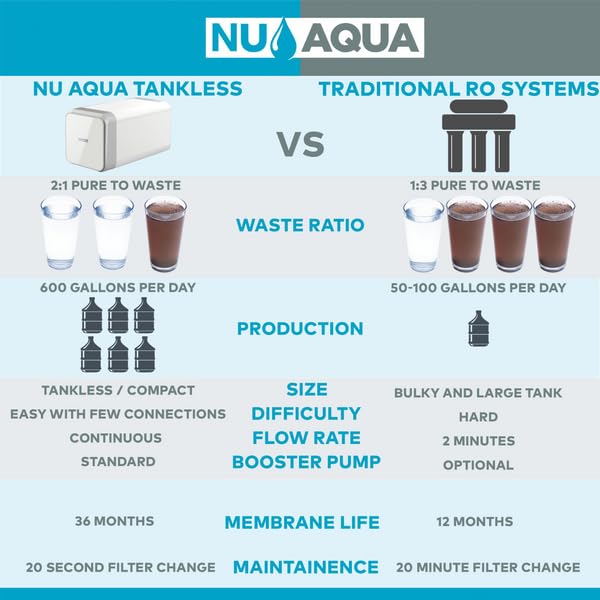
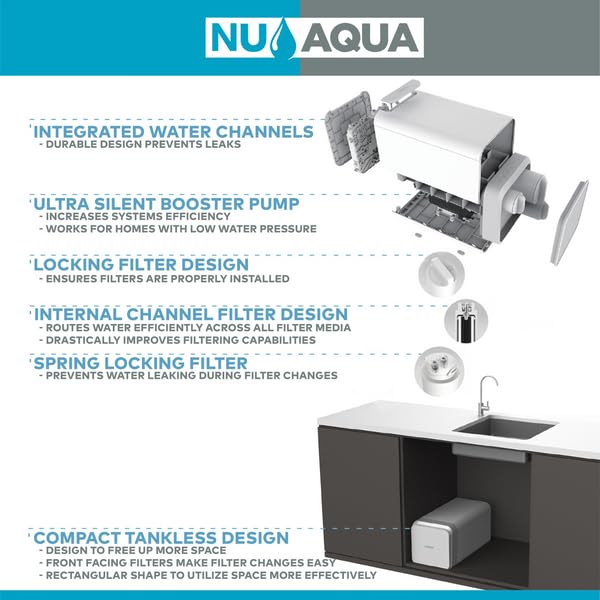
- Tankloses Design: Provides on-demand purified water without the need for a bulky storage tank, saving space.
- Hohe Kapazität: Capable of producing up to 600 gallons per day, suitable for large households or small commercial applications.
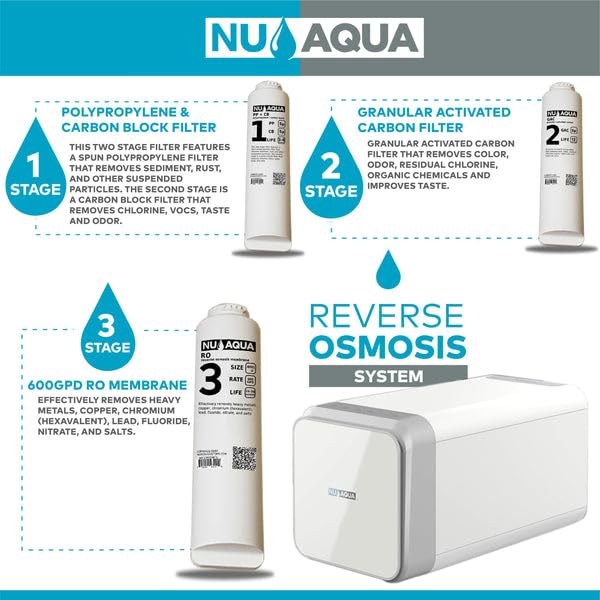
- Multi-Stage Filtration: Utilizes a comprehensive filtration process including polypropylene, granular activated carbon, and a reverse osmosis membrane to remove impurities.
- Einfache Wartung: Features easily replaceable cartridges for simplified filter changes.
- Langlebige Konstruktion: Built with robust polypropylene plastic for long-lasting performance.

2. Enthaltene Komponenten
Before beginning installation, ensure all components listed below are present in your package.
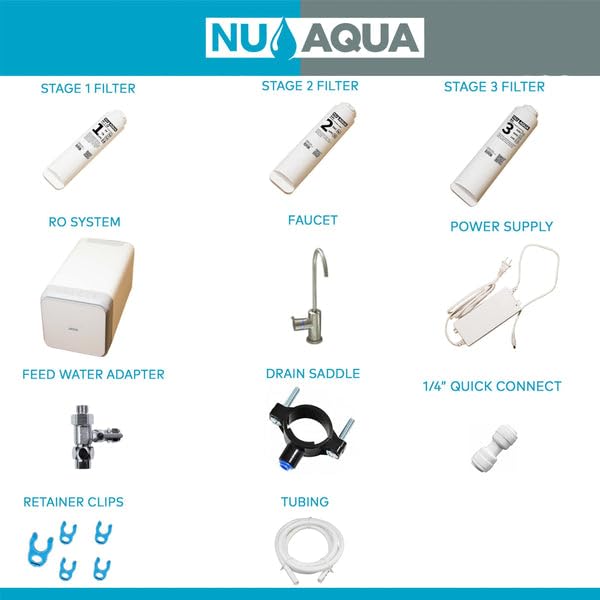
- Main RO System Unit
- Stage 1 Filter (Polypropylene & Carbon Block)
- Stage 2 Filter (Granular Activated Carbon)
- Stage 3 Filter (RO Membrane)
- Spezieller Wasserhahn
- Stromversorgung
- Speisewasseradapter
- Sattel entleeren
- 1/4" Quick Connect Fittings
- Halteklammern
- Schläuche
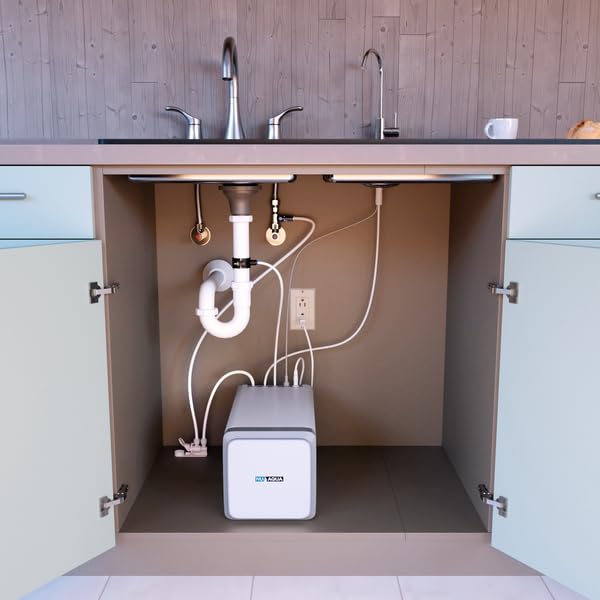
3. Einrichtung und Installation
The NU Aqua Tankless Water Purification Unit is designed for under-sink installation. Follow these general steps for setup. Refer to the detailed installation guide provided with your unit for specific instructions and safety precautions.
- Bereiten Sie den Installationsbereich vor: Ensure sufficient space under your sink for the unit and access for maintenance. Turn off the cold water supply to the sink.
- Installieren Sie den Wasserhahn: Drill a hole in your countertop or sink for the dedicated faucet, if one is not already present. Secure the faucet according to the instructions.
- Anschluss an die Kaltwasserversorgung: Install the feed water adapter to your cold water line. Connect the appropriate tubing from the adapter to the RO system unit.
- Ablaufsattel montieren: Attach the drain saddle to the drain pipe under your sink. Connect the drain line from the RO system to the drain saddle.
- Wasserhahn anschließen: Connect the purified water line from the RO system to the dedicated faucet.
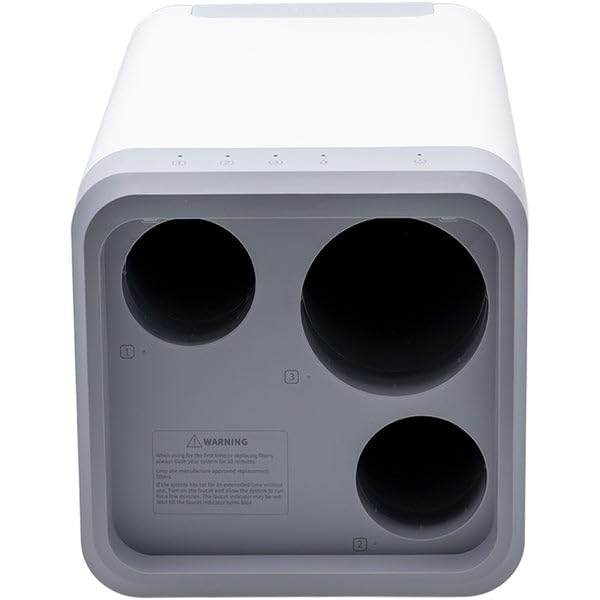
- Filter einfügen: Carefully insert the Stage 1, 2, and 3 filters into their respective slots in the main unit. Ensure they are securely locked in place.
- Strom anschließen: Plug the power supply into the unit and then into a standard electrical outlet.
- Spülen Sie das System: Turn on the cold water supply. Open the RO faucet and allow water to run for a specified period (e.g., 15-30 minutes) to flush the system and remove any carbon fines or air.
4. Bedienungsanleitung
Once installed and flushed, operating your NU Aqua Tankless Water Purification Unit is straightforward.
- Wasserabgabe: To obtain purified water, simply open the dedicated RO faucet. The tankless system will begin producing water on demand.
- Durchflussrate: The system provides a continuous flow of purified water at a rate suitable for drinking and cooking needs.
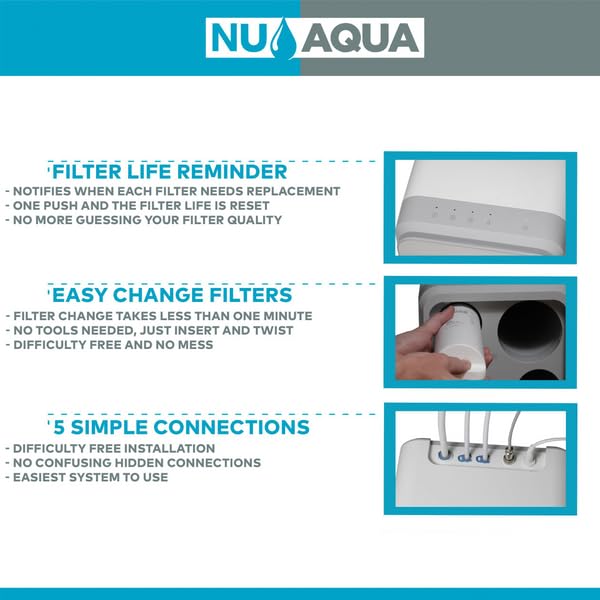
- Kontrollleuchten: The unit may feature indicator lights on its top panel to show system status or filter life. Refer to the unit's specific indicators for details.
5. Wartung
Regular maintenance, primarily filter replacement, is crucial for the optimal performance and longevity of your water purification unit.
5.1 Filterwechsel
The system features a filter life reminder and easy-change filters. Filter replacement typically takes less than one minute and requires no tools.
Recommended Filter Change Intervals:
- Stage 1 & 2 Filters: Typically every 6-12 months, depending on water quality and usage.
- Stage 3 RO-Membran: Approximately every 24-36 months, depending on water quality and usage.
Procedure for Filter Change:
- Unterbrechen Sie die Wasserzufuhr zum Gerät.
- Trennen Sie die Stromversorgung.
- Twist and pull out the old filter cartridge from its slot.
- Insert the new filter cartridge, aligning it correctly, and twist to lock it into place.
- Plug in the power supply and turn on the water supply.
- Flush the new filter(s) by running water through the faucet for a few minutes as per the initial setup instructions.
- Reset the filter life reminder on the unit, if applicable.
6. Fehlerbehebung
This section provides solutions to common issues you might encounter with your water purification unit.
| Problem | Mögliche Ursache | Lösung |
|---|---|---|
| Kein oder nur sehr langsamer Wasserdurchfluss |
|
|
| Poor water taste or odor |
|
|
| Wasserleck |
|
|
If you encounter issues not listed here or require further assistance, please contact NU Aqua customer support.
7. Spezifikationen
| Attribut | Detail |
|---|---|
| Marke | NU Aqua |
| Modellname | Effizienz |
| Besonderheit | Durchlauferhitzer |
| Paketinformationen | Patrone |
| UPC | 666714339999 |
| Hersteller | NU Aqua |
| Kapazität | 600 Gallonen pro Tag (GPD) |
| Filterung Stages | 3 (Polypropylene & Carbon Block, Granular Activated Carbon, RO Membrane) |
| Material | Polypropylen-Kunststoff |
8. Garantie und Support
For information regarding product warranty, technical support, or to purchase replacement filters, please refer to the official NU Aqua webSie können die Website besuchen oder sich direkt an den Kundendienst wenden. Die Kontaktdaten finden Sie in der Regel auf der Produktverpackung oder in den offiziellen Online-Ressourcen des Herstellers.
NU Aqua Official Store: Visit the NU Aqua Store on Amazon