1. Produktüberschreitungview
The Sharp Digital Clock is designed for simplicity and convenience, featuring a clear green LED display and dual USB FastCharge ports for charging your devices. It includes an alarm function and a battery backup system to retain settings during power outages.

Abbildung 1: Vorderseite view of the Sharp Digital Clock, highlighting the large green LED display and dual USB charging ports.
2. Installationsanleitung
2.1 Stromanschluss
Connect the provided power adapter to the DC IN jack located at the back of the clock. Plug the other end into a standard electrical outlet. The display will illuminate, and the clock will be ready for time setting.
2.2 Batterie-Backup (optional)
For battery backup functionality, which retains time and alarm settings during a power outage, install two (2) AAA batteries (not included) into the battery compartment located on the bottom of the unit. During battery backup, the display will go blank to conserve power, but settings will be preserved.
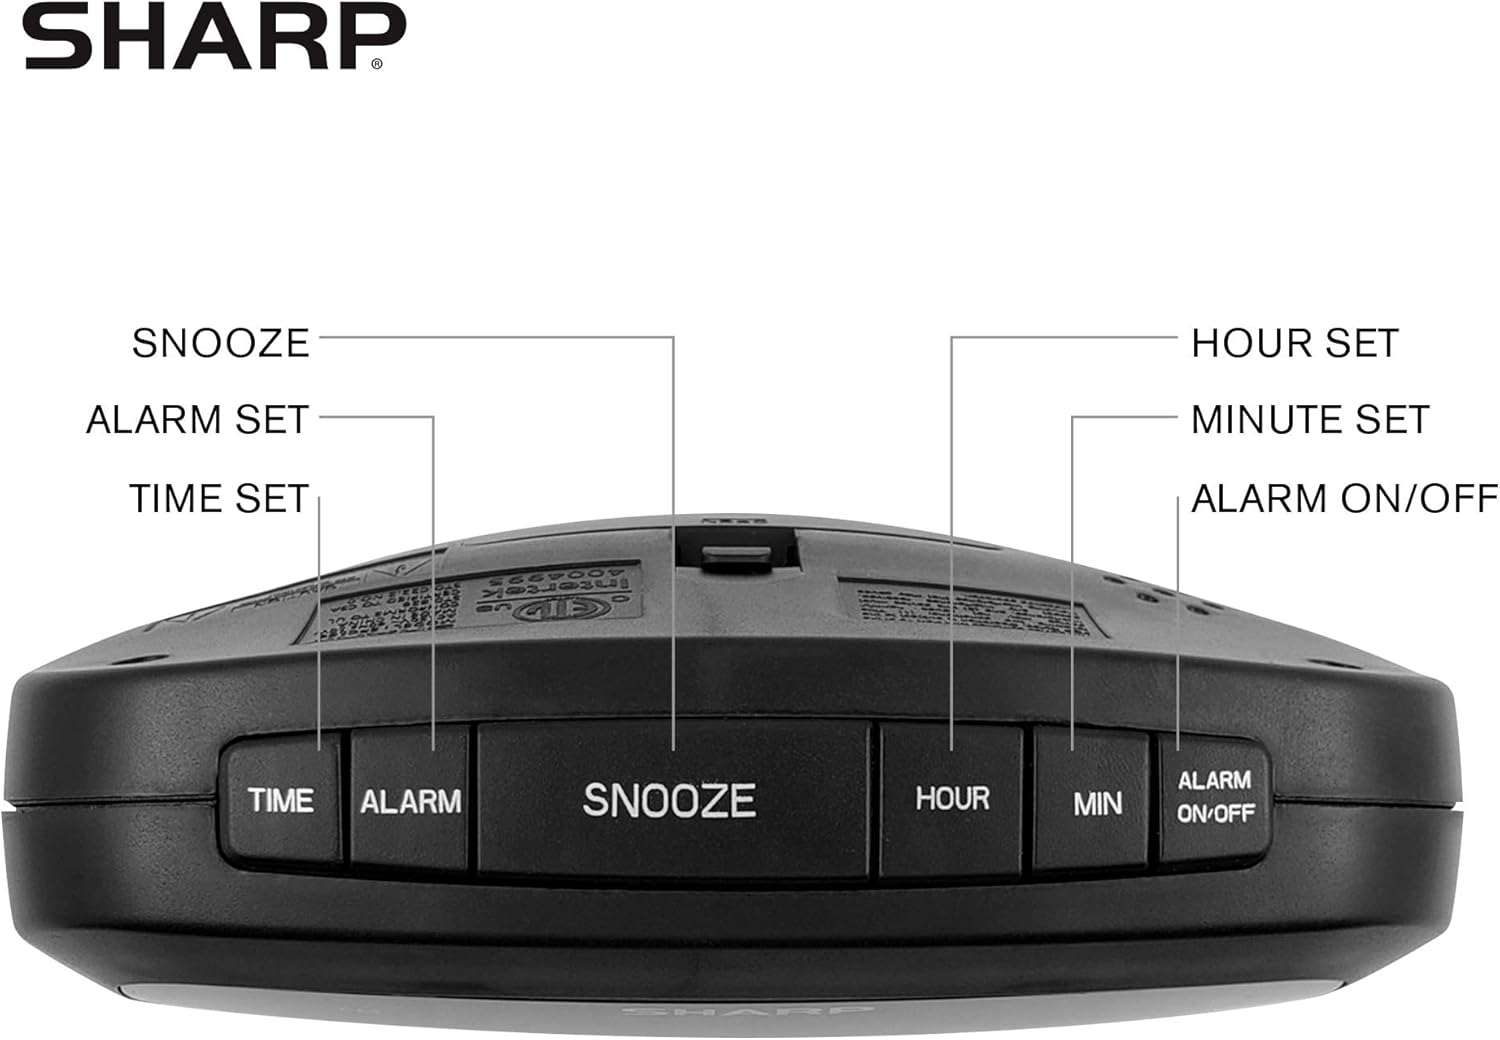
Figure 2: Underside of the clock with the battery compartment visible, requiring 2 AAA batteries for backup.
3. Bedienungsanleitung
The clock features intuitive top-mounted buttons for easy operation.

Figure 3: Top panel of the clock with clearly labeled buttons for time, alarm, snooze/dimmer, hour, minute, and alarm on/off.
3.1 Uhrzeit einstellen
- Halten Sie die ZEIT Drücken Sie die Taste, bis die Stundenziffern zu blinken beginnen.
- Drücken Sie die STUNDE button to adjust the hour. Pay attention to the PM indicator if setting a PM time.
- Drücken Sie die MIN Taste zum Einstellen der Minuten.
- Drücken Sie die ZEIT button again to confirm and save the time.
3.2 Wecker stellen
- Halten Sie die ALARM Drücken Sie die Taste, bis die Ziffern der Alarmstunde zu blinken beginnen.
- Drücken Sie die STUNDE Taste, um die Weckzeit einzustellen.
- Drücken Sie die MIN Taste zum Einstellen der Alarmminuten.
- Drücken Sie die ALARM button again to confirm and save the alarm time.
- Zum Aktivieren oder Deaktivieren des Alarms drücken Sie die Taste ALARM EIN / AUS button. An alarm indicator light will appear on the display when the alarm is active.
3.3 Schlummer- und Dimmfunktion
- Wenn der Alarm ertönt, drücken Sie die große Taste. SCHLUMMER/DIMMER Taste zum vorübergehenden Stummschalten des Alarms für einige Minuten.
- To adjust the brightness of the green LED display, repeatedly press the SCHLUMMER/DIMMER button when the alarm is not sounding. Cycle through bright, medium, and low brightness settings.
3.4 Verwendung der USB-Ladeanschlüsse
The clock is equipped with two 2 AMP USB charging ports on the front, allowing you to conveniently charge your smartphone or other USB-powered devices directly from the clock.

Figure 4: The clock demonstrating its dual USB charging capability with two smartphones connected.
- Simply connect your device's USB charging cable to one of the USB ports on the front of the clock.
- Ensure your device is compatible with 2 AMP charging for optimal speed.
4. Wartung
To ensure the longevity and proper functioning of your Sharp Digital Clock, follow these simple maintenance guidelines:
- Reinigung: Wipe the clock with a soft, dry cloth. Do not use abrasive cleaners, waxes, or solvents as they may damage the finish.
- Platzierung: Stellen Sie die Uhr auf eine stabile, ebene Fläche, fern von direkter Sonneneinstrahlung, Wärmequellen und übermäßiger Feuchtigkeit.
- Batteriewechsel: If using the battery backup, replace the AAA batteries annually or when the clock consistently loses time during power interruptions.
5. Fehlerbehebung
| Problem | Mögliche Ursache | Lösung |
|---|---|---|
| Die Uhranzeige ist leer. | Kein Strom oder Stromausfalltage. | Ensure the power adapter is securely plugged into the clock and a working electrical outlet. If there was a power outage, check if backup batteries are installed and functional. |
| Der Alarm ertönt nicht. | Alarm nicht eingestellt oder nicht aktiviert. | Verify that the alarm time is correctly set and that the alarm indicator light is visible on the display (press ALARM ON/OFF). |
| USB-Anschlüsse dienen nicht zum Laden von Geräten. | Device incompatibility or faulty cable. | Ensure your device is compatible with USB charging. Try a different USB cable. Confirm the clock is powered on. |
| Das Display ist zu hell/zu dunkel. | Die Helligkeitseinstellung muss angepasst werden. | Press the SNOOZE/DIMMER button repeatedly to cycle through brightness levels (bright, medium, low). |
6. Produktspezifikationen
- Marke: Scharf
- Modell: B08H3STVWG
- Anzeigetyp: Digital Green LED
- Energiequelle: Kabelgebundene Elektrik
- Batterie-Backup: 2 x AAA-Batterien (nicht im Lieferumfang enthalten)
- USB-Anschlüsse: 2 x 2 AMP USB FastCharge Ports
- Produktabmessungen: 5.95 Zoll B x 2.3 Zoll H
- Artikelgewicht: 9.59 Unzen
- Farbe: Grüne LED
- Material: Plastik
- UPC: 049353005089
7. Garantie und Support
This Sharp Digital Clock comes with a limited warranty. For detailed warranty information, product support, or to purchase accessories, please visit the official Sharp webSie können auch die Website besuchen oder sich an deren Kundenservice wenden. Sharp Store bei Amazon.
Bitte bewahren Sie Ihren Kaufbeleg für Garantieansprüche auf.