1. Einleitung
This manual provides essential information for the safe and efficient use, installation, and maintenance of your Candy PLE 64 X 4-burner built-in ceramic electric cooktop. Please read these instructions carefully before using the appliance and keep them for future reference.
2. Sicherheitshinweise
Beachten Sie stets die folgenden Sicherheitsvorkehrungen, um Verletzungen oder Schäden am Gerät zu vermeiden.
- Stellen Sie sicher, dass das Gerät von einem qualifizierten Techniker gemäß den örtlichen Vorschriften installiert wird.
- Do not operate the cooktop if the ceramic surface is cracked or broken. Disconnect from power immediately.
- Halten Sie Kinder während des Betriebs und der Abkühlphase vom Gerät fern. Die Oberfläche bleibt nach Gebrauch heiß.
- Do not use abrasive cleaning agents or sharp metal scrapers to clean the cooktop, as they can scratch the surface.
- Lassen Sie beim Kochen niemals die Aufsicht, insbesondere nicht bei hohen Hitzestufen.
- Ensure adequate ventilation in the kitchen during use.
- Lagern Sie keine brennbaren Materialien in der Nähe des Kochfelds.
- Trennen Sie das Gerät vor jeder Reinigung oder Wartung vom Stromnetz.
3. Installation
The Candy PLE 64 X cooktop is designed for drop-in installation into a kitchen countertop. Professional installation is recommended.
3.1 Abmessungen und Ausschnitt
Refer to the diagram below for precise dimensions and the required countertop cut-out measurements.
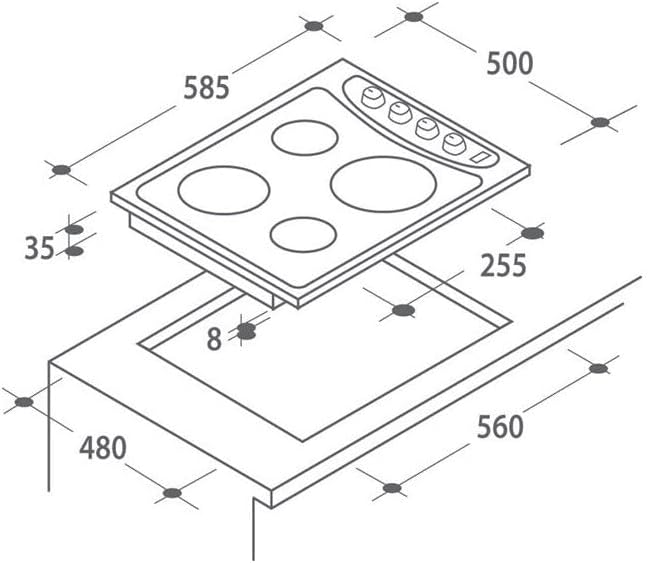
Abbildung 1: Installation diagram showing the cooktop dimensions (585x500mm) and the required countertop cut-out (560x480mm), with a depth of 35mm and a minimum clearance of 8mm below.
- Produktabmessungen: 51 cm (Depth) x 9 cm (Height) x 61 cm (Width)
- Ausschnittmaße: Approximately 56 cm (Width) x 48 cm (Depth)
- Ensure sufficient space for ventilation around the appliance.
3.2 Elektrischer Anschluss
The appliance requires a 220 Volt electrical supply. The electrical connection must be performed by a qualified electrician, ensuring compliance with all local electrical codes and regulations.
- Verify that the household electrical system can support the cooktop's power requirements.
- Install an accessible disconnect switch or circuit breaker near the appliance.
4. Bedienungsanleitung
Your Candy PLE 64 X cooktop features four ceramic heating elements controlled by rotary knobs.
4.1 Bedienfeld vorbeiview

Abbildung 2: Control panel featuring four rotary knobs for individual burner control.
Each knob corresponds to a specific heating zone. The symbols around the knobs indicate the power levels or functions.
4.2 Turning On and Adjusting Heat
- Place a suitable cooking pot or pan on the desired ceramic heating zone.
- Turn the corresponding rotary knob clockwise to the desired heat setting. The settings typically range from minimum (low heat) to maximum (high heat).
- The heating element will begin to heat up. An indicator light may illuminate to show that the zone is active.
4.3 Ausschalten
To turn off a heating zone, rotate its knob counter-clockwise until it clicks into the 'off' position. The indicator light will extinguish.
4.4 Restwärmeanzeige
After turning off a heating zone, the ceramic surface will remain hot for some time. Many ceramic cooktops include a residual heat indicator (often an 'H' symbol) that stays lit until the surface temperature drops to a safe level. Exercise caution when cleaning or touching the cooktop after use.
5. Reinigung und Wartung
Regelmäßige Reinigung und Wartung gewährleisten die Langlebigkeit und optimale Leistung Ihres Kochfelds.
- Tägliche Reinigung: After each use, once the cooktop has cooled down, wipe the ceramic surface with a damp cloth and a small amount of mild dish soap. Rinse thoroughly and dry with a clean cloth to prevent water spots.
- Hartnäckige Flecken: For burnt-on food or stubborn stains, use a specialized ceramic hob cleaner and a non-abrasive scraper designed for ceramic surfaces. Follow the product instructions carefully.
- Vermeiden: Do not use abrasive sponges, scouring pads, harsh chemicals, or steam cleaners, as these can damage the ceramic surface.
- Steuerknöpfe: The control knobs can be removed for cleaning. Wipe them with a damp cloth and dry thoroughly before reattaching.
- Inspektion: Periodically inspect the cooktop for any signs of damage, especially to the ceramic surface or electrical connections. If damage is found, contact a qualified technician.
6. Fehlerbehebung
Bevor Sie sich an den Kundendienst wenden,view Im Folgenden werden häufig auftretende Probleme und ihre möglichen Lösungen vorgestellt.
| Problem | Mögliche Ursache | Lösung |
|---|---|---|
| Das Kochfeld lässt sich nicht einschalten. | No power supply; circuit breaker tripped; appliance not properly connected. | Check the power supply and circuit breaker. Ensure the appliance is correctly plugged in or wired. |
| Heizelement heizt nicht. | Knob not set correctly; internal fault. | Ensure the knob is turned to a heat setting. If the issue persists, contact a qualified technician. |
| Cooktop surface is stained or discolored. | Burnt-on food; improper cleaning agents. | Clean with a specialized ceramic hob cleaner and a non-abrasive scraper after the surface has cooled. Avoid abrasive materials. |
| Ungewöhnliche Gerüche bei der ersten Benutzung. | Rückstände aus dem Herstellungsprozess. | This is normal for initial use. Ensure good ventilation. The odor will dissipate. |
7. Technische Daten
| Besonderheit | Spezifikation |
|---|---|
| Marke | Süßigkeiten |
| Modell | PLE 64 X |
| Installationstyp | Drop-in |
| Kochfeldtyp | Keramikelektrisch |
| Anzahl der Heizelemente | 4 |
| Steuerungstyp | Knopf |
| Bandtage | 220 Volt |
| Stromquelle | Elektrisch |
| Produktabmessungen (T x H x B) | 51 cm x 9 cm x 61 cm |
| Artikelgewicht | 9 Kilogramm |
| Im Lieferumfang enthaltene Komponenten | Keiner |
| Batterien erforderlich | NEIN |
8. Garantie und Support
For warranty information, please refer to the warranty card included with your product or contact your retailer. For technical support or service inquiries, please contact Candy customer service or an authorized service center.
Bewahren Sie Ihren Kaufbeleg als Kaufnachweis für Garantieansprüche auf.


