1. Produktüberschreitungview
The SCANGRIP NOVA R is a versatile, rechargeable COB LED floodlight designed for professional use. It offers powerful illumination, a compact design, and practical features for various work environments.

Abbildung 1: Vorderseite view of the SCANGRIP NOVA R floodlight, showcasing dank seiner kompakten und robusten Bauweise.
Hauptmerkmale:
- Rechargeable COB LED work light, providing up to 2000 lumens.
- Slim and compact design for portability and ergonomic handling.
- 5-step dimming function to adjust light output.
- Integrated magnetic bracket for flexible positioning.
- Built-in power bank with USB outlet for charging mobile devices.
- Waterproof (IP67) for use in challenging conditions.

Figure 2: The floodlight stored compactly within a tool bag, highlighting its portability.

Figure 3: The floodlight positioned on a workbench in a garage setting, ready for use.
2. Sicherheitshinweise
Please read these safety instructions carefully before using the SCANGRIP NOVA R floodlight. Failure to follow these instructions may result in electric shock, fire, or serious injury.
- Do not look directly into the light source when it is active. The intense light can cause eye damage.
- Bewahren Sie das Gerät außerhalb der Reichweite von Kindern auf.
- Versuchen Sie nicht, das Gerät zu öffnen, zu verändern oder zu reparieren. Überlassen Sie alle Wartungsarbeiten qualifiziertem Fachpersonal.
- Use only the provided charging cable and charger, or a compatible certified charger.
- Setzen Sie das Gerät keinen extremen Temperaturen, direkter Sonneneinstrahlung über längere Zeiträume oder offenen Flammen aus.
- Um die Wasserdichtigkeitsklasse IP67 zu erhalten, muss die Abdeckung des Ladeanschlusses sicher geschlossen sein, wenn der Ladevorgang nicht durchgeführt wird.
- Dispose of the battery responsibly according to local regulations. Do not incinerate.
3. Produktkomponenten und Bedienelemente
Familiarize yourself with the different parts and controls of your NOVA R floodlight.

Figure 4: Annotated diagram highlighting key features such as the COB LED, battery indicator, dimming controls, built-in power bank, powerful magnets, and flexible stand.
Control Panel (Refer to Figure 4 and Figure 5):
- Netzschalter: Schaltet das Licht ein/aus.
- Dimmertasten (+/-): Adjusts light intensity through 5 steps.
- Batterieanzeige: Zeigt den aktuellen Akkuladestand an.
- USB-Ausgangsport: Zum Laden externer Geräte.
- Ladeeingangsanschluss: For recharging the floodlight.
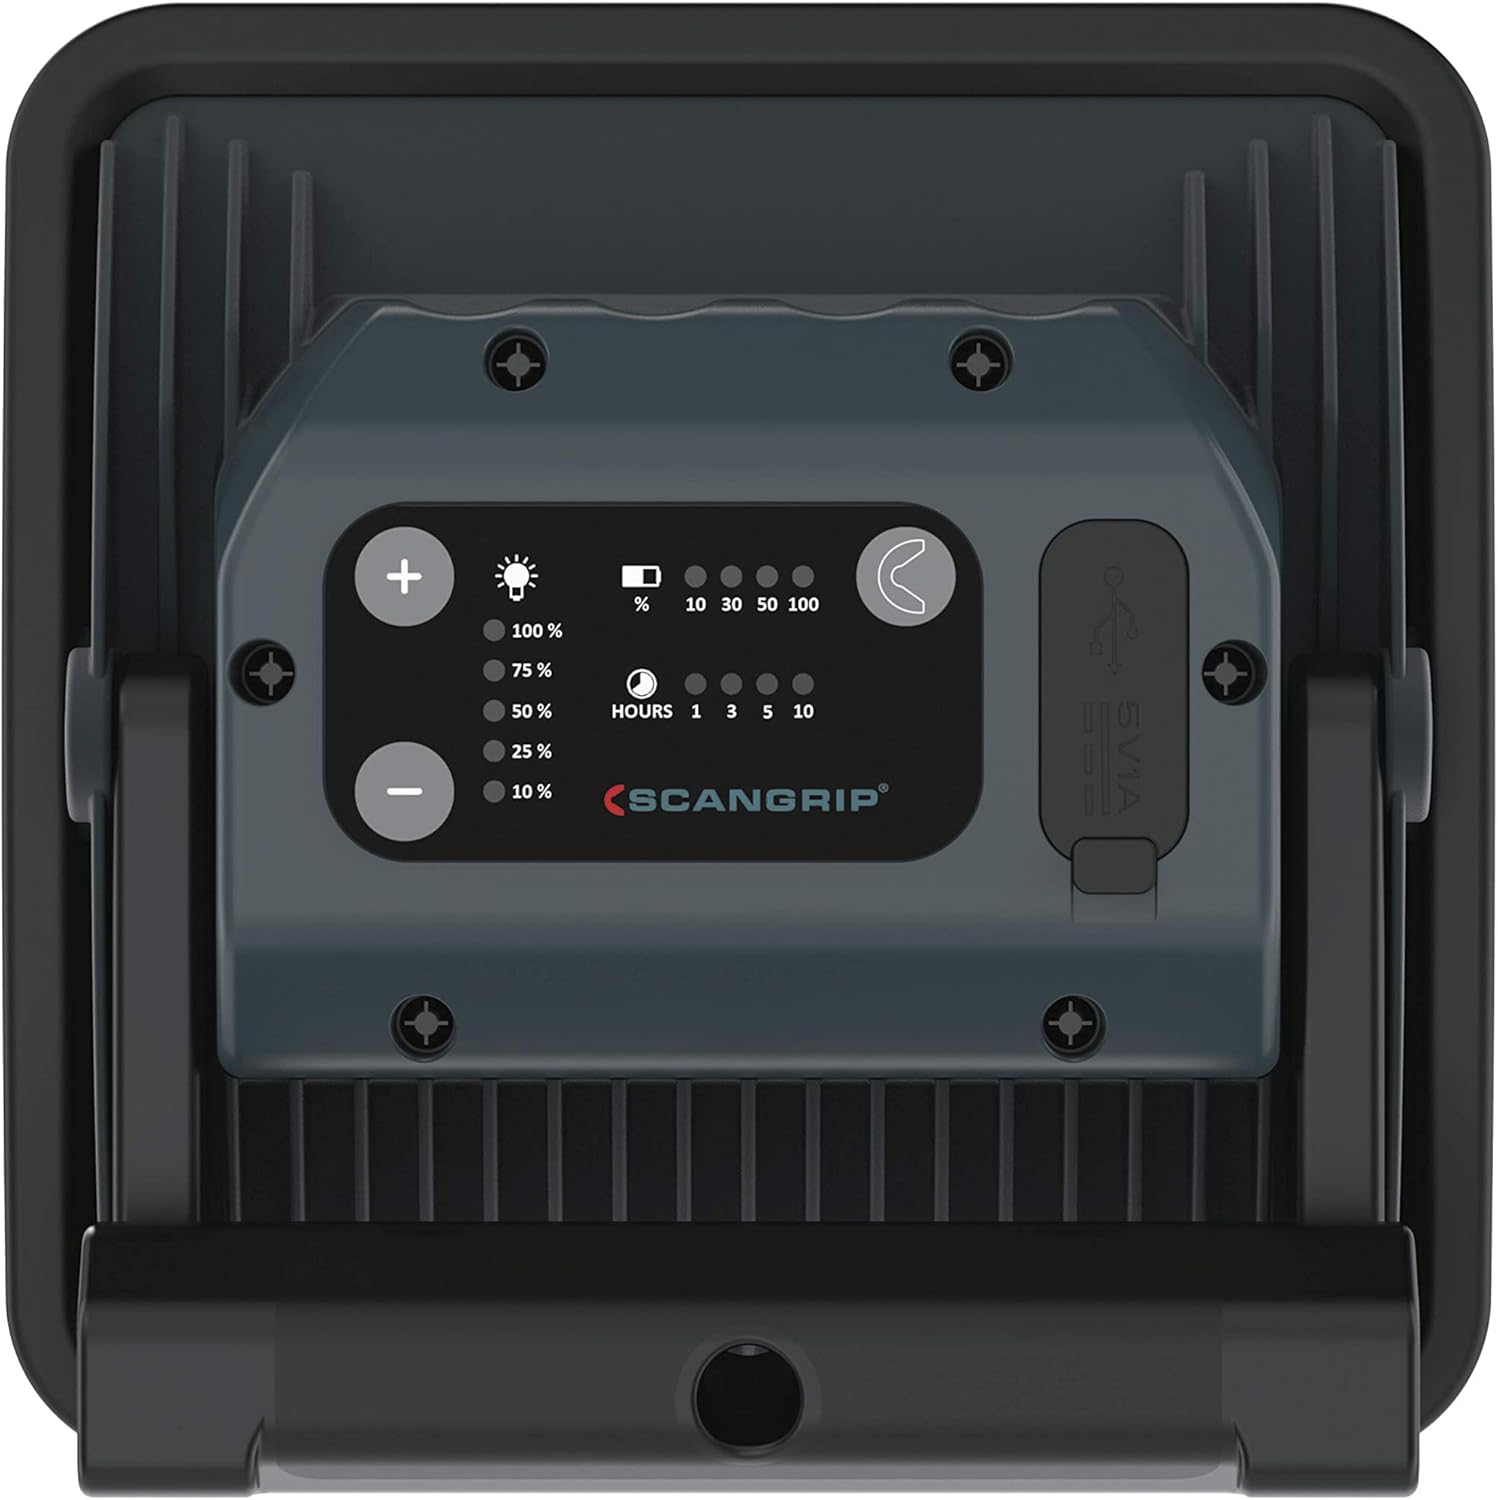
Figure 5: Close-up of the rear control panel, showing the power, dimming buttons, battery indicators, and USB ports.
4. Einrichtung
4.1 Erstaufladung
Before first use, fully charge the NOVA R floodlight. This ensures optimal battery performance and longevity.
- Locate the charging input port on the rear of the floodlight.
- Connect the provided charging cable to the floodlight and a suitable power source (e.g., wall adapter, USB port).
- Die Akkuanzeigeleuchten leuchten auf und zeigen den Ladefortschritt an. Alle Leuchten leuchten dauerhaft, wenn der Akku vollständig geladen ist.
- Sobald der Akku vollständig geladen ist, trennen Sie das Ladekabel und vergewissern Sie sich, dass die Anschlussabdeckung fest verschlossen ist.
4.2 Positioning the Floodlight
The NOVA R features a flexible stand and powerful built-in magnets for versatile positioning.
- Flexible Stand: Adjust the stand to tilt the light up to 160 degrees, directing illumination precisely where needed.
- Eingebaute Magnete: Attach the floodlight to any magnetic surface for hands-free operation. Ensure the surface is stable enough to support the light's weight.

Figure 6: The floodlight magnetically attached to a metal workbench, demonstrating its flexible positioning capabilities.
5. Bedienungsanleitung
5.1 Turning On/Off and Dimming
- Press the power button once to turn the floodlight on.
- Use the '+' and '-' buttons to cycle through the 5 dimming steps to achieve the desired light intensity.
- Press the power button again to turn the floodlight off.

Figure 7: A hand holding the floodlight, illustrating its ergonomic design for handheld use.

Figure 8: A user holding the floodlight to inspect a wall, demonstrating its handheld use and illumination capabilities.
5.2 Nutzung der Powerbank-Funktion
The NOVA R can be used as a power bank to charge your mobile devices.
- Open the cover of the USB output port on the rear of the floodlight.
- Connect your device's USB charging cable to the floodlight's USB output port.
- Charging will begin automatically. Monitor your device's charging status.
- Sobald der Ladevorgang abgeschlossen ist, trennen Sie das Kabel und schließen Sie die Abdeckung des USB-Anschlusses sicher.

Figure 9: The floodlight actively charging a smartphone via its built-in USB power bank function.
6. Wartung
6.1 Reinigung
- Vor der Reinigung muss sichergestellt sein, dass das Gerät ausgeschaltet und von jeglicher Stromquelle getrennt ist.
- Wipe the exterior of the floodlight with a soft, damp Tuch.
- Verwenden Sie keine Scheuermittel, Lösungsmittel oder aggressive Chemikalien, da diese die Oberfläche beschädigen können.
- Ensure all port covers are closed after cleaning to maintain water resistance.
6.2 Pflege und Lagerung der Batterie
- Um die Lebensdauer des Akkus zu verlängern, vermeiden Sie häufiges vollständiges Entladen des Akkus.
- If storing the floodlight for an extended period, charge it to approximately 50-70% every few months.
- Bewahren Sie das Gerät an einem kühlen, trockenen Ort auf, schützen Sie es vor direkter Sonneneinstrahlung und extremen Temperaturen.
7. Fehlerbehebung
| Problem | Mögliche Ursache | Lösung |
|---|---|---|
| Licht geht nicht an. | Batterie ist entladen. | Charge the floodlight fully. |
| Die Lichtleistung ist schwach. | Low battery or dimming setting. | Recharge the battery or increase brightness using the '+' button. |
| Das Gerät wird über den USB-Ausgang nicht geladen. | Floodlight battery is low or cable is faulty. | Ensure floodlight is sufficiently charged. Try a different USB cable. |
| Trotz Schutzart IP67 trat Wasser ein. | Port covers not properly sealed. | Always ensure all port covers are securely closed before exposure to water. If damage occurred, discontinue use and contact support. |
8. Spezifikationen
| Besonderheit | Detail |
|---|---|
| Modellnummer | Nr. 03.5456US |
| Lichtquelle | LED-Beleuchtung |
| Lichtstrom | Bis zu 2000 Lumen |
| Farbtemperatur | 6000 Kelvin |
| Dimming Steps | 5 Schritte |
| Stromquelle | Batteriebetrieben (1 Lithium-Ionen-Akku im Lieferumfang enthalten) |
| Batterie Voltage | 7.3 Volt |
| Betriebsdauer | Up to 20 hours (depending on dimming level) |
| Ladefunktion | Built-in power bank with USB output |
| Material | Aluminium |
| Schutzart | IP67 (wasserdicht) |
| Technische Daten | 6.42 x 2.48 x 6.42 Zoll |
| Artikelgewicht | 1.74 Pfund |
| Betriebstemperatur | 14 to 104 Degrees Fahrenheit (-10 to 40 Degrees Celsius) |
9. Garantie und Support
For warranty information, technical support, or service inquiries, please refer to the official SCANGRIP webBesuchen Sie unsere Website oder wenden Sie sich an Ihren autorisierten Händler.
Bewahren Sie Ihren Kaufbeleg als Kaufnachweis für Garantieansprüche auf.
Hersteller: ScanGrip
WebWebsite: www.scangrip.com