Einführung
Vielen Dank für Ihren Einkauf.asing the Power Dynamics PV240BT 4-Zone HiFi Stereo AmpVerstärker. Dieses Handbuch enthält wichtige Informationen für den sicheren und effizienten Betrieb Ihres Verstärkers. amplifier. Please read this manual thoroughly before using the device to ensure proper setup and to maximize its performance. Keep this manual for future reference.
Sicherheitshinweise
Beachten Sie stets die folgenden Sicherheitsvorkehrungen, um Stromschläge, Brände oder Schäden am Gerät zu vermeiden.
- Setzen Sie das Gerät weder Regen noch Feuchtigkeit aus.
- Öffnen Sie nicht das casing. Im Inneren befinden sich keine vom Benutzer wartbaren Teile. Alle Wartungsarbeiten dürfen nur von qualifiziertem Fachpersonal durchgeführt werden.
- Sorgen Sie für ausreichende Belüftung rund um das Gerät. Blockieren Sie keine Belüftungsöffnungen.
- Stellen Sie das Gerät auf eine stabile, ebene Fläche.
- Disconnect the power cord from the mains before cleaning or when not in use for extended periods.
- Verwenden Sie nur das angegebene Netzteil.
- Halten Sie das Gerät von Wärmequellen, direkter Sonneneinstrahlung und übermäßigem Staub fern.
Packungsinhalt
Bitte überprüfen Sie beim Auspacken, ob alle unten aufgeführten Artikel vorhanden und in gutem Zustand sind:
- Power Dynamics PV240BT AmpLifier-Einheit
- Bedienungsanleitung
- Fernbedienung
- Stromkabel
Produkteigenschaften
Der Power Dynamics PV240BT amplifier offers a range of features designed for versatile audio applications:
- Multi-zone HiFi stereo amplifier with 4x 100W output across four separate zones, each with independent volume control.
- Built-in Bluetooth 4.2 receiver for reliable wireless audio streaming from smartphones, tablets, or laptops.
- Integrated USB/SD MP3 player and FM radio with digital LCD display.
- AUX-Eingang zum Anschluss externer Audiogeräte.
- Dual microphone inputs with separate volume dials and echo effect, plus talkover function.
- Optical/coaxial ports, dual RCA in/out, and subwoofer output for comprehensive connectivity.
- Inklusive Fernbedienung für bequeme Bedienung.
Produkt überview

Abbildung 1: Front view of the Power Dynamics PV240BT ampVerstärker, Showcasing seine Bedienelemente und Anzeige.

Abbildung 2: Die 400W amplifier features four independent zones, each with its own volume control for multiroom audio distribution.
Aufstellen
1. Platzierung
Platzieren Sie die amplifier on a flat, stable surface with adequate ventilation. Ensure there is enough space around the unit for heat dissipation. Avoid placing it near heat sources or in direct sunlight.
2. Stromanschluss
Connect the supplied power cable to the AC IN socket on the rear panel of the amplifier and then to a suitable mains power outlet. Ensure the power switch on the front panel is in the OFF position before connecting.
3. Lautsprecheranschlüsse
Connect your speakers to the corresponding speaker terminals on the rear panel. The PV240BT features four speaker output zones. Ensure correct polarity (+ to + and - to -) for each speaker. Use appropriate gauge speaker wire for optimal performance.

Abbildung 3: Überview der amplifier's front and back panels, highlighting various input and output connections including speaker terminals.
Bedienungsanleitung
1. Ein-/Ausschalten
Drücken Sie die LEISTUNG Taste auf der Vorderseite zum Einschalten ampVerstärker ein- oder ausgeschaltet. Das Display leuchtet auf, wenn das Gerät eingeschaltet ist.
2. Auswahl der Eingangsquelle
Verwenden Sie die MODUS button on the front panel or remote control to cycle through available input sources: Bluetooth, USB, SD, FM, AUX, Optical, Coaxial.
3. Lautstärkeregelung
Der amplifier features independent volume controls for each of the four zones (VOLUME 1-4). Adjust these knobs to set the desired output level for each connected speaker zone. The main MUSIK-VOL knob controls the overall music volume.
4. Klangregelung
Passen Sie die BASS Und VERDREIFACHEN knobs to fine-tune the low and high frequencies of your audio output. The ECHO knob controls the echo effect for microphone inputs.

Abbildung 4: Close-up of the tone control section, showing knobs for Treble, Bass, Music Volume, and Echo.
5. Bluetooth-Streaming
So verbinden Sie sich über Bluetooth:
- Select "Bluetooth" as the input source using the MODUS Taste.
- Suchen Sie auf Ihrem Bluetooth-fähigen Gerät (Smartphone, Tablet usw.) nach verfügbaren Geräten.
- Select "PV240BT" from the list to pair. Once paired, you can stream audio wirelessly.

Abbildung 5: Der amplifier supports Bluetooth 4.2 for seamless wireless audio streaming from compatible devices.
6. USB/SD Media Player
Stecken Sie einen USB-Stick oder eine SD-Karte in den entsprechenden Steckplatz an der Vorderseite. ampDer Verstärker schaltet automatisch in den USB/SD-Modus und beginnt mit der Wiedergabe kompatibler Audiodateien. files (e.g., MP3). Use the playback controls (WIEDERGABE/PAUSE, VORHERIGE, NÄCHSTE) to navigate your media.

Abbildung 6: The integrated media player features USB and SD card slots for direct playback of audio files.
7. UKW-Radio
Select "FM" as the input source. Use the VORHERIGE Und NÄCHSTE buttons to tune to radio stations. The digital LCD display will show the current frequency.
8. Microphone Inputs
Schließen Sie die Mikrofone an das Mikrofon 1 or Mikrofon 2 inputs. Adjust the individual MIKROFONLAUTSTÄRKE knobs for each microphone. The BESPRECHEN function automatically lowers the music volume when a microphone is in use.
Wartung
Um die Langlebigkeit und optimale Leistung Ihres ampVerstärker, befolgen Sie diese Wartungsrichtlinien:
- Reinigung: Vor der Reinigung den Netzstecker ziehen. Die Außenseite des Geräts mit einem weichen, trockenen Tuch abwischen. Keine flüssigen Reiniger oder Sprays verwenden.
- Belüftung: Um eine Überhitzung zu vermeiden, sollten Sie regelmäßig prüfen, ob die Lüftungsöffnungen frei von Staub und Schmutz sind.
- Lagerung: Wenn Sie das Gerät über einen längeren Zeitraum lagern, trennen Sie es vom Stromnetz und lagern Sie es an einem kühlen, trockenen Ort, fern von direkter Sonneneinstrahlung und extremen Temperaturen.
Fehlerbehebung
Sollten Sie Probleme mit Ihrem amplifier, refer to the following table for common problems and their solutions:
| Problem | Mögliche Ursache | Lösung |
|---|---|---|
| Kein Strom | Netzkabel nicht angeschlossen; Netzschalter ausgeschaltet; Steckdose defekt. | Stellen Sie sicher, dass das Netzkabel fest angeschlossen ist. Schalten Sie den Netzschalter ein. Testen Sie die Steckdose mit einem anderen Gerät. |
| Keine Tonausgabe | Falsche Eingangsquelle ausgewählt; Lautstärke zu niedrig; Lautsprecher nicht angeschlossen oder defekt; Stummschaltung aktiviert. | Select correct input source. Increase master and zone volumes. Check speaker connections and ensure speakers are functional. Deactivate mute if applicable. |
| Bluetooth stellt keine Verbindung her | AmpVerstärker nicht im Bluetooth-Modus; Gerät zu weit entfernt; Gerät bereits mit einem anderen Gerät verbunden. | Sicherstellen ampDer Verstärker befindet sich im Bluetooth-Modus. Bringen Sie das Gerät näher heran. ampVerstärker. Verbindung zu anderen Bluetooth-Geräten trennen. |
| USB/SD-Wiedergabe funktioniert nicht | Falsch file format; USB/SD card faulty or empty; Amplifier not in USB/SD mode. | Sicherstellen files are compatible (e.g., MP3). Try another USB/SD card. Select USB/SD input mode. |
| Verzerrter Ton | Volume too high; Incorrect impedance speakers; Poor cable connections. | Reduzieren Sie die Lautstärke. Stellen Sie sicher, dass die Lautsprecher zusammenpassen. amplifier impedance. Check all audio cable connections. |
Wenn das Problem nach dem Ausprobieren dieser Lösungen weiterhin besteht, wenden Sie sich bitte an den Kundensupport.
Technische Daten
| Besonderheit | Detail |
|---|---|
| Modellnummer | PV240BT |
| Ausgangsleistung | 4 x 100W (insgesamt 400W) |
| Zonen | 4 independent zones with volume control |
| Bluetooth-Version | 4.2 |
| Media Player | USB/SD MP3 player, FM Radio |
| Eingänge | AUX/RCA, Optical, Coaxial, 2x Microphone (6.3mm jack) |
| Ausgaben | RCA Line Out, Subwoofer Out, Speaker Terminals (4 zones) |
| Abmessungen (L x B x H) | 38.5 x 30.6 x 14 cm |
| Gewicht | 4.6 kg |
| Stromversorgung | 220-240 VAC 50 Hz |
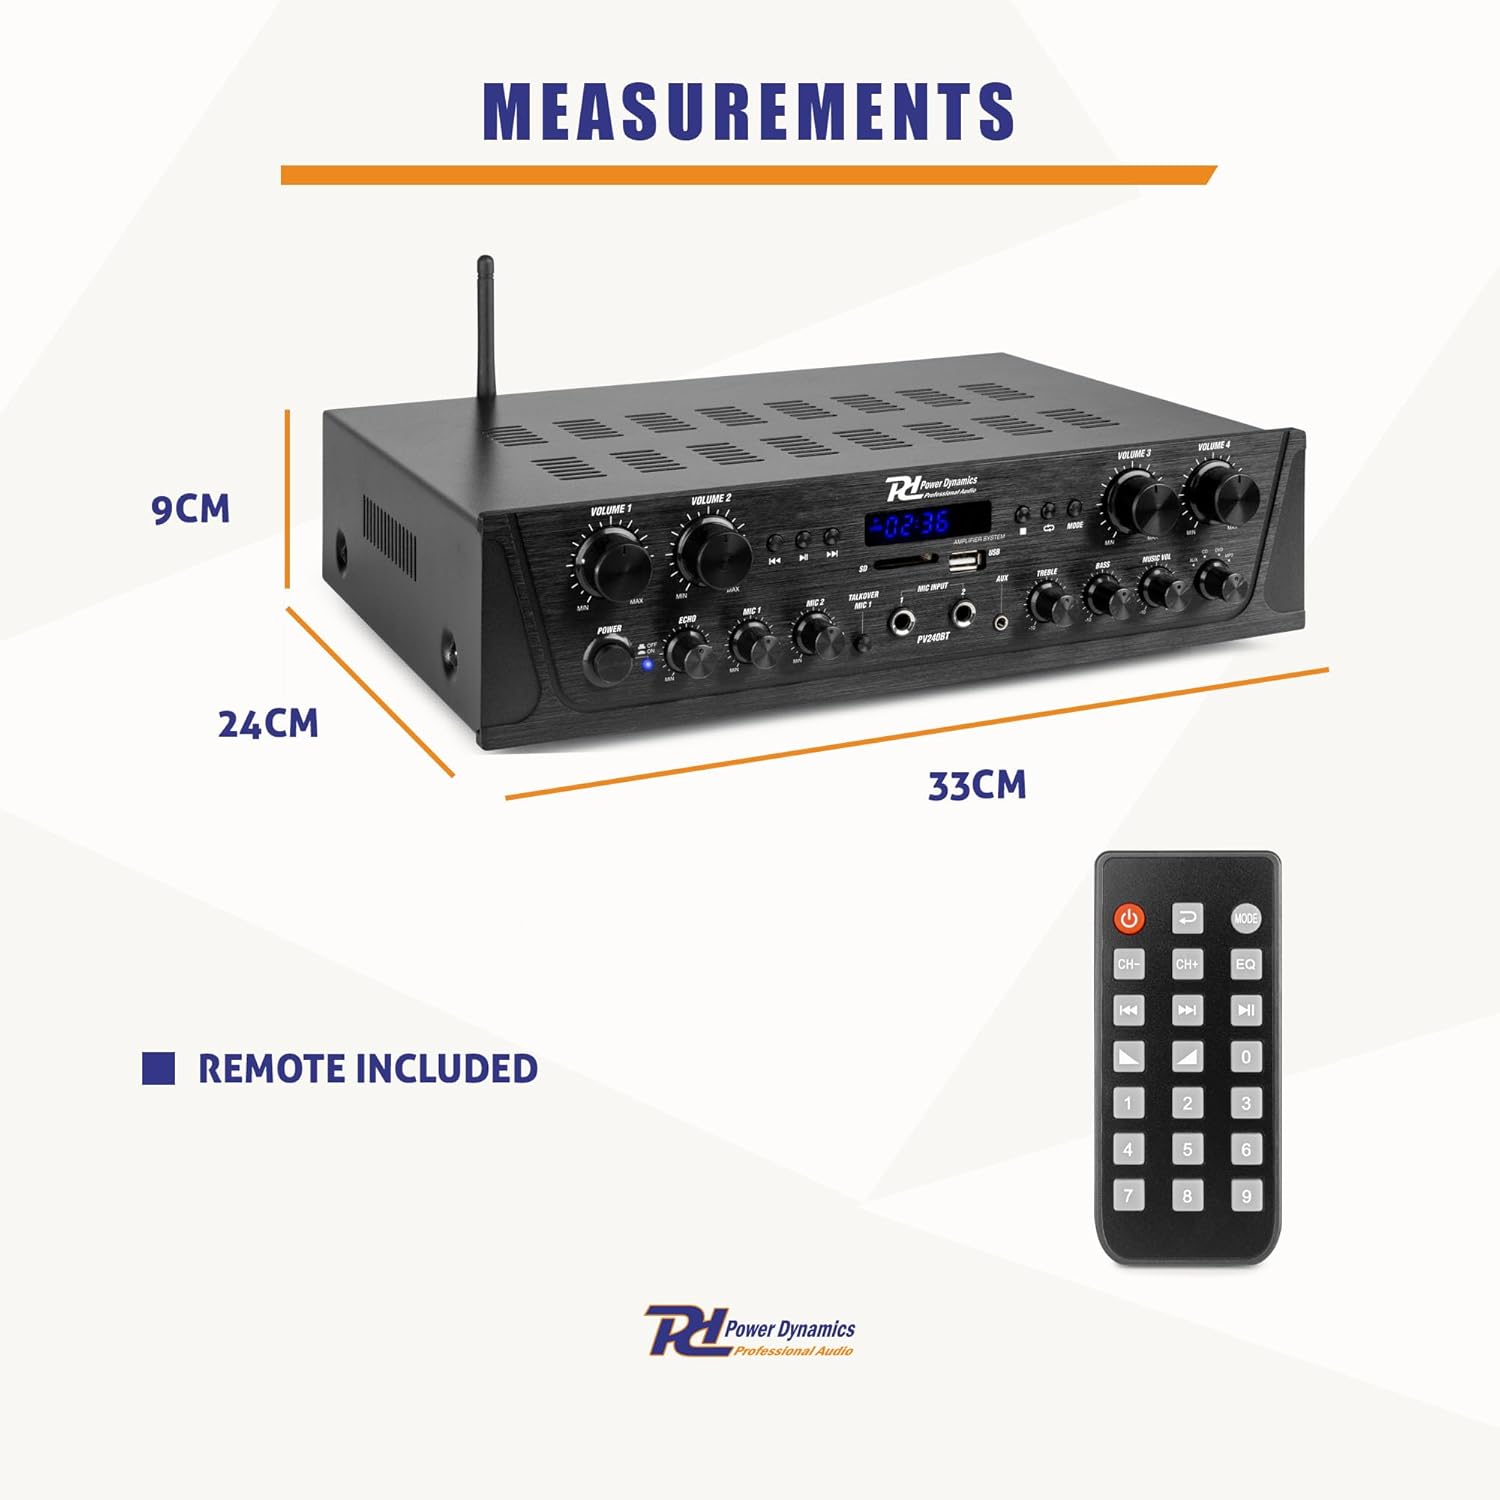
Abbildung 7: Physical dimensions of the amplifier and the included remote control.
Garantie und Support
This Power Dynamics PV240BT amplifier comes with a standard manufacturer's warranty. Please refer to the warranty card included in your package for specific terms and conditions. For technical support, service, or warranty claims, please contact your retailer or the Power Dynamics customer service department. Keep your proof of purchase for warranty validation.
For further assistance, visit the official Power Dynamics webBesuchen Sie die Website oder kontaktieren Sie deren Supportkanäle.