1. Einleitung
Thank you for choosing the Tornado TCM-14512ES Espresso Machine. This manual provides essential information for the safe and efficient operation, maintenance, and troubleshooting of your new appliance. Please read these instructions thoroughly before first use and retain them for future reference.
This espresso machine is designed to prepare high-quality espresso and froth milk for various coffee beverages. It features a 15-bar pump pressure system and a 1.2-liter water tank capacity.
2. Sicherheitshinweise
- Stellen Sie stets sicher, dass das Gerät an eine geerdete Steckdose mit der korrekten Spannung angeschlossen ist.tage (220-240 V).
- Tauchen Sie das Gerät, das Netzkabel oder den Stecker nicht in Wasser oder andere Flüssigkeiten.
- Keep hands and cords away from hot surfaces and steam. The steam wand and portafilter can become very hot during operation.
- Vor der Reinigung, Wartung oder wenn das Gerät nicht benutzt wird, ziehen Sie den Netzstecker.
- Betreiben Sie das Gerät nicht, wenn das Kabel oder der Stecker beschädigt ist, eine Fehlfunktion vorliegt oder in irgendeiner Weise beschädigt wurde.
- Dieses Gerät ist nur für den Hausgebrauch bestimmt. Nicht im Freien verwenden.
- Ensure the water tank is filled with clean, cold water before operation. Do not operate without water.
- Kinder sollten beaufsichtigt werden, um sicherzustellen, dass sie nicht mit dem Gerät spielen.
3. Produktüberschreitungview
Familiarize yourself with the components of your Tornado TCM-14512ES Espresso Machine:
- Wassertank (1.2 Liter Fassungsvermögen)
- Control Knob (Power, Espresso, Steam)
- Betriebsanzeige
- Bereitschaftsanzeige
- Siebträgergriff
- Filterkorb (für gemahlenen Kaffee)
- Steam Wand / Milk Frother
- Tropfschale und herausnehmbares Gitter
- Kaffee-Outlet
- Tamper/Measuring Spoon (often included)

Abbildung 3.1: Front view of the Tornado TCM-14512ES Espresso Machine, showing the control knob, portafilter, steam wand, and drip tray.
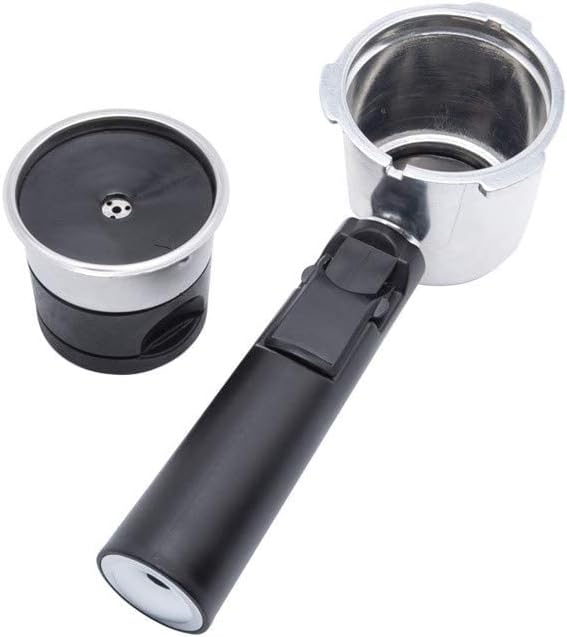
Abbildung 3.2: Detached portafilter with a single filter basket, ready for coffee grounds.

Abbildung 3.3: Filter basket with its lid open, illustrating the internal structure for holding coffee grounds.
4. Einrichtung
4.1 Auspacken
- Entfernen Sie vorsichtig sämtliches Verpackungsmaterial von der Maschine.
- Stellen Sie das Gerät auf eine stabile, ebene und hitzebeständige Oberfläche, fernab von Wasserquellen.
- Ensure all accessories are present: portafilter, filter basket(s), measuring spoon/tampäh.
4.2 Erstreinigung
- Wash the water tank, portafilter, filter basket(s), and drip tray with warm, soapy water. Rinse thoroughly and dry.
- Wischen Sie die Außenseite der Maschine mitamp Tuch.
4.3 Füllen des Wassertanks
- Entfernen Sie den Wassertank von der Rückseite der Maschine.
- Füllen Sie den Tank mit frischem, kaltem Wasser bis zur MAX-Markierung.
- Setzen Sie den Wassertank wieder sicher an seinen Platz.
4.4 Vorbereitung der Maschine (Erste Benutzung)
- Stellen Sie sicher, dass der Wassertank gefüllt ist.
- Plug the machine into a power outlet. Turn the control knob to the "Power" position (usually indicated by an 'I' or a power symbol). The power indicator light will illuminate.
- Stellen Sie eine Tasse unter den Kaffeeauslass.
- Turn the control knob to the "Espresso" position (coffee cup symbol). Water will start to flow through the coffee outlet. Let approximately 100ml of water run through.
- Turn the control knob back to the "Power" position to stop the flow.
- Next, turn the control knob to the "Steam" position (steam symbol). Allow steam to release from the steam wand for a few seconds to clear any air. Turn the knob back to "Power".
- Die Maschine ist nun vorbereitet und einsatzbereit.
5. Bedienungsanleitung
5.1 Espresso zubereiten
- Bereiten Sie die Maschine vor: Ensure the water tank is filled. Plug in the machine and turn the control knob to "Power". Wait for the "Ready" indicator light to illuminate, indicating the machine has reached the optimal brewing temperature.
- Bereiten Sie den Siebträger vor: Insert the desired filter basket into the portafilter. For a single shot, use the smaller basket; for a double shot, use the larger one.
- Kaffeesatz hinzufügen: Fill the filter basket with finely ground espresso coffee. Use the measuring spoon to add the correct amount (approx. 7g for a single shot, 14g for a double shot).
- Tamp der Kaffee: Verwenden Sie das tampDrücken Sie das Kaffeepulver fest und gleichmäßig an. Wischen Sie überschüssiges Kaffeepulver vom Rand des Siebträgers ab.
- Siebträger anbringen: Align the portafilter with the group head (coffee outlet) on the machine. Insert it and twist firmly to the right until it is securely locked in place.
- Platzpokal: Position one or two espresso cups under the coffee outlet.
- Espresso zubereiten: Once the "Ready" light is on, turn the control knob to the "Espresso" position. Espresso will begin to flow into your cup(s).
- Brauen stoppen: When the desired amount of espresso is reached (typically 25-30ml per shot), turn the control knob back to the "Power" position to stop the flow.
- Siebträger entfernen: Carefully twist the portafilter to the left to unlock and remove it. Be cautious as it will be hot. Discard the used coffee grounds.
5.2 Milch aufschäumen
- Bereiten Sie sich auf Steam vor: Ensure the machine is plugged in and turned on. Turn the control knob to the "Steam" position. Wait for the "Ready" indicator light to illuminate, indicating the machine has reached steaming temperature.
- Dampfdüse reinigen: Before frothing, place an empty cup under the steam wand and briefly open the steam valve (if applicable, or turn the control knob slightly to release a burst of steam) to clear any condensed water. Close the valve/knob.
- Milch zubereiten: Füllen Sie einen Milchaufschäumkännchen aus Edelstahl mit kalter Milch (Milchprodukte oder pflanzliche Alternativen) bis kurz unter den Ausguss.
- Milch aufschäumen: Immerse the tip of the steam wand just below the surface of the milk. Open the steam valve fully (or turn the control knob to the "Steam" position). Hold the pitcher at an angle, moving it slightly up and down to incorporate air and create foam.
- Milch erhitzen: Once desired foam is achieved, lower the pitcher to immerse the steam wand deeper into the milk to heat it without adding more air. Continue until the pitcher is hot to the touch (approx. 60-70°C).
- Dampf abstellen: Close the steam valve (or turn the control knob back to "Power"). Remove the pitcher.
- Reinigung der Dampfdüse: Wischen Sie die Dampfdüse sofort mit einem Tuch ab.amp Legen Sie ein Tuch darüber, damit keine Milchreste antrocknen. Öffnen Sie das Dampfventil kurz erneut, um eventuell vorhandene Milch aus der Lanze zu entfernen.
6. Reinigung und Wartung
Regelmäßige Reinigung gewährleistet optimale Leistung und verlängert die Lebensdauer Ihrer Espressomaschine.
6.1 Tägliche Reinigung
- Siebträger und Filterkorb: Nach jedem Gebrauch den Siebträger entnehmen, den Kaffeesatz entsorgen und Siebträger und Filterkorb unter fließendem Wasser abspülen.
- Tropfschale: Empty and clean the drip tray and grid daily. Wash with warm, soapy water and rinse.
- Dampfdüse: As mentioned in the operating instructions, wipe the steam wand immediately after frothing milk and purge it to prevent blockages.
- Exterieur: Wischen Sie das Äußere der Maschine mit einem weichen, damp Stoff. Verwenden Sie keine Scheuermittel oder Scheuerschwämme.
6.2 Wassertankreinigung
- Clean the water tank weekly with warm, soapy water. Rinse thoroughly to remove any soap residue.
6.3 Entkalkung
Mineral deposits from water can build up inside the machine over time, affecting performance. Descale your machine every 2-3 months, or more frequently if you have hard water or use it often.
- Verwenden Sie ein handelsübliches Entkalkungsmittel, das speziell für Espressomaschinen entwickelt wurde, und befolgen Sie dabei die Anweisungen des Herstellers.
- Alternativ kann eine Lösung aus Weißweinessig und Wasser (Verhältnis 1:1) verwendet werden.
- Run the descaling solution through the machine as if brewing coffee, and also through the steam wand.
- After descaling, run several cycles of clean water through the machine to rinse thoroughly and remove any descaling solution residue.
7. Fehlerbehebung
Bevor Sie sich an den Kundendienst wenden, lesen Sie bitte die folgenden häufig auftretenden Probleme und deren Lösungen:
| Problem | Mögliche Ursache | Lösung |
|---|---|---|
| No water flow / Machine not pumping water. | Water tank empty, airlock in pump, clogged filter. | Fill water tank. Prime the machine (Section 4.4). Clean filter basket. |
| Der Espresso fließt zu langsam oder gar nicht. | Coffee ground too fine, coffee tamped too hard, clogged filter basket. | Use coarser grind. Tamp less firmly. Clean filter basket. Descale machine. |
| Espresso flows too quickly / Weak coffee. | Coffee ground too coarse, not enough coffee, coffee tamped zu leicht. | Use finer grind. Increase coffee amount. Tamp fester. |
| Aus der Dampflanze kommt kein Dampf. | Steam wand clogged, machine not heated to steam temperature. | Clean steam wand thoroughly. Wait for "Ready" light in steam mode. Descale machine. |
| Die Maschine verliert Wasser. | Water tank not seated correctly, portafilter not locked properly, seals worn. | Ensure water tank is secure. Lock portafilter firmly. Contact support if seals are worn. |
8. Technische Daten
| Besonderheit | Spezifikation |
|---|---|
| Marke | Tornado |
| Modellnummer | TCM-14512ES |
| Bandtage | 220-240 Volt |
| Leistung / Wattage | 1050 Watt |
| Fassungsvermögen des Wassertanks | 1.2 Liter |
| Pumpendruck | 15 Bar |
| Material | Metall |
| Farbe | Schwarz & Silber |
| Besondere Merkmale | Milk Frother, Permanent Filter, Thermal, Timer, Water Filter |
| Artikelgewicht | 4.06 Kilogramm |
| Verpackungsabmessungen | 36.5 x 35.5 x 23.5 cm |
9. Garantie und Support
Your Tornado TCM-14512ES Espresso Machine comes with a manufacturer's warranty. Please refer to the warranty card included with your purchase for specific terms and conditions, including the warranty period and coverage details.
For technical assistance, spare parts, or warranty claims, please contact the retailer where you purchased the product or the authorized Tornado service center in your region. Keep your proof of purchase for warranty validation.


