Einführung
The SHARP Digital Alarm Clock with AccuSet is designed for effortless timekeeping. Featuring automatic time setting, a clear LED display, and user-friendly controls, this clock is ideal for any bedroom. Its AccuSet technology ensures the time is always accurate, eliminating the need for manual adjustments, making it perfect for seniors, children, or anyone seeking a hassle-free alarm clock solution.

Abbildung 1: Vorderseite view of the SHARP Digital Alarm Clock with green LED display.
Hauptmerkmale
- AccuSet Automatische Zeiteinstellung: The clock is pre-programmed to automatically set the correct time, removing the need for manual adjustments. Simply select your time zone.
- Schnelle Sommerzeitumstellung (DST): A convenient switch allows for easy adjustment for Daylight Savings Time (+1 hour) or Standard Time (-1 hour).
- Hoch-/Niedrig-Dimmersteuerung: Adjust the brightness of the LED display to your preference, ensuring comfortable viewTag oder Nacht.
- Batterie-Backup: A pre-installed CR2032 button cell battery provides backup for time settings during power outages, ensuring continuous accuracy.
- Auswahl der Zeitzone: Easily select your local time zone from the options provided at the bottom of the clock.

Figure 2: Diagram illustrating the key features and functionalities of the alarm clock.
Installationshandbuch
- Auspacken: Carefully remove the alarm clock from its packaging.
- Battery Installation (Pre-installed): The CR2032 button cell battery for backup is pre-installed in a screw-secured cabinet at the bottom of the clock. This battery is designed to last for several years. No immediate action is required for initial setup.
- Auswahl der Zeitzone: Before plugging in the clock, locate the time zone selection switch at the bottom of the unit. Select your correct time zone (e.g., EST, CST, MST, PST). The default time zone is Eastern Standard Time.
- Stromanschluss: Plug the clock into an approved electrical source. The AccuSet feature will automatically program the correct time based on your selected time zone.
- Daylight Savings Time (DST) Adjustment: If applicable, slide the DST switch at the bottom of the clock to "ON" to add one hour (+1 hr) for Daylight Savings Time. For Standard Time, slide the switch to "OFF" to subtract one hour (-1 hr).

Figure 3: Top panel controls for setting time, alarm, and adjusting display.
Bedienungsanleitung
Einstellen des Alarms
- Drücken Sie die ALARM button once. The alarm time will appear on the display.
- Während die Weckzeit angezeigt wird, drücken Sie die Taste STUNDE Taste, um die Weckzeit einzustellen.
- Drücken Sie die MINUTE Taste, um die Alarmminute einzustellen.
- Zum Aktivieren oder Deaktivieren des Alarms drücken Sie die Taste ALARM EIN / AUS button. An alarm indicator light (usually a small LED) will illuminate when the alarm is active.
- To return to the current time display, press the ZEIT button or wait a few seconds for it to revert automatically.
Verwendung der Schlummerfunktion
Wenn der Alarm ertönt, drücken Sie die große Taste. SCHLAFEN button located on the top of the clock. This will temporarily silence the alarm for a set period (typically 9 minutes), allowing for extra rest. The alarm will sound again after the snooze period ends.
Adjusting Display Brightness (Dimmer Control)
The clock features a High/Low dimmer control to adjust the display brightness. Locate the Dimmer hoch/niedrig button on the top panel. Press this button to toggle between high and low brightness settings to suit your environment and preference.

Figure 4: Illustration of the High & Low Display Dimmer Control.
Wartung
- Reinigung: To clean the clock, use a soft, dry cloth. Do not use abrasive cleaners or solvents, as they may damage the finish.
- Batteriewechsel: The CR2032 backup battery is designed for long-term use. If the clock loses time during a power outage after several years, it may be time to replace the battery. This is located in a screw-secured compartment at the bottom of the clock.
- Platzierung: Place the clock on a stable, flat surface. Avoid placing it in direct sunlight, near heat sources, or in areas with high humidity.
Fehlerbehebung
| Problem | Mögliche Ursache | Lösung |
|---|---|---|
| Clock does not display time after plugging in. | Not connected to power, or power outlet is not active. | Stellen Sie sicher, dass das Netzkabel fest in eine funktionierende Steckdose eingesteckt ist. |
| Die Uhrzeit ist falsch. | Incorrect time zone selected, or DST switch is set incorrectly. | Verify the time zone switch at the bottom of the clock is set to your local zone. Check the DST switch position. |
| Der Alarm ertönt nicht. | Alarm is not activated, or alarm volume is too low (if adjustable). | Ensure the alarm is turned ON using the ALARM ON/OFF button. Check for an alarm indicator light. |
| Das Display ist entweder zu hell oder zu dunkel. | Die Dimmereinstellung muss angepasst werden. | Drücken Sie die Taste DIMMER HI/LO, um durch die Helligkeitseinstellungen zu schalten. |
| Die Uhr verliert Zeit bei Stromausfalltage. | Backup battery is depleted. | Replace the CR2032 backup battery located in the compartment at the bottom of the clock. |
Technische Daten
| Besonderheit | Detail |
|---|---|
| Marke | Scharf |
| Modellnummer | OZJONG |
| Farbe | Black - Green Led |
| Anzeigetyp | Digitales |
| Besondere Merkmale | Alarm, Daylight Saving, Auto Dimmable |
| Technische Daten | 5.5 Zoll B x 2.6 Zoll H |
| Stromquelle | Kabelgebunden, batteriebetrieben |
| Pufferbatterie | CR2032 (vorinstalliert) |
| Material | Plastik |
| Artikelgewicht | 9.9 Unzen |
| Montagetyp | Tischplatte |
| UPC | 049353006079 |
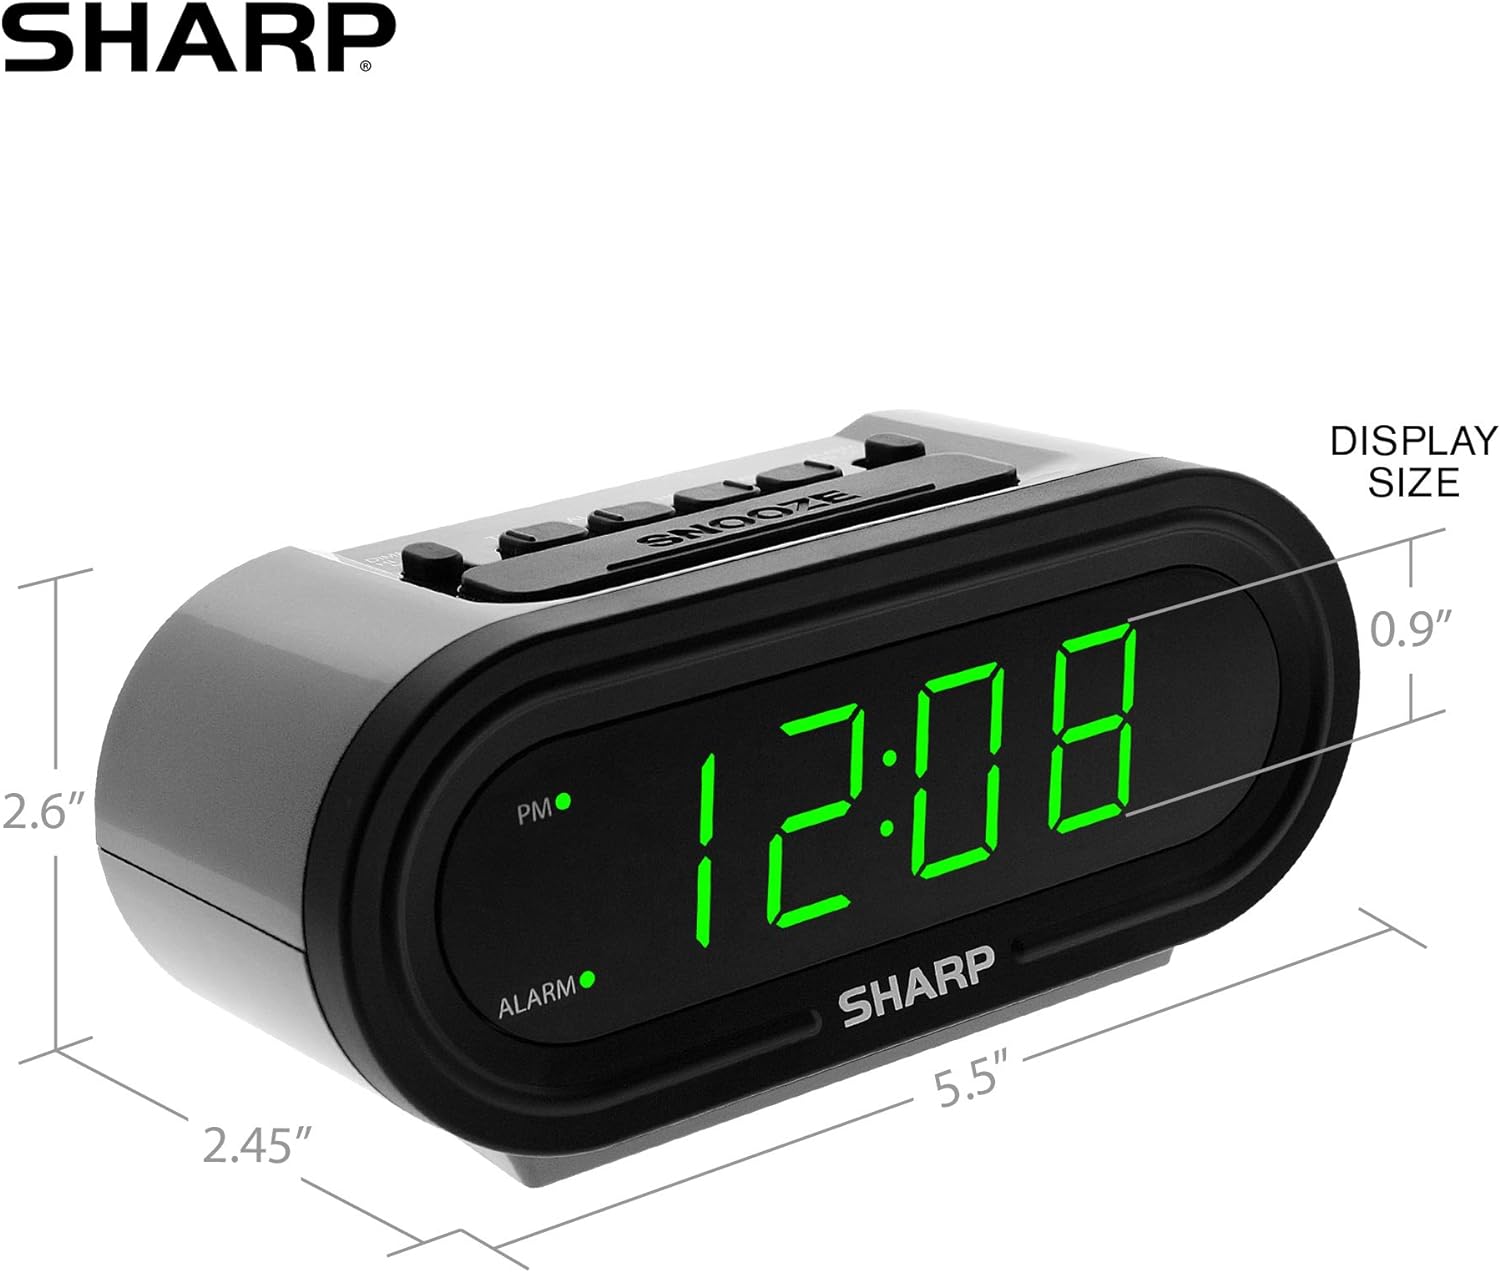
Figure 5: Product dimensions for easy reference.
Garantie und Support
For warranty information or technical support, please refer to the contact details provided in your product packaging or visit the official Sharp webWebsite. Bewahren Sie Ihren Kaufbeleg für Garantieansprüche auf.


