1. Einleitung
This manual provides detailed instructions for the proper installation, operation, and maintenance of your WORKPRO Garage Tool Organizer Wall Mount System. Designed for efficient storage, this system helps organize various garage and garden tools, maximizing your storage space. Please read this manual thoroughly before installation and use to ensure safe and optimal performance.

Bild 1: Überview of the WORKPRO Garage Tool Organizer Wall Mount System, showcasing its capacity for various tools like shovels, rakes, and ladders.
2. Wichtige Sicherheitshinweise
Always follow these safety guidelines to prevent injury or damage to the product and property:
- Ensure the mounting surface is structurally sound and capable of supporting the combined weight of the organizer and all items stored on it.
- Do not exceed the maximum weight capacity of 75 lbs per linear foot for the rails, or 300 lbs total for the entire system.
- Use appropriate fasteners for your specific wall type (drywall, wood studs, masonry).
- Tragen Sie während der Installation eine Schutzbrille, um Ihre Augen zu schützen.
- Halten Sie Kinder und Haustiere vom Installationsbereich fern.
- Distribute weight evenly across the hooks and rails to maintain stability.
- Regularly inspect the system for any signs of wear, damage, or loose fasteners.
3. Packungsinhalt
Vergewissern Sie sich vor Beginn der Installation, dass alle Komponenten vorhanden sind:
- 4 x 16-inch Tool Storage Rails (PVC)
- 8 x Adjustable Storage Hooks (various sizes, steel with rubber coating)
- Assorted Anchors and Fasteners (screws for wood studs, anchors for masonry/drywall)

Abbildung 2: Detailansicht view of all components included in the WORKPRO Garage Tool Organizer package, including four 16-inch rails, eight hooks of various designs, and the necessary screws and anchors.
4. Installationsanweisungen
The WORKPRO Garage Tool Organizer can be installed on drywall, wood studs, or masonry. Ensure you use the correct fasteners for your wall type.
4.1. Installation on Masonry/Concrete Walls
- Schraubenlöcher markieren: Place a rail against the wall at the desired height. Use a pencil to mark the screw hole locations on the wall.
- Pilotlöcher bohren: Drill 5/32-inch pilot holes through the rail and into the wall at the marked locations. For masonry, then drill 5/16-inch holes into the wall for anchors.
- Anker einfügen: Gently tap the provided anchors into the 5/16-inch holes until they are flush with the wall surface.
- Sichere Schiene: Align the rail with the anchors and secure it using the provided screws. Tighten until snug, but do not overtighten.
4.2. Installation on Wood Studs
- Bolzen lokalisieren: Use a stud finder to locate the center of the wall studs. Mark these locations. The rails are designed to fit standard 16-inch wall stud spacing.
- Schraubenlöcher markieren: Place a rail against the wall, aligning it with the marked stud centers. Use a pencil to mark the screw hole locations on the wall.
- Pilotlöcher bohren: Drill 5/32-inch pilot holes through the rail and into the wood studs at the marked locations.
- Sichere Schiene: Align the rail with the pilot holes and secure it using the provided screws. Tighten until snug.
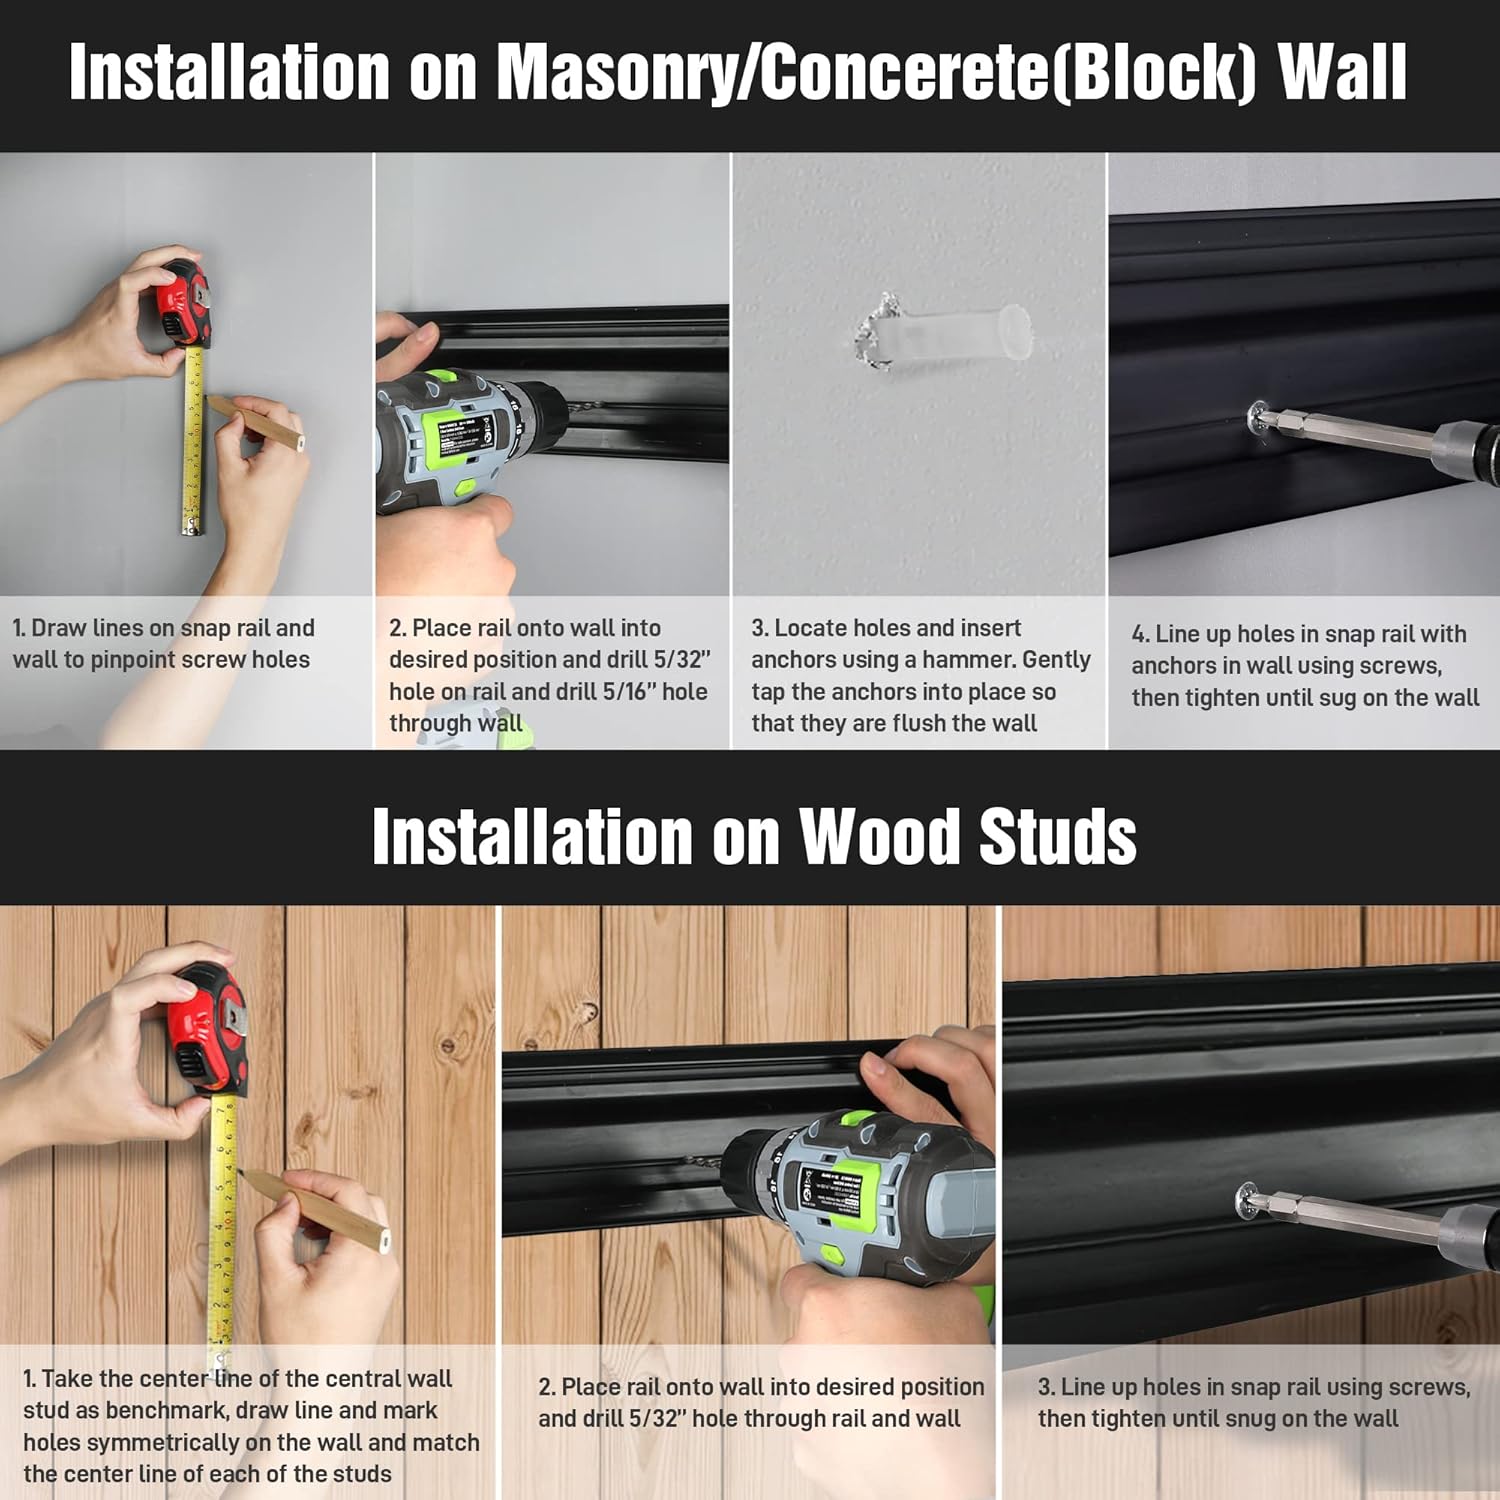
Image 3: Visual guide demonstrating the installation process for the storage rails on both masonry/concrete walls and wood studs, showing drilling and securing steps.
5. Bedienung
5.1. Adjusting and Releasing Hooks
The hooks are designed for easy adjustment and removal, allowing you to customize your storage layout as needed.
- To Install a Hook: Align the hook's top tab with the upper groove of the rail and the bottom tab with the lower groove. Push the hook firmly into the rail until it clicks into place.
- To Adjust a Hook: Once installed, the hook can slide horizontally along the rail to accommodate different tool sizes and arrangements.
- To Release a Hook: Locate the red lock button on the hook. Push the lock button upward to disengage the locking mechanism, then pull the hook away from the rail.

Image 4: Illustration of the 'Upgrade Design' feature, demonstrating how to push the red lock button to easily install, adjust, or remove hooks from the rail.

Image 5: The 'Mobile Slide' feature is depicted, showing how hooks can be easily moved horizontally along the rail to customize tool spacing and organization.
6. Wartung
The WORKPRO Garage Tool Organizer is designed for durability and minimal maintenance. To ensure its longevity:
- Reinigung: Wipe down the PVC rails and steel hooks with a damp cloth to remove dust and dirt. The materials are rust-resistant and waterproof, making cleaning simple.
- Inspektion: Periodically check all mounted rails and hooks for tightness and stability. Retighten any loose screws.
- Schaden: If any part of the system becomes damaged, discontinue use and replace the affected components.

Image 6: The rail material is shown with water droplets, emphasizing its rust resistance and ease of cleaning, contributing to low maintenance.
7. Fehlerbehebung
In der folgenden Tabelle finden Sie häufig auftretende Probleme und deren Lösungen:
| Ausgabe | Mögliche Ursache | Lösung |
|---|---|---|
| Hooks slide too easily or fall off. | Lock button not fully engaged. | Ensure the hook is pushed firmly into the rail until the lock button clicks and is fully engaged. |
| Rails feel loose on the wall. | Screws are not tight enough or incorrect fasteners used. | Retighten all screws. Verify that appropriate anchors and screws were used for your wall type. If on drywall, ensure screws are in studs or proper heavy-duty anchors are used. |
| System cannot hold advertised weight. | Weight concentrated in one area or exceeding capacity. | Distribute tools evenly across the rails and hooks. Do not exceed 75 lbs per linear foot or 300 lbs total. Ensure proper installation into studs or masonry. |
8. Produktspezifikationen
| Besonderheit | Detail |
|---|---|
| Marke | ARBEITSPRO |
| Modellnummer | W133308 |
| Farbe | Schwarz |
| Material | Legierter Stahl, Polyvinylchlorid (PVC) |
| Montagetyp | Wandhalterung |
| Total Storage Length | 64 inches (4 x 16-inch rails) |
| Anzahl der Haken | 8 |
| Weight Capacity (per linear foot) | 75 Pfund |
| Maximale Gewichtskapazität (gesamt) | 300 Pfund |
| Besondere Merkmale | Adjustable, Easy Install, Rust Resistant |
| Produktabmessungen (L x B x H) | 16 x 3 x 7.5 inches (per rail, approximate) |
9. Garantie und Support
For warranty information or customer support regarding your WORKPRO Garage Tool Organizer Wall Mount System, please refer to the product packaging or contact WORKPRO customer service directly. Keep your purchase receipt for warranty claims.


