1. Einleitung
This manual provides detailed instructions for the installation, operation, and maintenance of your VPFET HDMI Extender. This device allows you to extend 1080p HDMI signals up to 200 feet (60 meters) over a single Cat5e/6/7 Ethernet cable. It supports Power over Cable (POC) technology, requiring power only at the Transmitter (TX) unit.
2. Sicherheitshinweise
- Ensure all cables are connected securely before powering on the device.
- Verwenden Sie ausschließlich das mitgelieferte 5V-Gleichstromnetzteil.
- Setzen Sie das Gerät keiner Feuchtigkeit oder extremen Temperaturen aus.
- Vermeiden Sie es, das Gerät selbst zu zerlegen; Wartungsarbeiten sollten von qualifiziertem Fachpersonal durchgeführt werden.
- Use high-quality oxygen-free copper Cat5e/6/7 cables for optimal performance and transmission distance.
3. Packungsinhalt
Überprüfen Sie, ob alle Artikel in Ihrem Paket vorhanden sind:
- 1 x HDMI-Transmitter (TX)-Einheit
- 1 x HDMI-Empfänger (RX)
- 1 x 5-V-Gleichstrom-Netzteil
- 1 x Benutzerhandbuch

Image: Contents of the VPFET HDMI Extender package, showing the transmitter, receiver, power adapter, and user manual.
4. Produktüberschreitungview und Komponenten
Machen Sie sich mit den Anschlüssen und Anzeigen sowohl am Sender (TX) als auch am Empfänger (RX) vertraut.

Bild: Detailliert view of the Transmitter (TX) and Receiver (RX) units, highlighting HDMI Input/Output, 5V Power Output, EDID Copy button, and RJ45 ports.
Sendereinheit (TX):
- HDMI-Eingang: Connects to the HDMI source device (e.g., PC, DVD player, game console).
- 5V-Stromeingang: Wird an das mitgelieferte 5V-Gleichstromnetzteil angeschlossen.
- EDID Copy Button: Used to copy EDID information from the display.
- RJ45 Output (OUT): Connects to the Receiver (RX) unit via Cat5e/6/7 cable.
Empfängereinheit (RX):
- HDMI-Ausgang: Connects to the HDMI display device (e.g., TV, monitor).
- RJ45 Input (IN): Connects to the Transmitter (TX) unit via Cat5e/6/7 cable.
- Note: The RX unit receives power via the Cat cable (POC) from the TX unit.
5. Einrichtungsanweisungen
Befolgen Sie diese Schritte, um Ihren HDMI-Extender einzurichten:
- Schließen Sie die HDMI-Quelle an den Sender an: Schließen Sie Ihr HDMI-Quellgerät (z. B. PC, DVD-Player, Spielkonsole) an den HDMI IN port of the Transmitter (TX) unit using a high-quality HDMI cable.
- Verbinden Sie das Display mit dem RX-Gerät: Connect your HDMI display device (e.g., TV, monitor) to the HDMI-Ausgang port of the Receiver (RX) unit using a high-quality HDMI cable.
- Connect TX and RX with Ethernet Cable: Verbinden Sie RJ45 AUS Anschluss der TX-Einheit an die RJ45-EINGANG port of the RX unit using a single Cat5e, Cat6, or Cat7 Ethernet cable. Ensure the cable is oxygen-free copper for optimal performance.
- TX-Einheit einschalten: Schließen Sie das mitgelieferte 5V-Gleichstromnetzteil an das 5-V-Stromeingang port on the Transmitter (TX) unit. The RX unit will receive power via the Ethernet cable (POC).
- Verbindung überprüfen: Once all connections are made and the TX unit is powered, check for signal on your display.

Image: Connection diagram illustrating how to connect the HDMI source (laptop, PC, DVD, TV Box) to the Transmitter (TX), the TX to the Receiver (RX) via a Cat5e/6/7 cable, and the RX to the display.
EDID-Kopierfunktion:
The EDID (Extended Display Identification Data) copy function ensures the best video and audio signals are transmitted by allowing the TX unit to learn the display's capabilities. It is recommended to perform this step if you experience display issues.
- Connect the Transmitter (TX) unit directly to your monitor/display using an HDMI cable (without the RX unit or Cat cable).
- Connect the 5V power adapter to the TX unit.
- Halten Sie die EDID-Taste on the TX unit for approximately 3 seconds.
- The signal indicator light will flash 3 times, indicating that the EDID information has been successfully copied and stored.
- You can now proceed with the full setup as described above. The copied EDID will be remembered until the TX unit is reset or a new EDID copy operation is performed.
To restore factory EDID settings, connect the TX unit to power, then press and hold the EDID button for 3 seconds. The signal indicator will light up and then turn off, confirming the reset.

Image: Close-up of the Transmitter (TX) unit, highlighting the EDID button and its function in copying display information.
6. Bedienungsanleitung
Once the setup is complete, the VPFET HDMI Extender operates automatically. Ensure your source device is powered on and outputting an HDMI signal, and your display is set to the correct HDMI input.
- Power over Cable (POC): The TX unit powers the RX unit through the Ethernet cable, simplifying installation by eliminating the need for a power outlet at the display end.
- Automatic Equalization: The built-in automatic equalization algorithm adjusts for cable transmission distance, ensuring stable signal transmission without manual configuration.
- Unterstützte Auflösungen: The extender supports resolutions up to 1920x1200@60Hz and 1080p@60Hz.
- Unterstützte Audioformate: DTS-HD, Dolby-trueHD, DTS, Dolby-AC3, DSD.
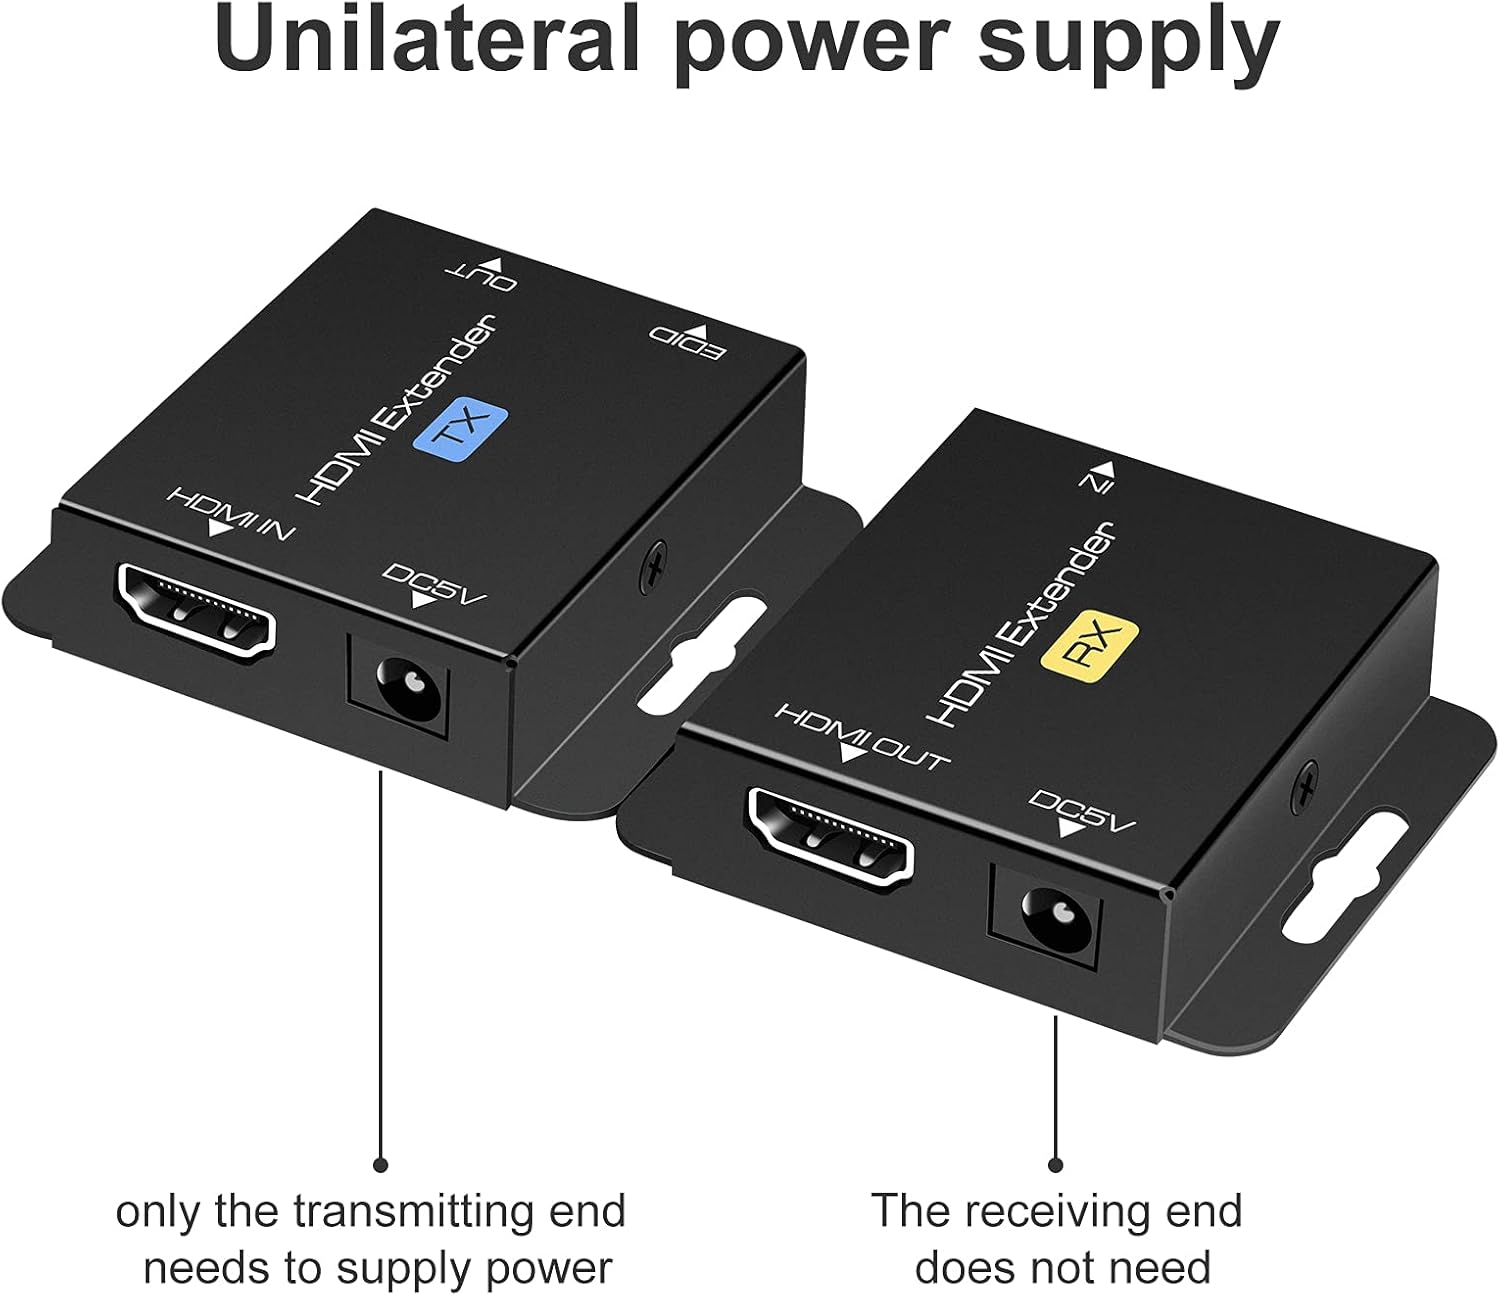
Image: Illustration of the unilateral power supply (POC) feature, indicating that only the transmitting (TX) end requires a power connection, while the receiving (RX) end does not.

Image: An illustration of the HDMI Extender in operation, showing a laptop connected to the TX unit, which is then connected via a long Ethernet cable to the RX unit, and finally to a large display, demonstrating extended transmission distance.
7. Spezifikationen
| Besonderheit | Detail |
|---|---|
| Maximale Auflösungsunterstützung | 1920x1200@60Hz / 1080p@60Hz / 3D |
| Transmission Distance (Cat5e/6/7) | Up to 200ft (60m) for 1080p; up to 165ft for 1920x1200@60Hz |
| Unterstützte Audioformate | DTS-HD, Dolby-trueHD, DTS, Dolby-AC3, DSD |
| Max. Übertragungsbandbreite | 1.65 Gbit/s |
| HDMI-Eingangs-/Ausgangskabellänge | Up to 16ft (5m) AWG26 HDMI standard cable |
| Stromversorgung | Input: AC 100V-240V (50/60Hz), Output: DC 5V |
| POC Support | Yes (Power on Cat6/7 from TX to RX) |
| EDID-Kopie | Ja |
| Dimensions (TX/RX Unit) | Approx. 2.4in x 2.1in x 0.63in (6.1cm x 5.3cm x 1.6cm) |
| Artikelgewicht | 9.3 Unzen (Gesamtgewicht der Verpackung) |
Image: Dimensions of the VPFET HDMI Extender Transmitter (TX) unit, showing its compact size.
8. Fehlerbehebung
Sollten Sie auf Probleme stoßen, konsultieren Sie bitte die folgenden häufigen Probleme und Lösungen:
- Kein Bild/Signal:
- Stellen Sie sicher, dass alle HDMI- und Ethernet-Kabel fest angeschlossen sind.
- Verify the TX unit is powered on with the included 5V adapter.
- Prüfen Sie, ob der Bildschirm auf den richtigen HDMI-Eingang eingestellt ist.
- Try performing the EDID Copy procedure (Section 5).
- Test with shorter, certified HDMI and Ethernet cables.
- Ensure the Ethernet cable is Cat5e/6/7 (oxygen-free copper recommended) and not damaged.
- Flackerndes/Intermittierendes Signal:
- Check cable lengths; ensure they are within the specified limits (200ft for Cat cable, 16ft for HDMI).
- Ensure the Ethernet cable is not running parallel to power lines or other sources of interference.
- Versuchen Sie es mit einem anderen Ethernet-Kabel.
- Perform the EDID Copy procedure.
- Kein Ton:
- Überprüfen Sie die Audioeinstellungen Ihres Quellgeräts und Ihres Displays.
- Stellen Sie sicher, dass die HDMI-Kabel die Audioübertragung unterstützen.
- Perform the EDID Copy procedure.
9. Wartung
The VPFET HDMI Extender requires minimal maintenance. Follow these guidelines to ensure longevity:
- Bewahren Sie das Gerät an einem kühlen, trockenen Ort auf, fern von direkter Sonneneinstrahlung und Wärmequellen.
- Reinigen Sie die Außenseite mit einem weichen, trockenen Tuch. Verwenden Sie keine flüssigen Reiniger oder Sprays.
- Sorgen Sie für ausreichende Belüftung rund um die Geräte, um eine Überhitzung zu vermeiden.
10. Garantie und Support
For warranty information or technical support, please refer to the contact details provided with your purchase or visit the official VPFET website. Please have your model number (B099ZCTV74) and purchase date ready when contacting support.