Einführung
This manual provides comprehensive instructions for the setup, operation, and maintenance of your Plustek OpticFilm 8200i SE Film & Slide Scanner. The OpticFilm 8200i SE is designed for high-resolution scanning of 35mm negative film and mounted slides, featuring a built-in infrared channel for dust and scratch detection and removal.

Image: The Plustek OpticFilm 8200i SE scanner shown with included 35mm negative film stripe holders and a mounted slide holder.
Packungsinhalt
Bitte überprüfen Sie, ob alle unten aufgeführten Artikel in Ihrem Paket enthalten sind:
- Plustek OpticFilm 8200i SE Scanner
- Netzteil
- USB-Kabel
- 35mm Negative Film Stripe Holder (x2 kits, total 4 holders)
- Mounted Slide Holder
- Kurzanleitung
- Software DVD (SilverFast SE Plus 8)
- Tragetasche
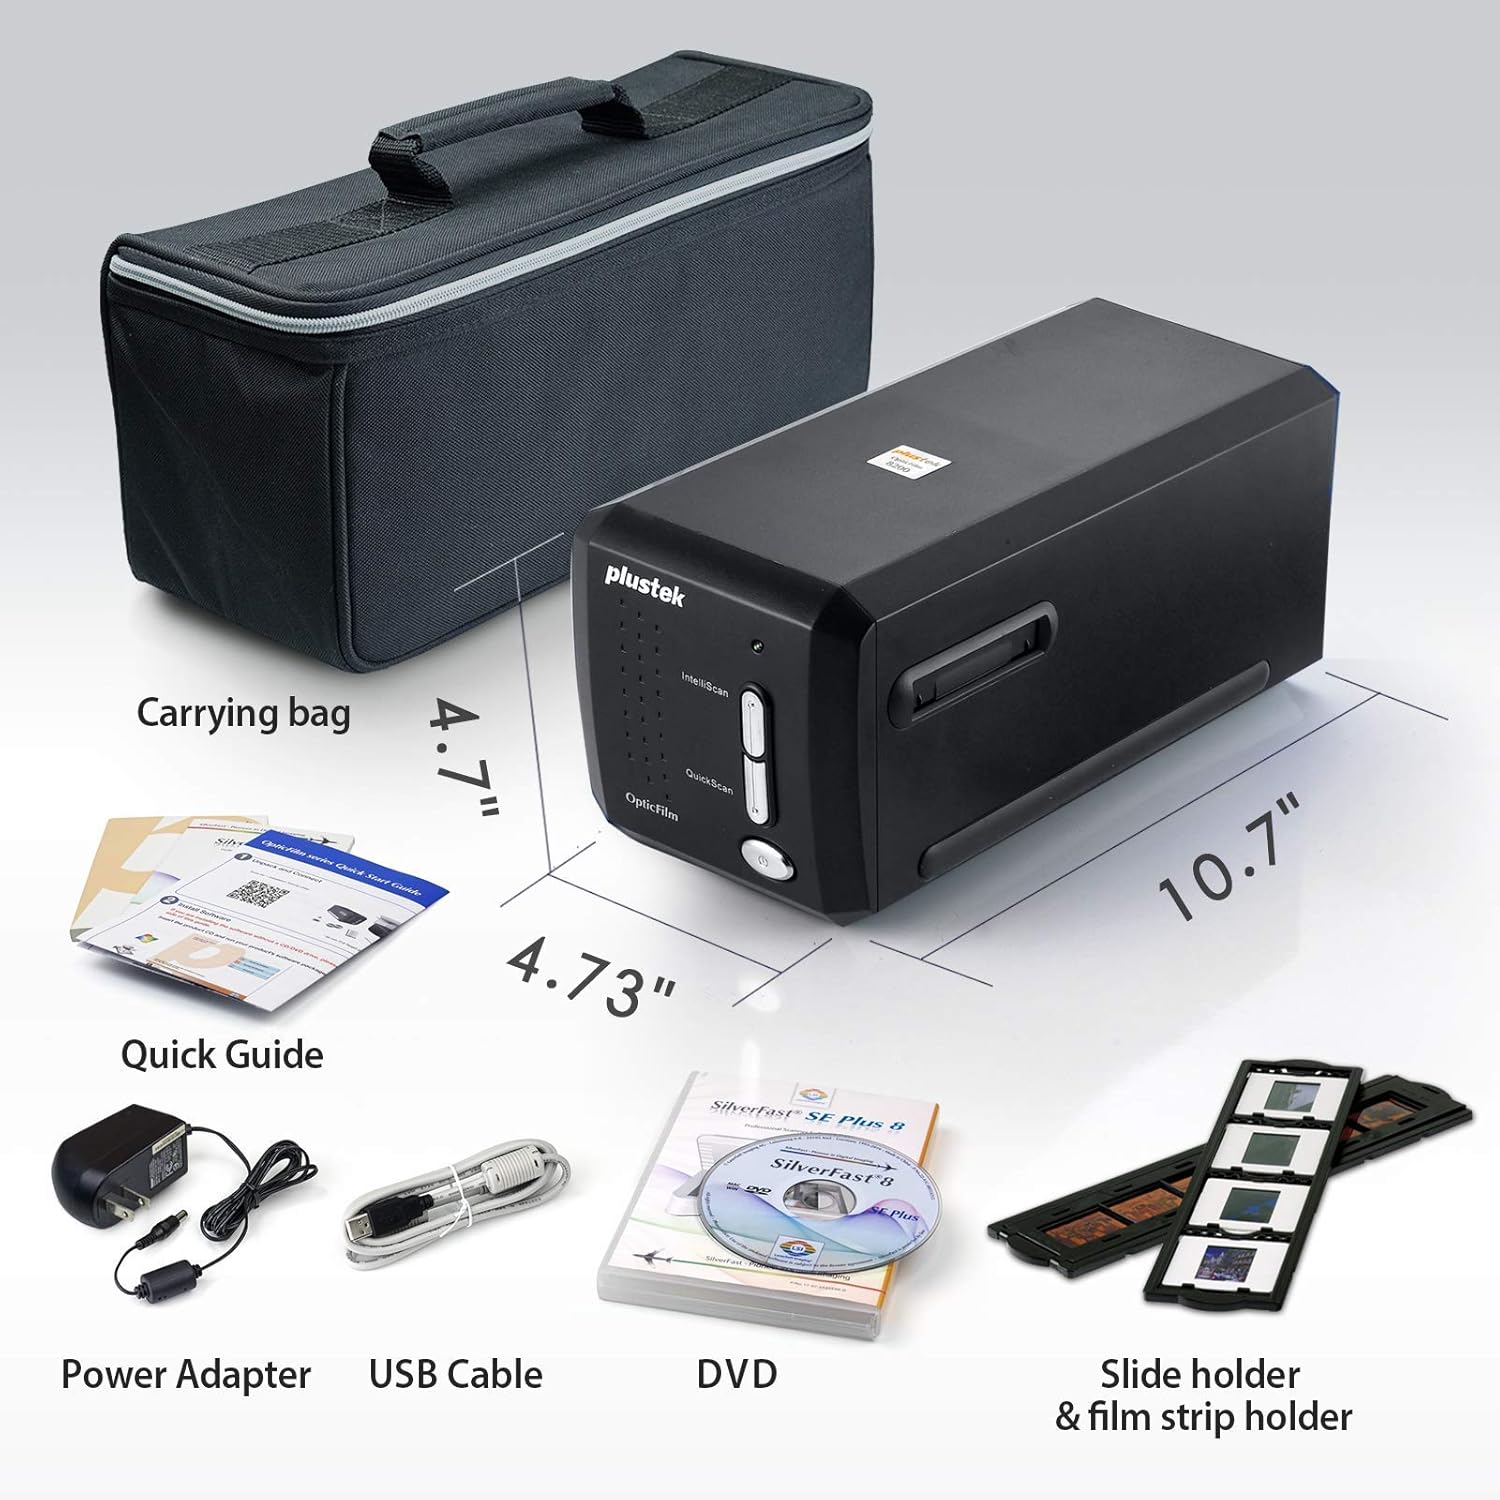
Image: All components included in the Plustek OpticFilm 8200i SE package, including the scanner, power adapter, USB cable, software DVD, quick guide, carrying bag, and film/slide holders.
Aufstellen
- Hardwareverbindung:
- Connect the power adapter to the scanner and then to a power outlet.
- Verbinden Sie das USB-Kabel des Scanners mit einem freien USB-Anschluss Ihres Computers.
- Softwareinstallation:
- Insert the provided SilverFast SE Plus 8 software DVD into your computer's optical drive.
- Follow the on-screen instructions to install the software and necessary drivers.
- If your computer does not have an optical drive, or for the latest drivers, download them from the official Plustek website. The scanner supports Windows 7/8/10/11 and Mac OS 10.12 ~ 11.x.
- SilverFast License Registration:
- After installation, launch the SilverFast software.
- You will be prompted to register your free SilverFast license. Follow the steps provided, which typically involve entering your scanner's hardware serial number.

Image: A visual guide demonstrating the steps for registering the SilverFast software license, including locating the serial number and inputting registration details.
Bedienungsanleitung
Loading Film/Slides:
- For 35mm negative film strips, carefully insert the film into the 35mm Negative Film Stripe Holder. Ensure the film is flat and correctly aligned.
- For mounted slides, place the slide into the Mounted Slide Holder.
- Insert the loaded holder into the scanner's film slot.

Image: Two 35mm negative film holders, designed to securely hold film strips for scanning with the OpticFilm 8200i SE.
Scanning Process with SilverFast:
- Launch the SilverFast SE Plus 8 software.
- Select the appropriate film type (negative or slide) and film profile innerhalb der Software.
- Nutzen Sie die Preview function to adjust scanning area and settings.
- iSRD (Infrared Smart Removal of Defects): The scanner features a built-in infrared channel to detect and remove dust and scratches. Enable this function in the SilverFast software for optimal results.
- Multi-Exposure Function: For improved image quality and dynamic range, enable the Multi-Exposure feature in the software. This captures multiple exposures to enhance detail in highlights and shadows.
- Adjust other settings such as resolution (up to 7200 dpi), color depth (48-bit input), and image enhancements as needed.
- Starten Sie den Scan. Das gescannte Bild wird in der Softwareoberfläche angezeigt.
- Save your scanned image in your desired format (e.g., TIFF, JPEG).

Image: A diagram illustrating how the infrared channel detects dust and scratches on film, showing the original source image, infrared scan, marker for defects, and the final corrected result.

Image: Screenshot of the SilverFast SE Plus 8 software interface, highlighting the iSRD (Infrared Dust and Scratch Removal) feature and its controls.

Bild: Examples demonstrating the effects of SilverFast NegaFix for film profiles, iSRD for defect removal, and Multi-Exposure for increased dynamic range, showing before and after comparisons.
Wartung
- Reinigen des Scanners: Use a soft, lint-free cloth to gently wipe the exterior of the scanner. Do not use liquid cleaners or abrasive materials.
- Reinigung von Filmen/Dias: Before scanning, ensure your film and slides are free of dust and fingerprints. Use a soft brush or compressed air designed for photographic materials. Avoid touching the film surface directly.
- Lagerung: When not in use, store the scanner in a clean, dry, and dust-free environment, preferably in its original packaging or the provided carrying bag.
Fehlerbehebung
Häufige Probleme und Lösungen:
- Scanner nicht erkannt:
- Stellen Sie sicher, dass das USB-Kabel sowohl mit dem Scanner als auch mit dem Computer fest verbunden ist.
- Verify the power adapter is connected and the scanner is powered on.
- Reinstall the scanner drivers from the Plustek webWebsite.
- Probieren Sie einen anderen USB-Anschluss an Ihrem Computer aus.
- Dust/Scratches on Scans:
- Ensure the film/slides are clean before scanning.
- Activate and properly configure the iSRD (Infrared Smart Removal of Defects) function in the SilverFast software. This feature is specifically designed to address dust and scratches.
- Poor Image Quality (Low Dynamic Range, Lack of Detail):
- Ensure the film/slide is correctly loaded and flat in the holder.
- Utilize the Multi-Exposure function in SilverFast to capture more detail in highlights and shadows.
- Check and adjust exposure, contrast, and color settings in the SilverFast software.
- Ensure you are scanning at an appropriate resolution for your needs (e.g., 7200 dpi for maximum detail).
- Softwareabstürze oder -einfrierungen:
- Ensure your operating system meets the minimum system requirements (Windows 7 or later, Mac OS 10.12 or later).
- Update your SilverFast software and scanner drivers to the latest versions from the Plustek webWebsite.
- Close other demanding applications while scanning.
Technische Daten
| Besonderheit | Beschreibung |
|---|---|
| Modellname | OpticFilm 8200i SE |
| Scannertyp | Film (35mm Negative & Mounted Slides) |
| Optische Auflösung | 7200 dpi |
| Dynamikbereich | Up to 3.6 Dmax |
| Farbtiefe | 48-bit input, 24/48-bit output |
| Lichtquelle | LED |
| Sensortyp | CCD |
| Konnektivität | USB |
| Infrared Channel | Yes (for dust and scratch removal) |
| Unterstützte Betriebssysteme | Windows 7/8/10/11, Mac OS 10.12 ~ 11.x |
Garantie und Support
Detaillierte Garantieinformationen finden Sie auf der Ihrem Produkt beiliegenden Garantiekarte oder auf der offiziellen Plustek-Website. website. Plustek provides technical support and driver updates through their webWebsite.
Official Plustek WebWebsite: www.plustek.com
It is recommended to regularly check the Plustek website for the latest software updates and support resources to ensure optimal performance of your scanner.


