1. Einleitung
Thank you for choosing the ETA Falco Smart Robot Vacuum Cleaner with Mopping Function. This manual provides essential information for the safe and efficient operation, maintenance, and troubleshooting of your device. Please read this manual thoroughly before using the product and keep it for future reference.
Wichtige Sicherheitsinformationen
- Always ensure the robot is placed on a stable, level surface.
- Halten Sie das Gerät von Wasser und Feuchtigkeit fern.
- Do not allow children or unauthorized persons to operate the robot.
- Use only the original charging adapter and accessories provided.
- Before cleaning or maintenance, ensure the robot is powered off and unplugged from the charging station.
- Avoid operating the robot near open flames or flammable materials.
2. Produktüberschreitungview
Komponenten und Bedienelemente
Familiarize yourself with the main parts and controls of your ETA Falco Smart robot vacuum cleaner.
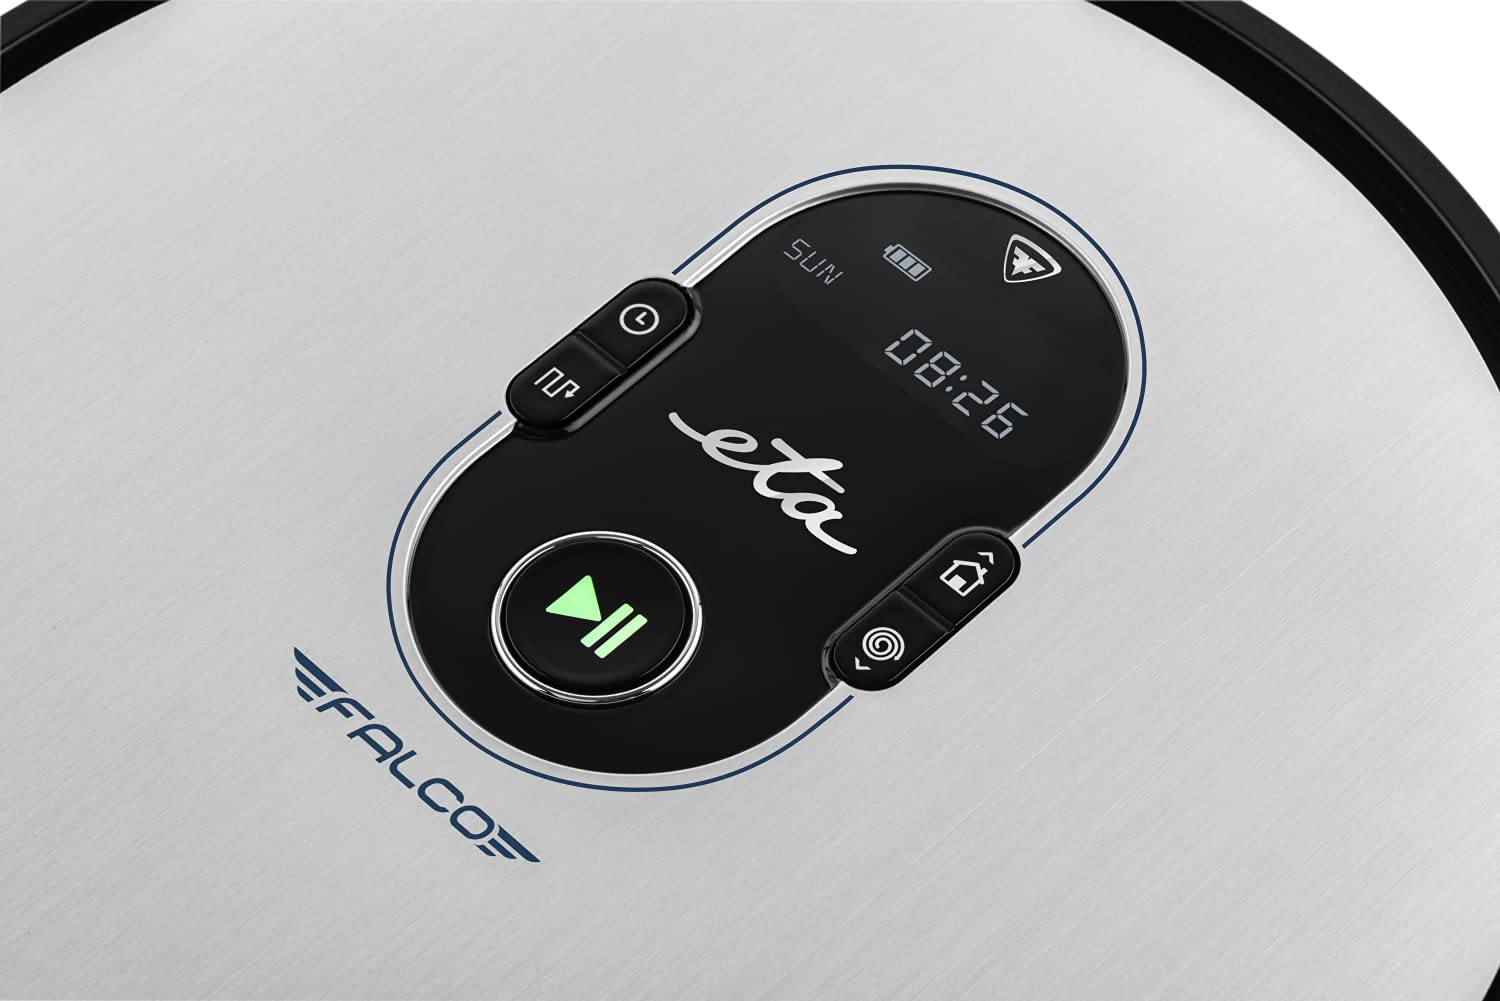
Bild 2.1: Top panel controls. This image shows the main control panel on the top of the robot, including buttons for power, scheduling, and return to charging station, along with a digital display.

Bild 2.2: Unterseite view. This image displays the bottom of the robot, highlighting the main brush, two side brushes, and the mop attachment.

Bild 2.3: Underside diagram. This diagram labels the key components on the robot's underside, including the side brushes, main brush, and mop attachment.
3. Packungsinhalt
Bitte vergewissern Sie sich beim Auspacken, dass alle folgenden Artikel vorhanden sind:
- ETA Falco Smart Robot Vacuum Cleaner
- Ladestation
- Ladeadapter
- Fernbedienung
- 2x Spare Side Brushes
- Special Rotary and Lamella Brush
- 2x Cleaning Cloths (Mop Pads)
- Ersatz-HEPA-Filter
- Mop Attachment with 300 ml Water Tank
- Virtuelle Wand
4. Einrichtung
4.1 Erstaufladung
- Platzieren Sie die Ladestation an einer Wand in einem offenen Bereich und achten Sie darauf, dass sich im Umkreis von 1 Meter zu den Seiten und 2 Metern nach vorne keine Hindernisse befinden.
- Connect the charging adapter to the charging station and plug it into a power outlet.
- Place the robot vacuum cleaner on the charging station. Ensure the charging contacts align. The robot will begin charging automatically. A full charge takes approximately 5 hours.
4.2 Einbau der Seitenbürsten
Attach the side brushes to the designated posts on the underside of the robot by pressing them down until they click into place. Ensure the 'L' and 'R' markings on the brushes match the corresponding markings on the robot.
4.3 Connecting to the ETA SMART App
The ETA SMART app enhances the functionality of your robot. Download the app from your smartphone's app store. Follow the in-app instructions to connect your robot to your home Wi-Fi network and pair it with the app.
4.4 Setting up the Virtual Wall
The virtual wall creates an invisible barrier to restrict the robot's access to certain areas. Place the virtual wall device on the floor where you want to create a boundary. Ensure the infrared beam is directed towards the area you wish to block. The robot will detect this beam and avoid crossing it.

Bild 4.1: Robot with charging station and virtual wall. This image shows the robot positioned near its charging station, with a virtual wall device placed nearby to illustrate its function.
5. Bedienungsanleitung
5.1 Reinigungsmodi
The ETA Falco Smart offers four distinct cleaning modes:
- CLEVER: General cleaning mode for optimal coverage.
- KLASSIKER: Standardreinigungsmuster.
- RAND: Reinigt entlang von Wänden und Möbelkanten.
- STELLE: Concentrated cleaning in a specific area.
You can select these modes via the ETA SMART app or the remote control.
5.2 Reinigungsplanung
Use the ETA SMART app to set a cleaning schedule for your robot. You can program specific times and days for the robot to automatically start cleaning.
5.3 Manuelle Steuerung
You can manually control the robot's movement and functions using the remote control or the ETA SMART app. The app also allows you to monitor cleaning activity, battery charge, and view cleaning routes.

Bild 5.1: ETA Smart App features. This image displays the ETA Smart App interface on a smartphone, highlighting features such as remote control, cleaning history, activity monitoring, battery status, cleaning modes (SMART, CLASSIC, EDGE, SPOT), cleaning schedule, mopping intensity control, and suction power adjustment.
5.4 Wischfunktion
- Fill the 300 ml water tank with clean water. Do not use detergents or cleaning solutions that are not approved for robot vacuums.
- Attach a clean mop pad to the mop attachment.
- Slide the mop attachment into the designated slot on the underside of the robot.
- Starten Sie einen Reinigungszyklus. Der Roboter saugt und wischt gleichzeitig.
6. Wartung
Regelmäßige Wartung gewährleistet optimale Leistung und verlängert die Lebensdauer Ihres Saugroboters.
6.1 Reinigung des Staubbehälters und des Filters
- Drücken Sie die Entriegelungstaste des Staubbehälters und entfernen Sie den Staubbehälter.
- Open the dust bin and empty its contents into a trash can.
- Remove the HEPA filter and primary filter. Tap them gently to remove dust. If washable, rinse under running water and allow to air dry completely before reinserting.
- Wipe the inside of the dust bin with a dry cloth.
- Reassemble the filters and dust bin, then reinsert into the robot.
6.2 Reinigung der Hauptbürste
- Drehen Sie den Roboter um.
- Die Hauptbürstenabdeckung kann durch Drücken der Entriegelungslaschen entfernt werden.
- Heben Sie die Hauptbürste heraus.
- Use the cleaning tool (if provided) or scissors to remove hair and debris tangled around the brush.
- Clean the brush compartment.
- Reinsert the main brush and secure the cover.
6.3 Reinigung der Seitenbürsten
Periodically check the side brushes for tangled hair or debris. If necessary, remove them by gently pulling upwards and clean them. Replace worn or damaged brushes with the spare ones provided.
6.4 Reinigung des Mopppads und des Wassertanks
After each mopping session, remove the mop pad and wash it thoroughly. Empty any remaining water from the water tank and rinse it. Allow both to air dry completely before storing or reusing.
6.5 Sensoren reinigen
Wipe the anti-drop sensors, bumper sensors, and charging contacts on the robot and charging station with a clean, dry cloth to ensure proper function.
7. Fehlerbehebung
Sollte Ihr Saugroboter ein Problem haben, beachten Sie bitte die folgenden häufig auftretenden Probleme und Lösungen:
| Problem | Mögliche Ursache | Lösung |
|---|---|---|
| Roboter lässt sich nicht einschalten | Schwache Batterie; Netzschalter ausgeschaltet | Laden Sie den Roboter auf. Stellen Sie sicher, dass der Netzschalter eingeschaltet ist. |
| Roboter lädt nicht | Ladekontakte verschmutzt; Ladestation nicht angeschlossen | Ladekontakte reinigen; Sicherstellen, dass die Ladestation angeschlossen ist |
| Schlechte Reinigungsleistung | Dust bin full; Brushes tangled; Filter clogged | Empty dust bin; Clean brushes; Clean/replace filter |
| Roboter bleibt häufig hängen | Hindernisse auf dem Boden; Sensoren verschmutzt | Boden frei von Kabeln/Kleinteilen; Sensoren reinigen |
| Virtual wall not working | Virtual wall batteries low; Incorrect placement | Replace batteries; Adjust virtual wall position |
Wenn das Problem nach dem Ausprobieren dieser Lösungen weiterhin besteht, wenden Sie sich bitte an den Kundensupport.
8. Spezifikationen
Technical specifications for the ETA Falco Smart Robot Vacuum Cleaner (Model ETA251590000):
| Besonderheit | Detail |
|---|---|
| Hersteller | Ankunftszeit |
| Produktabmessungen (L x B x H) | 32.5 x 33.5 x 7.5 cm |
| Gewicht | 250 Gramm |
| Artikelmodellnummer | ETA251590000 (T2261) |
| Modellfarbe | Blau |
| Material | Plastik |
| Leistungstyp | Batteriebetrieben |
| Bandtage | 3 Volts (14.4V Li-ion battery, 2400 mAh) |
| Anzahl der Artikel in der Verpackung | 1 |
| Besondere Merkmale | Pet brush compatibility, Smart App control, Floating brush system, HEPA filter, Virtual wall |
| Im Lieferumfang enthaltene Komponenten | Battery, Filter, Charging station, Adapter, Remote control, Side brushes, Rotary brush, Cleaning cloths, Mop attachment, Virtual wall |
| Batteriezusammensetzung | Lithium-Ionen |
| Akkulaufzeit | Bis zu 120 Minuten |
| Ladezeit | Ca. 5 Stunden |
| Oberflächenempfehlung | Laminieren |
| Controllertyp | App-Steuerung |
| Verfügbarkeit von Ersatzteilen | Informationen zu Ersatzteilen sind nicht verfügbar. |
9. Garantie und Support
For warranty information, product support, or to inquire about spare parts, please refer to the warranty card included with your purchase or visit the official ETA webBewahren Sie Ihren Kaufbeleg für Garantieansprüche auf.


