1. Einleitung
This manual provides detailed instructions for the setup, operation, and maintenance of your MOES Smart Temperature Humidity Monitor with IR Remote Control. This device integrates temperature and humidity sensing with universal infrared remote control capabilities, allowing you to monitor your environment and control various IR-enabled appliances via a smartphone application or voice commands.
2. Produktüberschreitungview
The MOES Smart Temperature Humidity Monitor is a compact device designed to provide real-time environmental data and smart control. It features an LCD display for immediate readings and connects to your home Wi-Fi network for remote access and automation.

Image 2.1: MOES Smart Temperature Humidity Monitor displaying temperature and humidity, alongside a smartphone showing the companion app interface.
Hauptmerkmale:
- Echtzeitüberwachung: Displays current temperature and humidity on an LCD screen.
- IR-Fernbedienung: Controls various infrared appliances such as TVs, air conditioners, and fans.
- Wi-Fi-Konnektivität: Connects to 2.4GHz Wi-Fi for remote access via the Tuya Smart or Smart Life app.
- Intelligente Automatisierung: Create rules to automatically control IR devices based on temperature and humidity changes.
- Sprachsteuerung: Kompatibel mit Amazon Alexa und Google Assistant für freihändige Bedienung.
- Schalter Temperatureinheit: Wechseln Sie einfach zwischen Celsius und Fahrenheit.
3. Spezifikationen
Detailed technical specifications for the MOES Smart Temperature Humidity Monitor.

Image 3.1: Product dimensions and component labels for the MOES Smart Temperature Humidity Monitor.
| Besonderheit | Spezifikation |
|---|---|
| Produktname | Intelligente IR-Fernbedienung |
| Modellnummer | WR-TY-THR-BK-MS |
| Maße | 65 mm x 65 mm x 17 mm (2.56 x 2.56 x 0.67 Zoll) |
| Artikelgewicht | 3.2 Unzen |
| Leistungsaufnahme | DC 5V/1A (Micro USB, adapter not included) |
| LED-Anzeige | Blau |
| Temperaturgenauigkeit | ±1 °C |
| Temperaturmessbereich | 0°C – 60°C |
| Luftfeuchtigkeit am Arbeitsplatz | ±5% relative Luftfeuchtigkeit |
| Infrarotfrequenz | 38 kHz |
| IR-Entfernung | <10 m |
| Verbindung | WLAN 2.4GHz |
| Kompatible Geräte | Air Conditioner, Humidifier, Fan, TV, Set-top Box, Projector, etc. |
| Besondere Merkmale | Voice Search, App Control, Automation |
4. Einrichtung
4.1 Was ist in der Box?
- MOES Smart Temperature Humidity Monitor
- Micro-USB-Kabel
- Benutzerhandbuch (dieses Dokument)
4.2 Physische Einrichtung
- Stromanschluss: Connect the provided Micro USB cable to the Micro USB port on the device and plug the other end into a 5V/1A USB power adapter (not included). The device will power on and the LCD display will activate.
- Platzierung: Place the monitor in a central location within the room where you intend to measure temperature and humidity and control IR devices. Ensure there are no obstructions between the monitor and the IR-controlled appliances. The IR distance is typically up to 10 meters.
4.3 App-Installation und -Kopplung
The MOES Smart Temperature Humidity Monitor works with the Tuya Smart or Smart Life app.
- Laden Sie die App herunter: Suchen nach "Tuya Smart" or "Smart Life" in your smartphone's app store (iOS App Store or Google Play Store) and download it.
- Registrieren/Anmelden: Öffne die App und registriere dich für ein neues Konto oder melde dich an, falls du bereits eines hast.
- Gerät hinzufügen:
- Stellen Sie sicher, dass Ihr Smartphone mit einem 2.4-GHz-WLAN-Netzwerk verbunden ist.
- In the app, tap the "+" icon in the top right corner to add a device.
- Select "Sensor" or "Universal Remote Control" from the device list, or use the auto-scan feature.
- Kopplungsmodus aktivieren: On the MOES monitor, press and hold the "Reset Button" (located at the back, often labeled 'C/F Switch' or 'Reset') for 5-7 seconds until the Wi-Fi icon on the LCD display starts blinking rapidly.
- Follow the on-screen instructions in the app to connect the device to your Wi-Fi network. This usually involves confirming the blinking indicator and entering your Wi-Fi password.
- Once successfully paired, the Wi-Fi icon on the monitor will stop blinking and remain solid.
5. Bedienungsanleitung
5.1 LCD-Anzeige überview
The LCD display provides essential information at a glance:

Abbildung 5.1: Detailansicht view des LCD-Displays und seiner Anzeigen.
- Temperaturanzeige: Shows the current temperature (in °C or °F).
- Feuchtigkeitsanzeige: Shows the current relative humidity (%).
- Wi-Fi-Signal: Zeigt den Wi-Fi-Verbindungsstatus an.
- Uhrzeit und Datum: Zeigt die aktuelle Uhrzeit und das aktuelle Datum an.
- Week/AM/PM: Shows the day of the week and AM/PM indicator.
5.2 Schalttemperatureinheiten (°C/°F)
To switch between Celsius and Fahrenheit, briefly press the "Reset Button" on the back of the device. The unit on the LCD display will change accordingly. This can also be adjusted within the Tuya Smart/Smart Life app.

Image 5.2: Switching temperature units via the Smart Life app.
5.3 IR Remote Control Functionality
The device can learn and emit IR signals to control various home appliances.
- Hinzufügen von IR-Geräten:
- In the Tuya Smart/Smart Life app, navigate to your MOES monitor device.
- Look for an option like "IR Remote Control" or "Add Remote".
- Select the type of appliance you want to control (e.g., TV, Air Conditioner, Fan, Set-top Box).
- Follow the app's instructions to either select from a pre-programmed library of remote codes or use the "DIY" (Do It Yourself) function to learn commands from your original remote control.
- For DIY learning, point your original remote at the MOES monitor and press the desired button when prompted by the app.
- Steuergeräte: Once an IR device is added, you can control it directly from the app interface, even when you are away from home.
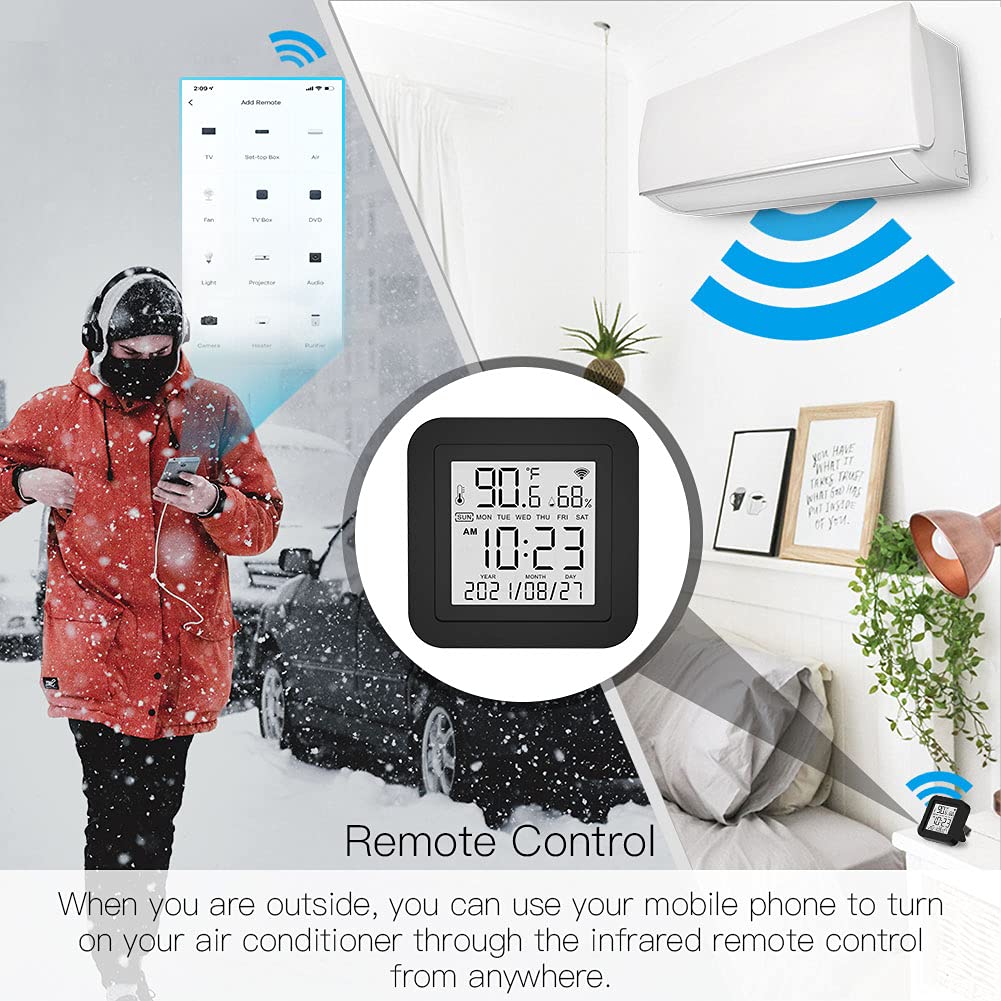
Image 5.3: Remote control functionality via the smartphone app.
5.4 Intelligente Automatisierung
Leverage the temperature and humidity data to create automated routines for your IR-controlled devices.
- Access Automation: In der Tuya Smart/Smart Life App gehen Sie zum Abschnitt „Smart“ oder „Automatisierung“.
- Create a Scene/Automation:
- Select "When device status changes" or "Schedule" as the condition.
- Choose your MOES monitor and set a condition based on temperature or humidity (e.g., "Temperature rises above 26°C" or "Humidity drops below 50%").
- For the task, select "Run the device" and choose the IR-controlled appliance (e.g., Air Conditioner, Humidifier). Set the desired action (e.g., "Turn On", "Set Temperature to 24°C").

Abbildung 5.4: Beispielample of temperature-based automation for an air conditioner.

Abbildung 5.5: Beispielample of humidity-based automation for a humidifier.
5.5 Sprachsteuerung
The MOES Smart Temperature Humidity Monitor is compatible with Amazon Alexa and Google Assistant.
- Konten verknüpfen: In the Alexa or Google Home app, enable the "Tuya Smart" or "Smart Life" skill/service and link your account.
- Geräte entdecken: Once linked, ask your voice assistant to discover new devices. Your MOES monitor and any configured IR devices will appear.
- Sprachbefehle: You can now use voice commands to control your IR appliances. Examples:
- "Alexa, schalte den Fernseher ein."
- "Hey Google, stell die Klimaanlage auf 22 Grad ein."
- "Alexa, schalte den Ventilator aus."

Image 5.6: Voice control integration with Amazon Alexa and Google Assistant.
6. Wartung
- Reinigung: Use a soft, dry cloth to clean the device. Do not use liquid cleaners or sprays, as they may damage the internal components.
- Platzierung: Avoid placing the device in direct sunlight, near heat sources, or in areas with high humidity to ensure accurate readings and optimal performance.
- Firmware-Updates: The device's firmware may be updated periodically via the Tuya Smart/Smart Life app. Ensure your app is up-to-date and follow any prompts for device firmware updates.
7. Fehlerbehebung
| Problem | Mögliche Lösung |
|---|---|
| Gerät lässt sich nicht einschalten | Ensure the Micro USB cable is securely connected and the power adapter is working. Try a different USB port or adapter. |
| Keine Verbindung zum WLAN möglich |
|
| IR remote control not working |
|
| Ungenaue Temperatur-/Feuchtigkeitsmesswerte |
|
| Sprachsteuerung reagiert nicht |
|
| Device unresponsive / needs reset | Press and hold the "Reset Button" on the back of the device for approximately 10 seconds until the device restarts or enters pairing mode. You may need to re-pair it with the app. |
8. Garantie und Support
MOES products are designed for reliability and performance. For warranty information, technical support, or further assistance, please refer to the official MOES webBesuchen Sie die Website oder kontaktieren Sie direkt den Kundenservice. Bewahren Sie Ihren Kaufbeleg als Kaufnachweis für Garantieansprüche auf.
Online-Ressourcen:
- Besuchen Sie die MOES Store auf Amazon for product updates and related accessories.


