1. Einleitung
Thank you for choosing the AVATTO WT200B-BH Smart WiFi Thermostat. This device is designed to provide intelligent temperature control for electric underfloor heating systems, enhancing comfort and energy efficiency in your home. This manual provides detailed instructions for installation, operation, programming, and smart home integration.
2. Produktmerkmale
- Programmierbar: Supports weekly programming for customized heating schedules.
- Smart Life Application: Fernsteuerung und -überwachung über die mobile Anwendung Smart Life.
- Sprachsteuerung: Kompatibel mit Amazon Alexa und Google Assistant für bequeme Sprachbefehle.
- Touch-Screen: Intuitive touch interface for local control.
- Kompaktes Design: Standard 55 x 55 mm size for seamless integration.
- Floor Heating Compatibility: Specifically designed for electric underfloor heating systems.
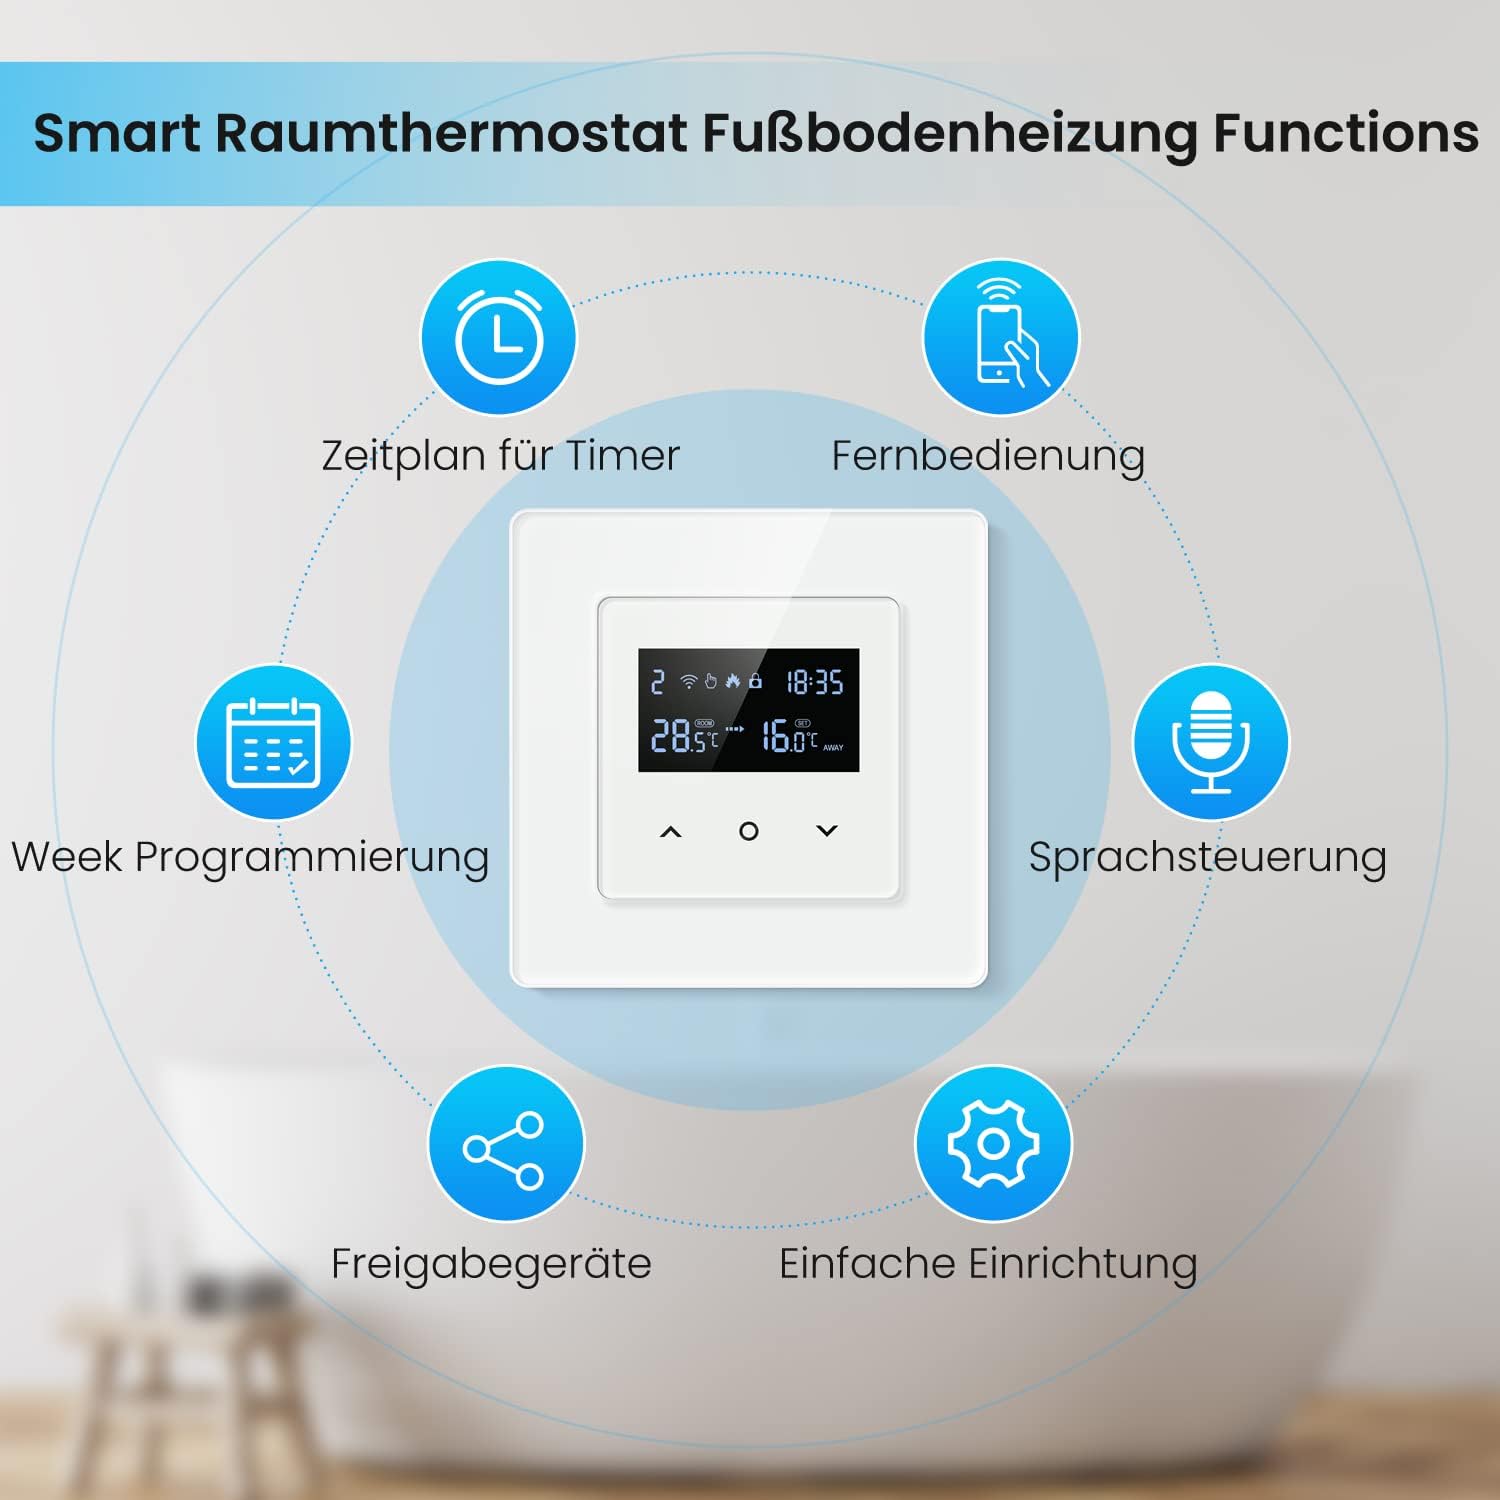
Abbildung 2.1: Überview of AVATTO Smart Thermostat functions, including timer schedule, remote control, week programming, voice control, device sharing, and easy setup.
3. Produktspezifikationen
| Marke | AVATTO |
| Modellnummer | WT200B-BH |
| Bandtage | AC 100V-240V (250 Volts nominal) |
| Material | Plastik |
| Artikelgewicht | 310 g |
| Verpackungsabmessungen | 10.4 x 9.8 x 6.7 cm |
| Controllertyp | Amazon Alexa, Google Assistant, Application, Voice Control |
| Spezifische Verwendungen | Heated (Underfloor Heating) |

Abbildung 3.1: Detailed dimensions of the AVATTO Smart Thermostat, showing front panel measurements of 80mm x 80mm, a standard 55mm x 55mm mounting frame, and a depth of 33mm.
4. Installationsanleitung
Eine fachgerechte Installation ist für den sicheren und effizienten Betrieb Ihres Thermostats unerlässlich. Wir empfehlen, die Installation von einem qualifizierten Elektriker durchführen zu lassen.
4.1. Montage
The thermostat is designed for standard wall-box installation. Ensure the power supply is disconnected before beginning installation.

Abbildung 4.1: Illustration of different installation methods for the AVATTO Smart Thermostat, including separate installation, combined installation with other modules, and replacement installation for existing products.
4.2. Schaltplan
Connect the thermostat according to the wiring diagram provided. Ensure all connections are secure and comply with local electrical codes. The thermostat requires Live (L) and Neutral (N) wires for power, and connections for the heating element (L1, N1) and the floor temperature sensor.
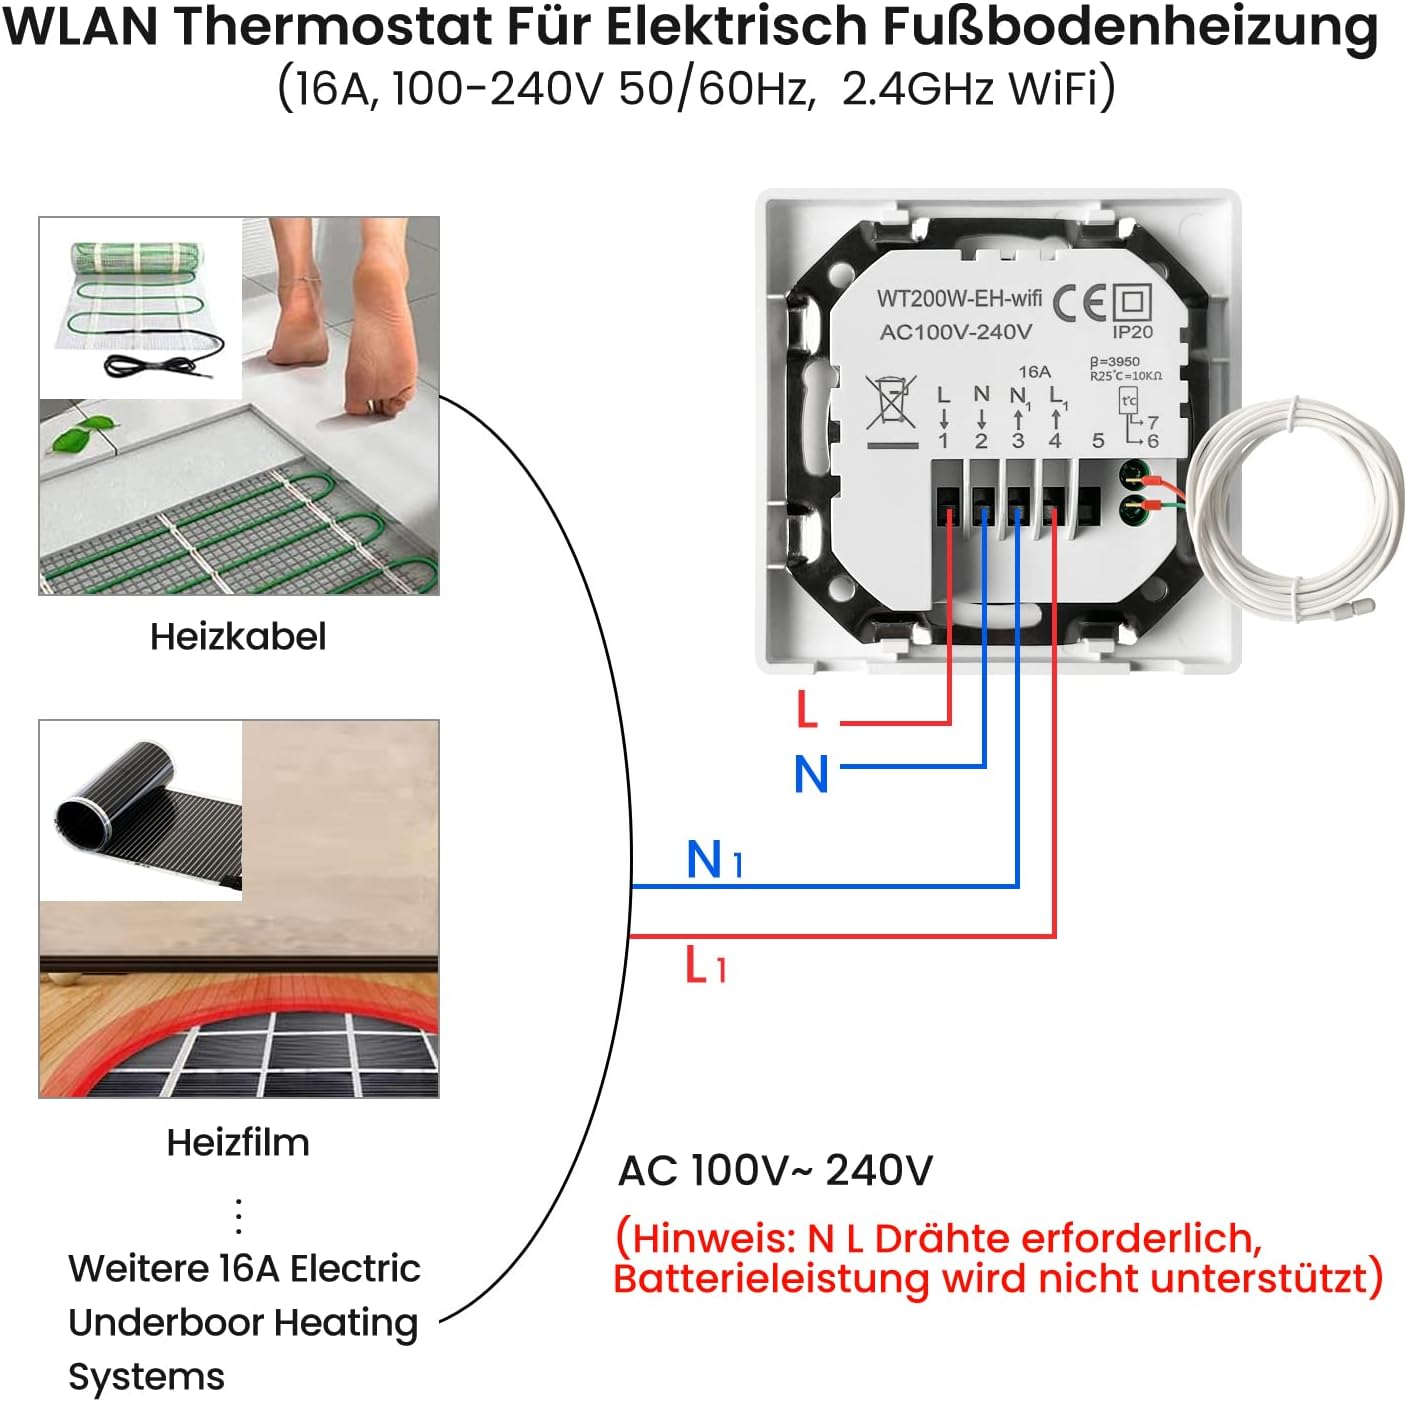
Abbildung 4.2: Detailed wiring diagram for the AVATTO Smart Thermostat, showing connections for Live (L), Neutral (N), heating load (L1, N1), and the floor sensor. This diagram is for AC 100V-240V systems and requires N and L wires; battery power is not supported.
Wichtig: Ensure the main power supply is turned off before performing any wiring. Incorrect wiring can cause damage to the thermostat or the heating system, and poses a safety risk.
5. Grundlegende Bedienung
After successful installation and power-up, the thermostat display will show the current temperature and time. Use the touch buttons on the device to adjust settings directly.
- Ein-/Ausschalten: Press and hold the power button (if available) or use the app.
- Temperatureinstellung: Stellen Sie mit den Auf-/Ab-Pfeilen die gewünschte Temperatur ein.
- Modusauswahl: Cycle through different operating modes (e.g., Manual, Auto, Holiday) using the mode button.
6. Programmierung
The AVATTO thermostat supports weekly programming, allowing you to set different temperature schedules for various times of the day and week. This feature helps optimize energy consumption and comfort.

Abbildung 6.1: Example of weekly programming interface on the Smart Life app, showing multiple periods with set times and temperatures for a working day. The thermostat supports 5+2, 6+1, or 7-day programming options with up to 6 time periods per day.
Detailed programming instructions are available within the Smart Life application. Generally, you can set up to six time periods per day, each with a specific target temperature. This allows for flexible heating based on your daily routine.
7. Smart Home Integration
The AVATTO Smart WiFi Thermostat can be integrated with popular smart home platforms for enhanced control and automation.
7.1. Smart Life App
Download the "Smart Life" app from your mobile device's app store. Follow the in-app instructions to add your thermostat. This will enable remote control, scheduling, and advanced settings management.
7.2. Amazon Alexa & Google Assistant
Once connected to the Smart Life app, you can link your Smart Life account to Amazon Alexa or Google Assistant. This allows for voice control of your thermostat, such as adjusting the temperature or changing modes.

Abbildung 7.1: Visual representation of the AVATTO Smart Thermostat's compatibility with Smart Life, Amazon Alexa, and Google Home, demonstrating voice control capabilities and remote management via a smartphone app.
8. Wartung
The AVATTO Smart WiFi Thermostat requires minimal maintenance. Follow these guidelines to ensure its longevity and optimal performance:
- Reinigung: Wischen Sie den Bildschirm ab und casing with a soft, dry cloth. Avoid using abrasive cleaners or solvents, as they may damage the surface.
- Feuchtigkeit vermeiden: Do not expose the thermostat to excessive moisture or direct water spray.
- Software-Updates: Periodically check the Smart Life app for any available firmware updates for your thermostat to ensure you have the latest features and security enhancements.
9. Fehlerbehebung
If you encounter issues with your AVATTO Smart WiFi Thermostat, refer to the following common troubleshooting steps:
- Kein Strom/Display aus: Überprüfen Sie den Leitungsschutzschalter und stellen Sie sicher, dass das Thermostat korrekt angeschlossen ist und Strom erhält.
- Heating Not Working: Verify the thermostat is in heating mode and the set temperature is above the ambient temperature. Check the wiring to the heating element.
- WLAN-Verbindung unterbrochen: Ensure your home WiFi network is active and the thermostat is within range. Restart your router and the thermostat. Re-pair the device with the Smart Life app if necessary.
- Ungenaue Temperaturmessung: Ensure the floor sensor is correctly installed and not obstructed. Avoid placing the thermostat in direct sunlight or near heat sources.
- Probleme mit der App-Steuerung: Ensure your phone has an internet connection and the Smart Life app is updated to the latest version. Log out and log back into your Smart Life account.
For persistent issues, contact AVATTO customer support or consult a qualified electrician.
10. Garantie und Support
Warranty information for the AVATTO WT200B-BH Smart WiFi Thermostat should be obtained from your retailer at the time of purchase. Please retain your proof of purchase for warranty claims.
For technical support or further assistance, please refer to the contact information provided by AVATTO or your product retailer. Information regarding spare parts availability is not provided in the product specifications.


