1. Einleitung
Thank you for choosing an Indesit appliance. This user manual provides essential information for the safe and efficient operation, installation, and maintenance of your Indesit TWE 71252 S EU front-loading washing machine. Please read these instructions carefully before using the appliance and keep them for future reference. Proper use and maintenance will ensure optimal performance and extend the lifespan of your washing machine.
2. Sicherheitshinweise
Generelle Sicherheit:
- Dieses Gerät ist nur für den Hausgebrauch bestimmt.
- Do not allow children to play with the appliance. Supervise children to ensure they do not climb into the drum.
- Vor der Reinigung oder Durchführung von Wartungsarbeiten muss das Gerät immer vom Stromnetz getrennt werden.
- Do not operate the washing machine if the power cord or plug is damaged, or if the appliance itself is faulty. Contact qualified service personnel.
- Stellen Sie sicher, dass das Gerät ordnungsgemäß geerdet ist.
Installationssicherheit:
- Remove all transit bolts and packaging materials before use. Failure to do so can cause severe damage.
- Install the appliance on a firm, level floor. Adjust the feet to ensure stability.
- Sorgen Sie für ausreichende Belüftung rund um das Gerät.
- Schließen Sie den Wasserzulaufschlauch an einen Kaltwasserhahn an. Achten Sie darauf, dass alle Verbindungen dicht sind, um Leckagen zu vermeiden.
- The drain hose must be securely fixed to prevent displacement during operation.
3. Produktüberschreitungview
Your Indesit TWE 71252 S EU washing machine features a user-friendly design with essential components for efficient laundry care.

Abbildung 3.1: Front view of the Indesit TWE 71252 S EU washing machine. This image shows the overall design, including the control panel at the top, the detergent dispenser on the left, and the main loading door in the center.
Schlüsselkomponenten:
- Bedienfeld: Located at the top, featuring digital touch controls, push buttons, and a rotary knob for program selection.
- Waschmittelspender: A pull-out drawer for adding detergent and fabric softener.
- Ladetür: Frontladertür zum Hinzufügen und Entnehmen der Wäsche.
- Trommel: Innenraum aus Edelstahl, in dem die Wäsche gewaschen wird.
- Ablauffilter: Located at the bottom front, accessible for cleaning.

Abbildung 3.2: Close-up of the detergent dispenser and control panel. This view highlights the various compartments within the dispenser for pre-wash, main wash, and softener, along with the program selection knob and digital display.

Abbildung 3.3: Innere view of the stainless steel drum. This image shows the perforated surface of the drum, designed for effective washing and rinsing, and the agitator paddles.
4. Installation und Einrichtung
Eine fachgerechte Installation ist entscheidend für die Leistung und Lebensdauer Ihrer Waschmaschine.
4.1 Auspacken:
- Entfernen Sie vorsichtig sämtliche Verpackungsmaterialien, einschließlich der Styroporbasis und jeglicher Schutzfolie.
- Remove the transit bolts located at the rear of the machine. These bolts secure the drum during transport and must be removed before operation. Keep them for future transport if needed.
4.2 Positionierung:
- Place the washing machine on a flat, stable surface, away from direct sunlight or heat sources.
- Adjust the adjustable feet at the bottom of the machine to ensure it is perfectly level. Use a spirit level to verify.
- Ensure there is sufficient space around the machine for ventilation and ease of access.
4.3 Wasseranschluss:
- Connect the supplied water inlet hose to the cold water tap. Hand-tighten the connection, then use a wrench for a quarter turn.
- Connect the other end of the inlet hose to the water inlet valve at the back of the washing machine.
- Position the drain hose into a standpipe or over the edge of a sink, ensuring it is securely fixed to prevent it from falling out during draining. The height of the drain point should be between 65 cm and 100 cm from the floor.
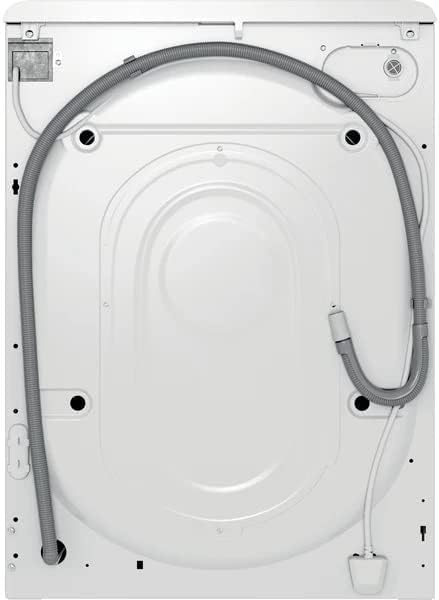
Abbildung 4.1: Hinteren view of the washing machine. This image illustrates the connections for the water inlet hose (typically blue or white) and the drain hose, along with the power cable.
4.4 Elektrischer Anschluss:
- Plug the power cord into a properly earthed electrical socket.
- Verwenden Sie keine Verlängerungskabel oder Mehrfachstecker.
4.5 First Wash Cycle:
- Before washing clothes, run an empty wash cycle to clean the drum and remove any manufacturing residues.
- Geben Sie eine kleine Menge Waschmittel in das Hauptwaschfach.
- Select a short, hot wash program (e.g., 60°C cotton cycle) and start the machine.
5. Bedienungsanleitung
Befolgen Sie diese Schritte für einen effektiven und sicheren Betrieb Ihrer Waschmaschine.
5.1 Loading Laundry:
- Öffnen Sie die Ladetür.
- Sortieren Sie die Wäsche nach Stoffart, Farbe und Verschmutzungsgrad.
- Load laundry loosely into the drum, ensuring not to overload. The 7kg capacity refers to dry laundry weight.
- Schließen Sie die Tür fest, bis sie einrastet.
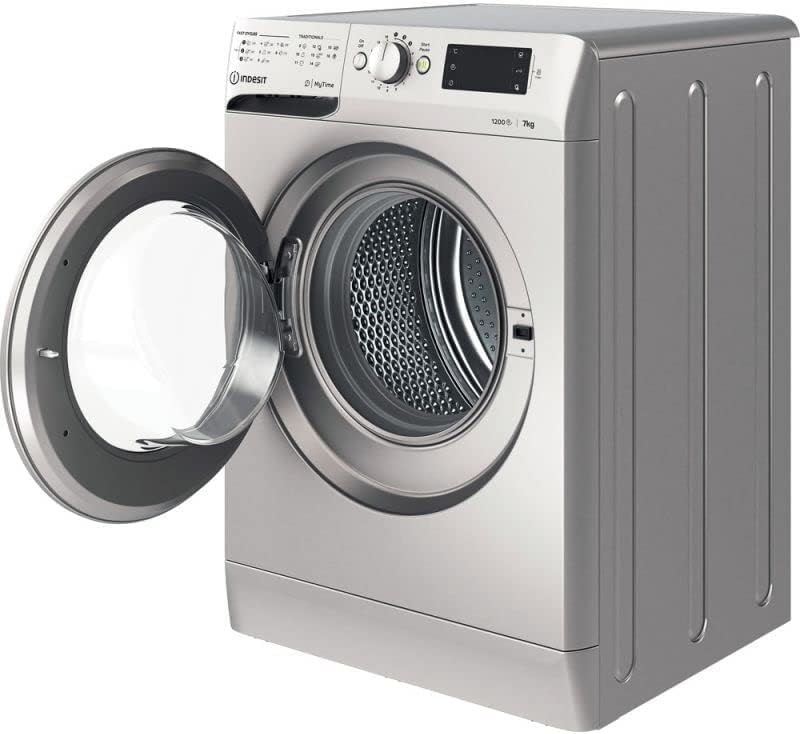
Abbildung 5.1: Front view of the washing machine with the door open. This image shows the wide opening for easy loading and unloading of laundry into the drum.
5.2 Adding Detergent and Additives:
- Ziehen Sie die Waschmittelschublade heraus.
- Add the appropriate amount of detergent to the main wash compartment (usually marked 'II' or 'Main Wash').
- If using fabric softener, pour it into the designated compartment (usually marked with a flower symbol or 'Softener'). Do not exceed the 'MAX' level.
- Schließen Sie die Spenderschublade vorsichtig.
5.3 Selecting a Program:
- Turn the rotary knob on the control panel to select the desired wash program. The machine offers various programs for different fabric types and soil levels, including a 'Quick Wash' option.
- Use the digital touch controls and push buttons to adjust additional settings such as temperature, spin speed (up to 1200 RPM), or delay start, if available for the selected program.
5.4 Einen Zyklus starten:
- Press the 'Start/Pause' button to begin the wash cycle. The indicator light will illuminate.
5.5 Pausing/Canceling a Cycle:
- To pause a cycle, press the 'Start/Pause' button. The indicator light will flash.
- To cancel a cycle, press and hold the 'Start/Pause' button for a few seconds, or turn the program selector knob to 'Off' and then back to a new program.
5.6 End of Cycle:
- The machine will signal the end of the cycle (e.g., with an audible alert or a specific display message).
- Open the door and remove the laundry promptly to prevent creasing and odors.
- Lassen Sie die Tür einen Spalt breit offen, damit die Trommel an der Luft trocknen kann.
6. Wartung und Reinigung
Regelmäßige Wartung gewährleistet optimale Leistung und Hygiene.
6.1 Cleaning the Detergent Dispenser:
- Ziehen Sie die Spenderschublade vollständig heraus.
- Entfernen Sie alle abnehmbaren Teile und spülen Sie diese unter fließendem Wasser ab.
- Reinigen Sie das Schubladengehäuse mit einer Bürste.
- Die Schublade wieder zusammenbauen und einsetzen.
6.2 Cleaning the Drum:
- Run a maintenance wash cycle (e.g., a hot cycle with a drum cleaning agent or white vinegar) every few months to prevent odor and residue buildup.
6.3 Cleaning the Door Seal:
- Wipe the rubber door seal after each wash to remove lint, dirt, and moisture. This prevents mold and odors.
6.4 Cleaning the Drain Filter:
- Periodically clean the drain filter to prevent blockages and ensure proper drainage.
- Open the cover at the bottom front of the machine.
- Stellen Sie ein flaches Gefäß darunter, um eventuell vorhandenes Restwasser aufzufangen.
- Slowly unscrew the filter, allowing water to drain.
- Entfernen Sie Flusen, Münzen oder Fremdkörper aus dem Filter und seinem Gehäuse.
- Rinse the filter under running water and screw it back in firmly. Close the cover.

Abbildung 6.1: Close-up of the drain filter access. This image shows the removable cap that covers the drain filter, which needs to be regularly cleaned to prevent blockages.
6.5 External Cleaning:
- Wischen Sie das Äußere der Maschine mit einem weichen, damp Tuch. Keine Scheuer- oder Lösungsmittel verwenden.
7. Fehlerbehebung
Before contacting customer service, try these simple solutions for common issues.
| Problem | Mögliche Ursache | Lösung |
|---|---|---|
| Maschine startet nicht | No power; Door not closed; Program not selected; Start/Pause button not pressed. | Check power supply; Ensure door is firmly closed; Select a program; Press Start/Pause. |
| Wasser füllt sich nicht | Wasserhahn geschlossen; Zulaufschlauch geknickt; Wasserdruck zu niedrig. | Wasserhahn öffnen; Schlauch begradigen; Wasserdruck im Haushalt prüfen. |
| Wasser läuft nicht ab | Drain hose kinked or blocked; Drain filter blocked. | Straighten or clear drain hose; Clean the drain filter (see Section 6.4). |
| Übermäßige Vibration/Lärm | Transportsicherungen nicht entfernt; Maschine steht nicht waagerecht; ungleichmäßige Beladung. | Remove transit bolts (if not already); Adjust feet to level machine; Redistribute laundry evenly. |
| Waschmittelreste auf der Kleidung | Too much detergent; Detergent dispenser blocked; Insufficient rinse. | Reduce detergent amount; Clean dispenser; Select an extra rinse option if available. |
8. Spezifikationen
Detailed technical specifications for the Indesit TWE 71252 S EU washing machine.
| Besonderheit | Spezifikation |
|---|---|
| Modell | TWE 71252 S EU |
| Marke | Indesit |
| Kapazität | 7 kg |
| Maximale Schleudergeschwindigkeit | 1200 U/min |
| Abmessungen (H x B x T) | 85 cm x 59.5 cm x 54 cm |
| Gewicht | 66.5 kg |
| Energieeffizienz | A+++ 90% |
| Trommelmaterial | Edelstahl |
| Steuerungstyp | Digital Touch, Push Button, Rotary Knob |
| Installationstyp | Freistehende |
| Farbe | Silber |
| Besondere Merkmale | Durable, Quick Wash Option |
| Im Lieferumfang enthaltene Komponenten | Waschmaschine |
9. Garantie und Support
For warranty information, please refer to the warranty card provided with your appliance or contact your retailer. Keep your proof of purchase (receipt or invoice) as it will be required for any warranty claims.
If you encounter issues that cannot be resolved using the troubleshooting guide, please contact Indesit customer service or an authorized service center. Do not attempt to repair the appliance yourself, as this may void your warranty and pose safety risks.


