1. Einleitung
This manual provides comprehensive instructions for the Espressif ESP32-S3-EYE Development Board. It covers product overview, component identification, setup procedures, operational guidelines, maintenance tips, troubleshooting, and detailed specifications. Please read this manual thoroughly before using the device to ensure proper functionality and longevity.
2. Produktüberschreitungview
The ESP32-S3-EYE is a compact AI development board designed for applications requiring image recognition and audio processing. It integrates the ESP32-S3 SoC with Espressif's AI development framework, ESP-WHO. Key features include a 2-Megapixel camera, an LCD display, and a microphone. The board is equipped with 8 MB Octal PSRAM and 8 MB flash memory, supporting Wi-Fi for image transmission and a Micro-USB port for debugging.
Hauptmerkmale:
- Integrated 8 MB Flash and 8 MB PSRAM for ample storage and processing.
- Equipped with a 2-megapixel camera and a 1.3-inch LCD screen for visual applications.
- Supports high-performance image recognition and voice wake-up functionalities.
- Facilitates Wi-Fi based image transmission.
- Features a Micro-USB port for debugging and power supply.
3. Komponenten und Layout
The ESP32-S3-EYE board features several integrated components essential for its operation. Understanding their placement and function is crucial for development.
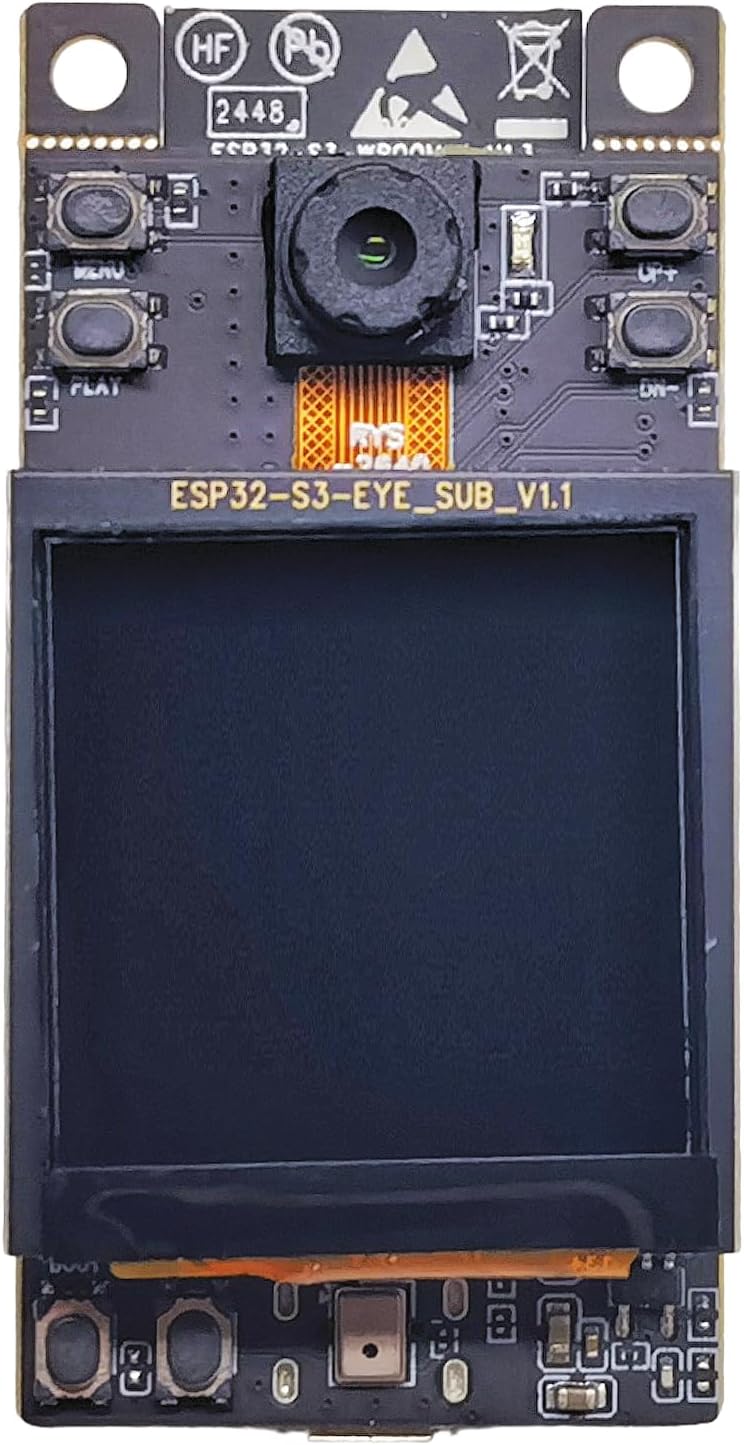
Abbildung 3.1: Vorderseite View of ESP32-S3-EYE Board. This image displays the front side of the development board, highlighting the integrated camera module at the top, control buttons (MENU, PLAY, UP, DOWN) on the sides, and the central LCD display. The board's model number, ESP32-S3-EYE_SUB_V1.1, is visible above the LCD.

Abbildung 3.2: Zurück View of ESP32-S3-EYE Board. This image shows the reverse side of the development board. Prominently featured is the ESP32-S3-WROOM-1 module, which houses the main SoC. Below it, a MicroSD card slot is visible for expandable storage, and at the bottom, the Micro-USB port for power and data connection.

Abbildung 3.3: Detaillierte Frontansicht View. A closer look at the front of the board, emphasizing the camera module with its ribbon cable connection (RYS-2640-M7), the various buttons (MENU, PLAY, UP, DOWN), and the connector (J4) for the LCD display. Pin headers (J8, J9) are also visible, providing access to GPIOs.

Figure 3.4: LCD Display Module. This image focuses on the 1.3-inch LCD display module, labeled ESP32-S3-EYE_SUB_V1.1. It shows the screen area and the flexible flat cable (FFC) connector at the bottom, which interfaces with the main board.

Abbildung 3.5: Zurück View of LCD Sub-Board. This image presents the rear side of the LCD sub-board, revealing its circuitry and connection points. Pin headers (J8, J9) are visible, along with test points (TP1-TP5) and the FFC connector (J5) for the display's ribbon cable. The board is labeled ESP32-S3-EYE_SUB_V1.1.
4. Einrichtungsanweisungen
To begin using your ESP32-S3-EYE Development Board, follow these setup steps:
- Strom- und Datenanschluss: Connect the ESP32-S3-EYE board to your computer using a Micro-USB cable. This connection provides power to the board and enables data communication for programming and debugging.
- Entwicklungsumgebung installieren: For programming and utilizing the board's full capabilities, you will need to set up a development environment. Espressif recommends using the ESP-IDF (Espressif IoT Development Framework). Detailed instructions for installing ESP-IDF can be found in the official Espressif documentation.
- Obtain Firmware/Examples: Download the necessary firmware or example projects from the official Espressif GitHub repository for the ESP32-S3-EYE. A good starting point is the ESP32-S3-EYE Getting Started Guide.
- Firmware hochladen: Use the ESP-IDF tools or a compatible IDE (e.g., Arduino IDE with ESP32 board support) to compile and upload your desired application or example firmware to the board via the Micro-USB connection.
- Erstes Einschalten: Once firmware is uploaded, the board will typically boot automatically. Observe the LCD display for any output or status indicators.
5. Bedienungsanleitung
Operating the ESP32-S3-EYE involves interacting with its camera, LCD, microphone, and Wi-Fi capabilities through programmed applications.
- Kamerabedienung: The 2-megapixel camera can be controlled via software to capture images or video streams. Refer to the ESP-WHO framework documentation for API calls and examples related to camera initialization, capture, and processing.
- LCD Anzeige: The 1.3-inch LCD can be used to display captured images, user interfaces, or debugging information. Software libraries within ESP-IDF provide functions for drawing graphics and text on the display.
- Microphone and Audio Processing: The integrated microphone enables audio input for voice wake-up or other audio processing applications. Consult the ESP-WHO documentation for details on microphone access and audio data handling.
- Wi-Fi-Konnektivität: The board supports Wi-Fi for network communication, including image transmission. Configure Wi-Fi credentials within your application code to connect to a local network. Once connected, data can be sent and received over Wi-Fi.
- Interaktion mit den Schaltflächen: The MENU, PLAY, UP, and DOWN buttons can be programmed to trigger specific actions within your application, such as navigating menus, starting/stopping processes, or adjusting settings.
6. Wartung
Proper maintenance ensures the longevity and reliable operation of your ESP32-S3-EYE Development Board.
- Handhabung: Fassen Sie die Platine immer an den Kanten an, um zu vermeiden, dass Sie empfindliche Bauteile berühren, die durch statische Elektrizität oder Hautfette beschädigt werden können.
- Lagerung: Lagern Sie die Platine in einer trockenen, antistatischen Umgebung, fern von direkter Sonneneinstrahlung und extremen Temperaturen.
- Reinigung: If necessary, gently clean the board with a soft, dry, anti-static brush or a lint-free cloth. Avoid using liquids or abrasive cleaners.
- Stromversorgung: Use only appropriate power sources (e.g., a standard USB port or a regulated 5V power supply) to prevent damage.
- Firmware-Updates: Regularly check for and apply firmware updates from Espressif to benefit from bug fixes, performance improvements, and new features.
7. Fehlerbehebung
If you encounter issues with your ESP32-S3-EYE board, consider the following troubleshooting steps:
- Platine schaltet sich nicht ein:
- Ensure the Micro-USB cable is securely connected to both the board and a working USB port on your computer or power adapter.
- Try a different Micro-USB cable or USB port.
- Firmware-Upload fehlgeschlagen:
- Verify that the correct COM port (or equivalent for your OS) is selected in your development environment.
- Ensure all necessary drivers for the USB-to-serial converter are installed.
- Check your development environment setup (e.g., ESP-IDF installation, toolchain paths). Refer to the official ESP-IDF documentation for common setup issues.
- Ensure the board is in bootloader mode if required by your flashing tool (often by holding the BOOT button while connecting USB or resetting).
- No Display Output on LCD:
- Confirm that the LCD ribbon cable is properly seated in its connector (J4).
- Verify that your firmware includes the correct initialization code for the LCD display.
- Check for any error messages in the serial monitor during boot-up.
- Kamera funktioniert nicht:
- Ensure the camera module's ribbon cable is correctly connected.
- Check your application code for proper camera initialization and configuration.
- Verify that the camera module itself is not physically damaged.
- Probleme mit der Wi-Fi-Verbindung:
- Double-check the Wi-Fi SSID and password in your code for accuracy.
- Ensure the Wi-Fi network is within range and operating on a compatible frequency (2.4 GHz).
- Verify that your router is not blocking new connections or has MAC address filtering enabled.
8. Spezifikationen
| Besonderheit | Detail |
|---|---|
| Modellname | ESP32-S3-EYE |
| Marke | Espressif |
| SoC | ESP32-S3 |
| Flash-Speicher | 8 MB |
| PSRAM | 8 MB Octal PSRAM |
| Kamera | 2 Megapixel |
| Anzeige | 1.3-Zoll-LCD |
| Audioeingang | Integriertes Mikrofon |
| Kabellose Konnektivität | Wi-Fi (802.11b, Single-Band) |
| Schnittstelle | Micro-USB for debugging and power |
| Maße | Ungefähr 3.35 x 2.17 x 1.34 Zoll |
| Artikelgewicht | Ungefähr 1.13 Unzen |
| Betriebssystemkompatibilität | ZyNOS (as listed in specifications, typically refers to network OS, but for dev boards, it's the underlying OS for the Wi-Fi module, or a generic placeholder. For development, it's usually OS-agnostic with toolchains.) |
9. Garantie und Support
Espressif provides support for its development boards. For technical assistance, documentation, and community forums, please refer to the official Espressif website and GitHub repositories.
For business or specific technical inquiries, you may contact Espressif directly:
- E-Mail: sales@espressif.com
Specific warranty details are typically provided at the point of purchase or within the product packaging. Please retain your proof of purchase for any warranty claims.


