1. Einleitung
This manual provides detailed instructions for the safe and efficient operation of your InFocus P120 INL412 Multimedia Projector (Model INL4128). Please read this manual thoroughly before using the projector and keep it for future reference. This projector is designed for high-quality image projection, suitable for various applications including presentations, home entertainment, and gaming.
2. Sicherheitshinweise
Beachten Sie die folgenden Sicherheitsvorkehrungen, um Schäden am Projektor zu vermeiden und die Sicherheit des Benutzers zu gewährleisten:
- Belüftung: Sorgen Sie für ausreichende Belüftung um den Projektor herum. Blockieren Sie keine Lüftungsöffnungen. Halten Sie einen Mindestabstand von 30 cm (12 Zoll) zu Wänden und anderen Objekten ein.
- Energiequelle: Verwenden Sie ausschließlich das angegebene Netzteil und die angegebene Lautstärke.tage. Schließen Sie das Netzkabel sicher an.
- Hitze: The projector generates heat during operation. Do not touch the projector's vents or exhaust areas directly after use.
- Lichtleistung: Schauen Sie nicht direkt in die Projektorlinse, wenn der lamp ist eingeschaltet, da das intensive Licht Augenschäden verursachen kann.
- Platzierung: Stellen Sie den Projektor auf eine stabile, ebene Fläche. Vermeiden Sie direkte Sonneneinstrahlung, die Nähe zu Wärmequellen oder Orte mit hoher Luftfeuchtigkeit oder Staub.
- Reinigung: Vor der Reinigung den Netzstecker ziehen. Ein weiches, trockenes Tuch verwenden. Keine flüssigen oder Aerosolreiniger verwenden.
- Wartung: Versuchen Sie nicht, den Projektor selbst zu reparieren. Überlassen Sie alle Reparaturen qualifiziertem Fachpersonal.
3. Produktüberschreitungview
3.1 Top Panel and Lens Area
The top panel features the control buttons for basic operation and the lens area with focus and zoom adjustments.

Abbildung 3.1: Oben view of the InFocus P120 INL412 projector, highlighting the control panel on the right and the lens adjustment area on the left. The InFocus logo is visible on the top surface.
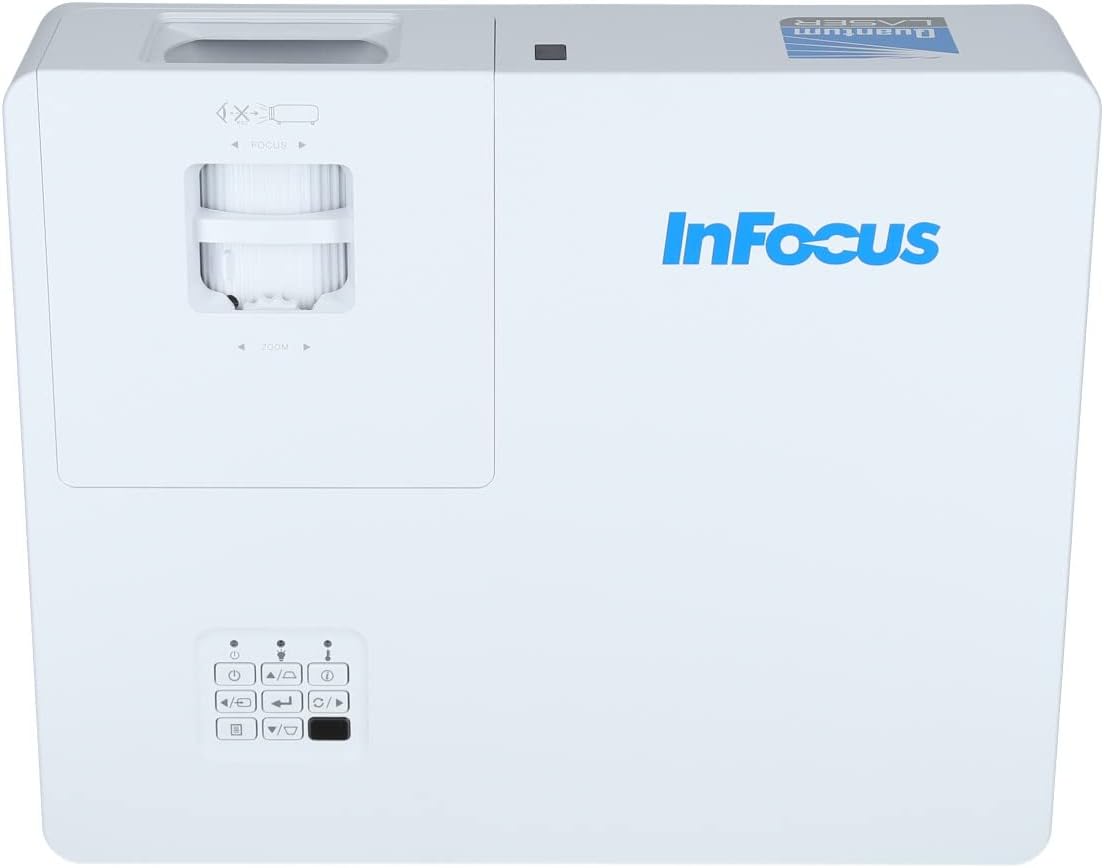
Abbildung 3.2: Eine Nahaufnahme view of the projector's top panel, showing the focus and zoom rings near the lens opening and the array of control buttons for power, menu, source selection, and navigation.
3.2 Anschlüsse auf der Rückseite
The rear panel provides various input and output ports for connecting external devices.

Figure 3.3: Rear panel of the InFocus P120 INL412 projector, displaying a comprehensive array of connectivity options including HDMI (x2), USB, S-Video, Ethernet (LAN), VGA In (x2), VGA Out, RS232, and Audio In/Out ports. The power input is located on the bottom left.
Zu den wichtigsten Anschlüssen gehören:
- HDMI 1 und 2: For connecting high-definition digital video and audio sources.
- USB: For connecting USB devices, potentially for media playback or firmware updates.
- S-Video: For connecting older video sources.
- VGA IN 1 & 2: Zum Anschluss von Computern oder anderen Geräten mit VGA-Ausgang.
- VGA-Ausgang: Zum Anschluss an einen externen Monitor.
- Ethernet (LAN): Zur Netzwerkverbindung und -steuerung.
- Audio IN 1 & 2 / Audio OUT: Für analoge Audioanschlüsse.
- RS232: Für serielle Steuerung.
- Leistungsaufnahme: Zum Anschließen des Netzkabels.
3.3 Front and Side Panels
The front panel houses the projection lens and front ventilation, while the side panels feature additional ventilation grilles.

Abbildung 3.4: Vorderseite view of the InFocus P120 INL412 projector, displaying the main projection lens on the right and the extensive front ventilation grille on the left, crucial for heat dissipation.

Abbildung 3.5: Seite view of the InFocus P120 INL412 projector, illustrating the side ventilation grilles that contribute to maintaining optimal operating temperature.
4. Einrichtung
4.1 Aufstellung des Projektors
Position the projector on a stable, flat surface or mount it securely. Ensure the projector is within the optimal projection distance for your screen size. Maintain clear space around the projector for proper ventilation.
4.2 Geräte anschließen
Before connecting any cables, ensure the projector and all source devices are powered off.
- HDMI-Verbindung: Connect an HDMI cable from your source device (e.g., laptop, Blu-ray player, gaming console) to either the HDMI 1 or HDMI 2 port on the projector.
- VGA-Anschluss: Connect a VGA cable from your computer to either VGA IN 1 or VGA IN 2. For audio, connect a separate audio cable from your computer's audio output to the corresponding Audio IN port on the projector.
- USB-Verbindung: Insert a USB drive into the USB port for media playback (if supported by firmware) or service functions.
- Ethernet-Anschluss (LAN): Connect an Ethernet cable to the LAN port for network control or updates.
- Audioausgang: If using external speakers, connect an audio cable from the Audio OUT port on the projector to your audio system.
4.3 Stromanschluss
Connect the power cord to the projector's power input and then plug the other end into a grounded electrical outlet.
5. Bedienungsanleitung
5.1 Ein-/Ausschalten
- Einschalten: Drücken Sie die Leistung button on the projector's control panel or the remote control. The power indicator light will change.
- Ausschalten: Drücken Sie die Leistung button again. A confirmation message may appear. Press the button a second time to confirm shutdown. Allow the projector to cool down before unplugging it.
5.2 Fokus und Zoom einstellen
Rotate the focus ring around the lens until the image appears sharp and clear. Use the zoom ring to adjust the image size to fit your screen.
5.3 Auswahl der Eingangsquelle
Drücken Sie die Quelle button on the control panel or remote control to cycle through available input sources (HDMI 1, HDMI 2, VGA 1, VGA 2, S-Video, USB). Select the input corresponding to your connected device.
5.4 Menünavigation
Verwenden Sie die Speisekarte button to access the on-screen display (OSD) menu. Use the arrow buttons to navigate through menu options and the Eingeben Taste zum Auswählen drücken. Speisekarte wieder zu verlassen.
6. Wartung
6.1 Reinigung der Linse
Gently wipe the lens with a soft, lint-free cloth specifically designed for optical surfaces. Do not use abrasive cleaners or excessive force, as this can scratch the lens.
6.2 Cleaning the Projector Exterior
Verwenden Sie ein weiches, trockenes Tuch, um den Bildschirm des Projektors zu reinigen.asing. For stubborn dirt, dampen the cloth slightly with water, then wipe dry immediately. Avoid getting liquids into the projector's openings.
6.3 Ventilation Care
Regularly check the projector's ventilation grilles for dust accumulation. Use a soft brush or a vacuum cleaner with a brush attachment to gently remove dust from the vents to ensure proper airflow and prevent overheating.
7. Fehlerbehebung
7.1 Kein Bild angezeigt
- Vergewissern Sie sich, dass der Projektor eingeschaltet ist und die Betriebsanzeigeleuchte dauerhaft leuchtet.
- Verify that the video cable (HDMI, VGA, etc.) is securely connected to both the projector and the source device.
- Prüfen Sie, ob am Projektor die richtige Eingangsquelle ausgewählt ist.
- Confirm that the source device (laptop, player) is powered on and outputting a signal.
7.2 Das Bild ist unscharf oder unscharf.
- Stellen Sie den Fokusring am Projektorobjektiv so ein, dass das Bild scharf ist.
- Stellen Sie sicher, dass der Projektor den richtigen Abstand zur Leinwand hat.
- Reinigen Sie die Projektorlinse, falls sie verschmutzt aussieht.
7.3 Kein Ton
- If using HDMI, ensure the source device's audio output is set to HDMI.
- If using VGA, ensure a separate audio cable is connected from the source to the projector's Audio IN port.
- Überprüfen Sie die Lautstärkeeinstellungen sowohl am Projektor als auch am Quellgerät.
- If using external speakers, ensure they are properly connected to the Audio OUT port and powered on.
8. Spezifikationen
| Besonderheit | Detail |
|---|---|
| Marke | Im Fokus |
| Hersteller | Im Fokus |
| Modellname | P120 INL412 |
| Modellnummer | INL4128 |
| Jahr | 2023 |
| Hardware-Schnittstelle | Ethernet, HDMI, S-Video, USB |
| Anzahl der Artikel | 1 |
| Seitenverhältnis | 16:9 |
| Wastage | 341 Watt |
| Batterien im Lieferumfang enthalten | NEIN |
| Batterien erforderlich | NEIN |
| Formfaktor | Desktop |
| Montagetyp | Tischmontage |
| Fernbedienung im Lieferumfang enthalten | Ja |
| Technische Daten | 56.13 x 46.48 x 25.15 cm |
| Artikelgewicht | 5.5 kg |
| Maximale Bildgröße | 308.28 Zoll |
| Minimale Bildgröße | 910.63 Millimeter |
| Erstes verfügbares Datum | 5. Januar 2022 |
9. Garantie und Support
For warranty information and technical support, please refer to the documentation included with your purchase or visit the official InFocus webBewahren Sie Ihren Kaufbeleg für Garantieansprüche auf.


