1. Einleitung
Thank you for choosing the E-ACE 11.26-inch Mirror Dash Cam. This device is designed to enhance your driving safety and provide comprehensive recording capabilities. It features a large, full-screen display, GPS functionality, and advanced monitoring features. This manual provides detailed instructions for installation, operation, and maintenance.
Hauptmerkmale:
- 3-Channel Simultaneous Recording: Records front, internal, and rear views concurrently.
- 11.26-Zoll-Voll-Touchscreen: Provides a clear and intuitive interface for easy operation and display switching.
- Integriertes GPS: Records driving speed, direction, and route for playback.
- Erweiterte Nachtsicht: Equipped with a 2-megapixel CMOS sensor and STARVIS technology for clear night recordings.
- Essential Recording Functions: Includes loop recording, emergency recording (G-sensor), and 24-hour parking monitoring.
- Einfache Installation: Designed for simple attachment over your vehicle's existing rearview Spiegel.
2. Packungsinhalt
Bitte überprüfen Sie, ob alle unten aufgeführten Artikel in Ihrem Paket enthalten sind:
- 1x E-ACE 11.26-inch Mirror Dash Cam (Main Unit)
- 1x Built-in Internal Camera with Infrared Light
- 1x Rückfahrkamera
- 2x Rubber Bands for Fixing
- 1x Rear Camera Mounting Sticker
- 1x englische Bedienungsanleitung
- 1x Rear Camera Cable (approx. 6 meters)
- 1x GPS Antenna (1 meter)
- 1x Cigarette Lighter Power Cord (approx. 3 meters)
- 1x Micro SD Card (32GB/CLASS10)

Image: All components included in the E-ACE Mirror Dash Cam package.
3. Einrichtung und Installation
Follow these steps to install your E-ACE Mirror Dash Cam:
- Montieren Sie die Haupteinheit: Secure the main dash cam unit over your vehicle's existing rearview mirror using the provided rubber bands. Ensure it is firmly attached and does not obstruct your view.
- Strom anschließen: Insert the cigarette lighter power cord into your vehicle's cigarette lighter socket. Connect the other end to the Mini USB port on the main dash cam unit. Route the cable neatly to avoid interference with driving.
- Rückfahrkamera installieren:
- Choose a suitable location on the rear of your vehicle, typically above the license plate or on the rear window.
- Use the provided double-sided tape for attachment. If a more permanent fixture is desired, use the screws (drilling may be required).
- Connect the rear camera cable to the main unit and route it carefully through the vehicle's interior.
- GPS-Antenne installieren: Attach the GPS antenna to a location on your dashboard or windshield with a clear view of the sky. Connect the GPS antenna cable to the designated GPS port on the main unit.
- Micro-SD-Karte einlegen: Insert the included 32GB Micro SD card into the designated slot on the main unit. Ensure it is inserted correctly until it clicks into place.
- Parking Monitoring (Optional): For 24-hour parking monitoring functionality, a separate step-down cable (not included) is required. This cable connects directly to your car's fuse box to provide continuous power.

Image: E-ACE Mirror Dash Cam and its primary accessories.
4. Bedienungsanleitung
This section details the primary functions and how to operate your dash cam.
4.1 Grundlegende Bedienung
- Ein-/Ausschalten: The device will automatically power on and begin recording when your vehicle's engine starts. It will power off automatically when the engine is turned off.
- Bildschirmsteuerung: The 11.26-inch display is a full touch screen. Swipe the screen up, down, left, or right to adjust the camera view or switch between different display modes (front, internal, rear camera viewS).
- Kamera wechseln Views: On the display, touch the car icon once to cycle through front, internal, and rear camera views.
4.2 Aufnahmefunktionen
- Loop-Aufnahme: The dash cam continuously records video in segments (1, 2, or 3 minutes). When the SD card is full, the oldest unlocked files werden überschrieben.
- Notfallaufzeichnung (G-Sensor): In the event of a sudden impact or collision, the built-in G-sensor automatically detects the event and locks the current video segment, preventing it from being overwritten by loop recording.
- 24-Stunden-Parkraumüberwachung: With a connected step-down cable, the dash cam can monitor your vehicle even when parked. It will automatically start recording if an impact is detected.
- Zeitraffer-Aufnahme: This feature records video at a lower frame rate, compressing long periods into shorter video files, useful for extended parking monitoring.
- Stimmaufnahme: The built-in microphone allows for audio recording during driving. This can be enabled or disabled via the settings.

Image: Display showing simultaneous recording from front, internal, and rear cameras.

Image: Explanation of 24-hour parking monitoring and GPS functionality.

Image: Features like G-sensor, voice recording, and reverse assist.
5. Wartung
Durch sachgemäße Wartung wird die Langlebigkeit und optimale Leistung Ihrer Dashcam sichergestellt.
- Reinigung der Linsen und des Bildschirms: Use a soft, lint-free cloth to gently wipe the camera lenses and the display screen. Avoid using abrasive cleaners or solvents that could damage the surfaces.
- SD-Kartenverwaltung: Periodically format the Micro SD card (at least once a month) to prevent data corruption and ensure smooth recording. Back up any important files vor der Formatierung.
- Firmware-Updates: Überprüfen Sie die offizielle E-ACE-Website. website for any available firmware updates. Follow the instructions carefully to update the device.
- Temperaturüberlegungen: Vermeiden Sie es, die Dashcam über längere Zeiträume extremen Temperaturen auszusetzen, da dies die Batterielebensdauer und die elektronischen Bauteile beeinträchtigen kann.
6. Fehlerbehebung
If you encounter any issues with your E-ACE Mirror Dash Cam, refer to the following common problems and solutions:
| Problem | Mögliche Ursache/Lösung |
|---|---|
| Gerät lässt sich nicht einschalten. | Ensure the cigarette lighter power cord is securely connected and the vehicle's power outlet is functioning. Check the fuse in the cigarette lighter plug. |
| Screen flickers or device stops working. | This could indicate a hardware issue. Please contact customer support for assistance. |
| Das GPS-Signal ist schwach oder wird nur langsam empfangen. | Stellen Sie sicher, dass die GPS-Antenne an einem Ort mit freiem Blick montiert ist. view of the sky, away from obstructions. Environmental factors (e.g., tunnels, dense urban areas) can affect signal strength. |
| Loop recording is not smooth or freezes. | Format the Micro SD card regularly. Ensure you are using a high-speed (Class 10 or higher) SD card. If the issue persists, the SD card may be faulty and require replacement. |
| Das Bild der Rückkamera wird nicht angezeigt. | Prüfen Sie die Verbindung des Rückkamerakabels sowohl zur Rückkamera als auch zur Haupteinheit. Stellen Sie sicher, dass das Kabel nicht beschädigt ist. |
7. Spezifikationen
| Besonderheit | Spezifikation |
|---|---|
| Marke | E-ACE |
| Modell | B09Q2RT7S3 |
| Bildschirmgröße | 11.26 inches (LCD Touch Screen) |
| Auflösung der Videoaufnahme | 1080p (Front, Internal, Rear) |
| Frontkamerawinkel | 170° |
| Internal Camera Angle | 330° |
| Rückkamerawinkel | 150° |
| Optische Sensorik | CMOS |
| Besondere Merkmale | Built-in GPS, Night Vision, G-Sensor, Loop Recording, Parking Monitor, WDR, HDR |
| Montagetyp | Clip-on (over rearview Spiegel) |
| Im Lieferumfang enthaltene Komponenten | User Manual, GPS Antenna, 32GB Micro SD Card |
| Technische Daten | 29 cm (B) x 7 cm (H) x 1.5 cm (T) |
| Verpackungsabmessungen | 33.4 x 11.4 x 5.9 cm; 920 g |
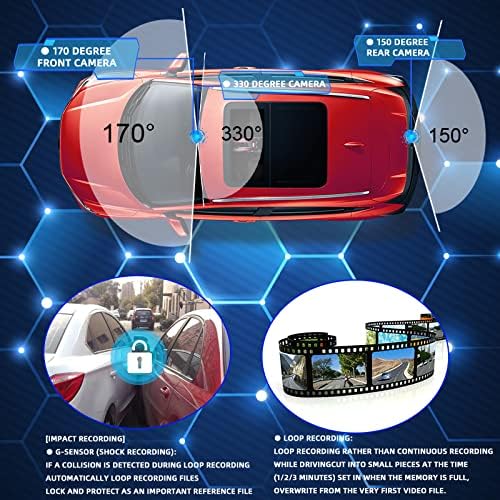
Image: Camera viewBlickwinkel für eine umfassende Abdeckung.
8. Garantie und Support
E-ACE stands behind the quality of its products. Your Mirror Dash Cam comes with the following:
- 2 Jahre Qualitätsgarantie: We provide a 2-year warranty covering manufacturing defects.
- 1-Month Full Refund/Exchange: If you are not satisfied with your purchase within one month, you are eligible for a full refund or exchange.
For any questions, technical support, or warranty claims, please contact our customer service team. We are committed to providing prompt assistance.


