Einführung
This manual provides essential information for the safe and efficient operation of your Hover-1 Renegade Electric Scooter. Please read this manual thoroughly before using the scooter to ensure proper setup, usage, and maintenance. Retain this manual for future reference.

Image: The Hover-1 Renegade Electric Scooter, black in color, shown from a front-side angle, highlighting its sleek design and front headlight.
Sicherheitshinweise
Operating an electric scooter carries inherent risks. To minimize these risks and ensure your safety, always adhere to the following guidelines:
- Tragen Sie immer geeignete Sicherheitsausrüstung, einschließlich Helm, Knieschützer und Ellbogenschützer.
- Machen Sie sich mit den örtlichen Gesetzen und Vorschriften bezüglich der Nutzung von Elektrorollern vertraut.
- Perform a pre-ride inspection: check tire pressure, brake function, and ensure all components are secure.
- Do not ride in adverse weather conditions, such as heavy rain, snow, or ice.
- Avoid riding on uneven surfaces, potholes, or obstacles that could cause loss of control.
- Halten Sie eine angemessene Geschwindigkeit ein und achten Sie stets auf Ihre Umgebung, einschließlich Fußgänger und andere Fahrzeuge.
- Das zulässige Höchstgewicht von 264 Pfund darf nicht überschritten werden.
- Vermeiden Sie plötzliches Beschleunigen oder Bremsen.
- Ensure the scooter is fully charged before each use, especially for longer rides.
Packungsinhalt
Upon unpacking your Hover-1 Renegade Electric Scooter, please verify that all the following items are included:
- Hover-1 Renegade Electric Scooter
- Ladeadapter
- Benutzerhandbuch (dieses Dokument)
Produkt überview
The Hover-1 Renegade Electric Scooter is designed for efficient urban commuting, featuring dual motors, a robust frame, and user-friendly controls.
Hauptmerkmale
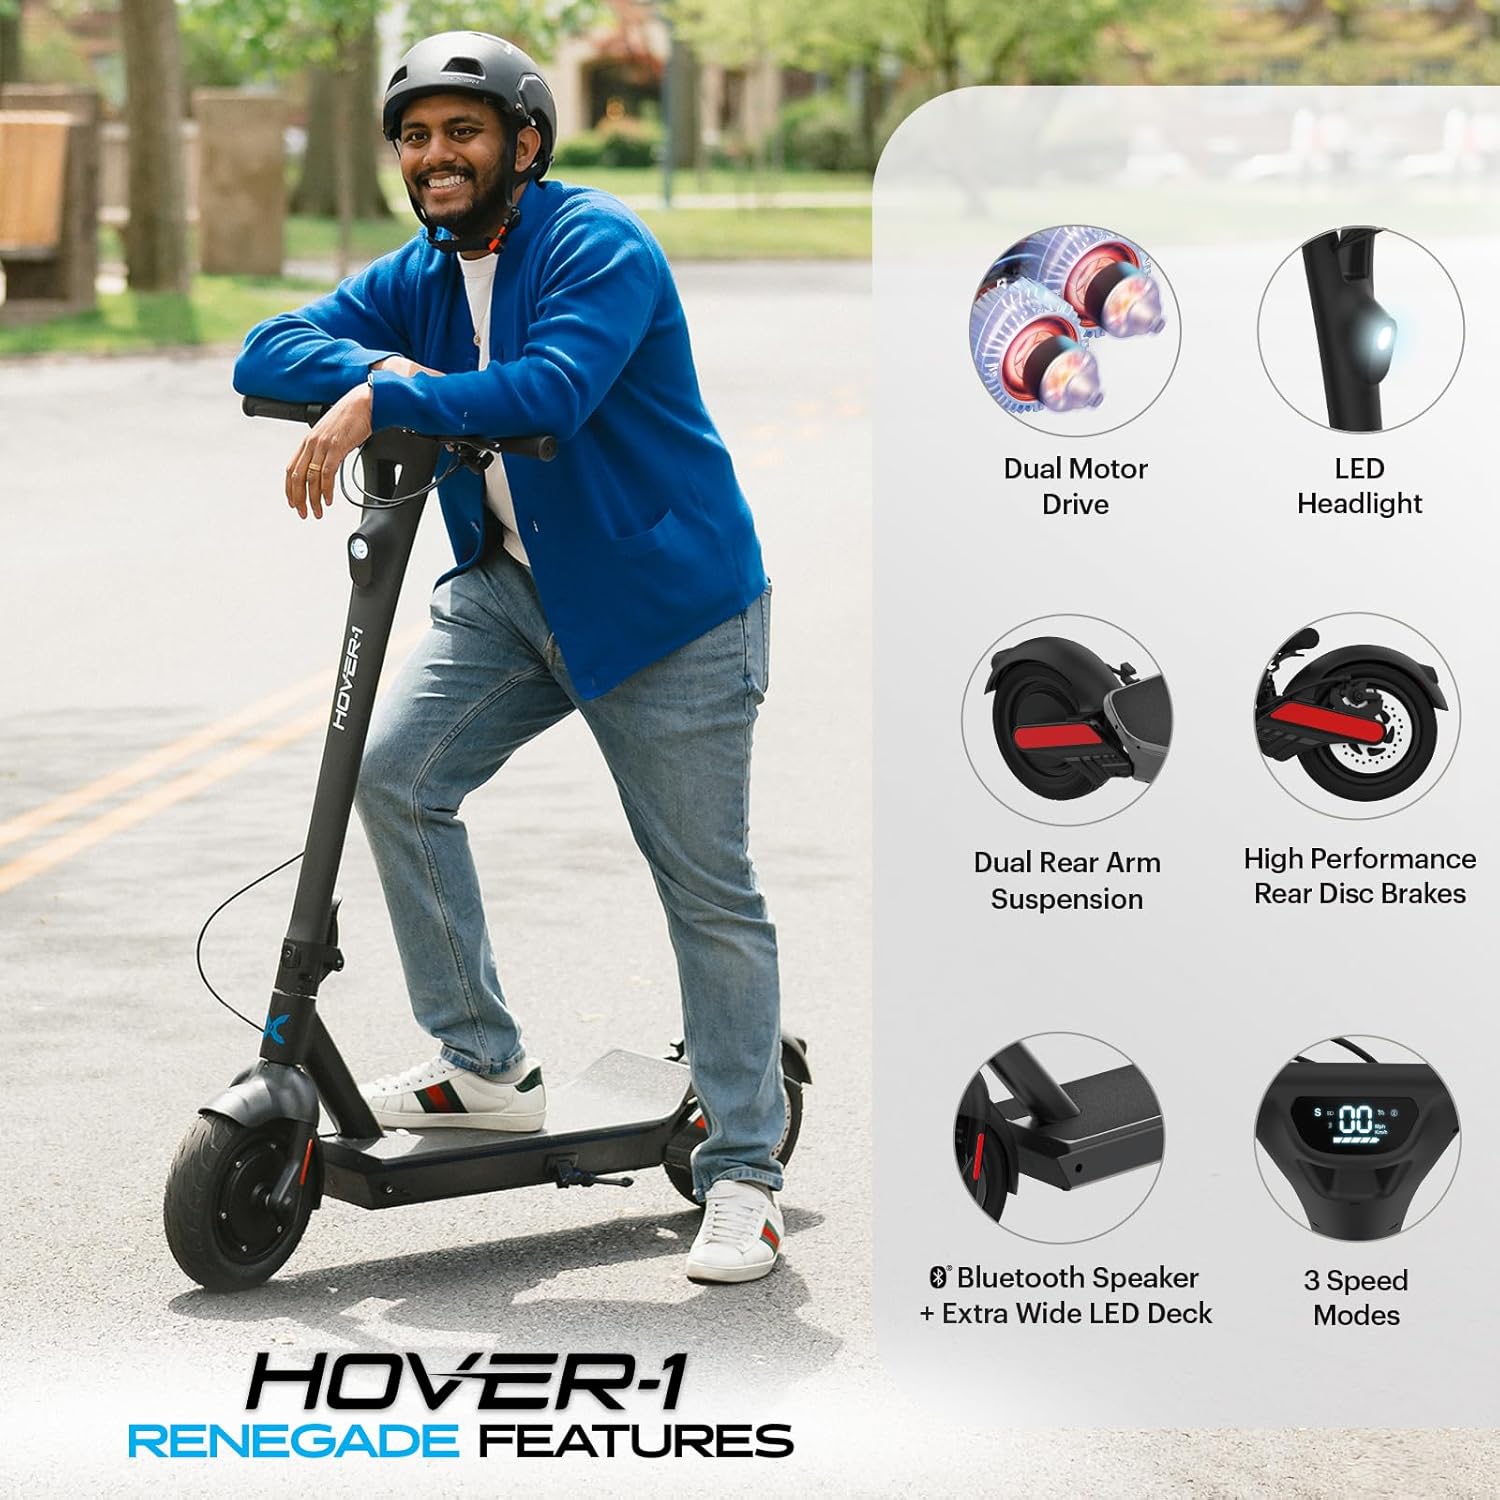
Image: An illustration highlighting key features of the Hover-1 Renegade, including Dual Motor Drive, LED Headlight, Dual Rear Arm Suspension, High Performance Rear Disc Brakes, Bluetooth Speaker with Wide LED Deck, and 3 Speed Modes.
- Zwei bürstenlose 450-W-Motoren: Provides powerful acceleration and performance, capable of handling inclines up to 15 degrees.
- 10-Zoll-Luftreifen: High-traction tires designed for a smooth and comfortable ride.
- LCD Anzeige: Shows speed, battery status, cruise control, and headlight indicators.
- Hintere Scheibenbremse: Gewährleistet zuverlässige Bremskraft.
- LED-Rücklicht: Enhances visibility for safer night riding.
- Faltbares Design: Ermöglicht bequeme Lagerung und Transport.
- Bluetooth Lautsprecher: Integrierter Lautsprecher zur Audiowiedergabe.
Bedienelemente und Anzeigen

Bild: Eine Nahaufnahme view of the Hover-1 Renegade's handlebars, labeling the Folding Clip, Brake lever, Power Button, Dual Drive Button, Turn Signal, Bell, LCD Digital Display, and Thumb Throttle.
- Netzschalter: Turns the scooter on/off and cycles through speed modes.
- Daumengas: Steuert die Beschleunigung.
- Bremshebel: Activates the rear disc brake.
- Dual Drive Button: Engages or disengages the second motor for increased power.
- Blinklicht: Activates left or right turn indicators.
- Glocke: Zur Warnung von Fußgängern und anderen Radfahrern.
- Folding Clip: Mechanism for folding the scooter for storage.
- LCD-Digitalanzeige: Provides real-time information including:
- High Speed Mode indicator
- Scheinwerfer-Symbol
- Speedometer (MPH/KMH)
- Tempomat-Symbol
- Dual Drive (2-Wheel Drive) indicator
- Bluetooth-Anzeige
- Batterieanzeige
Aufstellen
Aufklappen des Scooters
- Stellen Sie den Roller auf eine ebene, stabile Fläche.
- Release the folding clip mechanism located near the base of the handlebar stem.
- Carefully lift the handlebar stem until it locks securely into the upright position. Ensure the locking mechanism is fully engaged before use.
- Adjust the handlebar height if necessary, securing it at your preferred level.
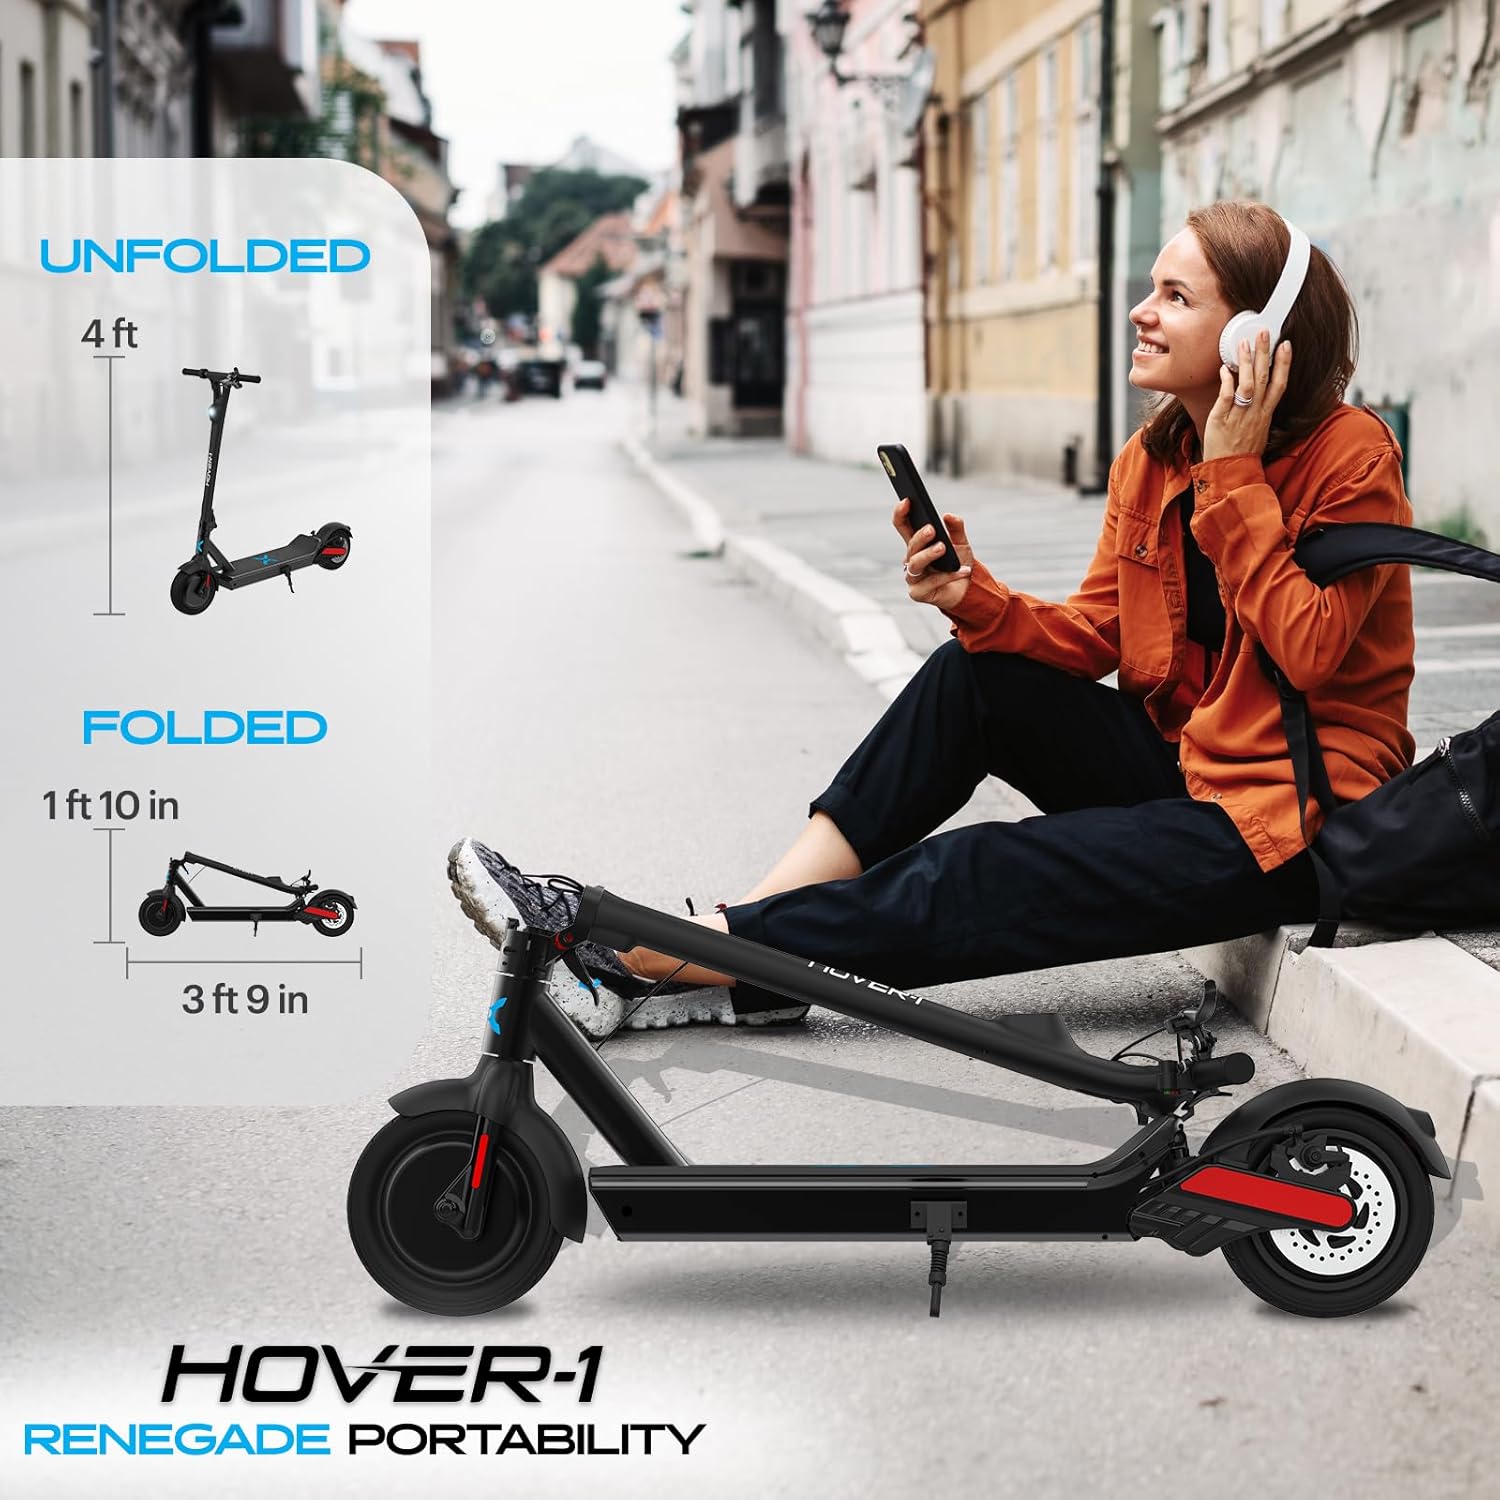
Image: A visual comparison of the Hover-1 Renegade scooter in its unfolded state (4 ft tall) and folded state (1 ft 10 in tall, 3 ft 9 in long), demonstrating its portability.
Erstladung
Before your first ride, fully charge the scooter's battery. A full charge typically takes approximately 7 hours.
- Suchen Sie den Ladeanschluss am Roller.
- Schließen Sie den Ladeadapter an den Ladeanschluss an.
- Stecken Sie den Ladeadapter in eine normale Steckdose.
- Die Kontrollleuchte am Ladegerät leuchtet während des Ladevorgangs normalerweise rot und wechselt auf Grün, wenn der Akku vollständig geladen ist.
- Once fully charged, disconnect the charger from the scooter and the wall outlet.
Bedienungsanleitung
Ein-/Ausschalten
- To power on: Press and hold the Power Button until the LCD display illuminates.
- To power off: Press and hold the Power Button until the LCD display turns off.
Rollerfahren
- Stelle einen Fuß fest auf das Trittbrett des Scooters.
- Drücken Sie sich mit dem anderen Fuß vom Boden ab, um Schwung zu holen.
- Once moving, gently press the Thumb Throttle to accelerate.
- To slow down or stop, release the throttle and gently squeeze the Brake Lever.
Geschwindigkeitsmodi
The scooter features multiple speed modes. Briefly press the Power Button while the scooter is on to cycle through the available speed settings. The current speed mode will be indicated on the LCD display.
Dual Drive Mode
For increased power and acceleration, especially on inclines, activate Dual Drive Mode.
- To activate: Press the Dual Drive Button. The LCD display will show an indicator for 2-wheel drive.
- To deactivate: Press the Dual Drive Button again.
Tempomat
For maintaining a constant speed during longer rides:
- Activate cruise control by pressing the throttle down two times quickly while maintaining a desired speed.
- A cruise control icon will appear on the LCD display.
- To deactivate, gently apply the brake or press the throttle again.
Bluetooth-Konnektivität
The scooter includes a Bluetooth speaker for audio playback.

Image: A rider on the Hover-1 Renegade scooter, with a graphic overlay showing a smartphone playing music, indicating the scooter's Bluetooth speaker functionality.
- Stellen Sie sicher, dass der Roller eingeschaltet ist.
- Aktivieren Sie Bluetooth auf Ihrem Mobilgerät.
- Suchen nach "Hover-1 Renegade" in your device's Bluetooth settings and pair.
- A Bluetooth indicator will appear on the scooter's LCD display once connected.
- You can now play audio through the scooter's integrated speaker.
Wartung
Batteriepflege

Image: A graphic illustrating key battery maintenance tips, including not leaving batteries unused for extended periods, storing in a cool dry place, maintaining 60-80% charge for storage, charging every six months, and proper charging instructions.
- Do not leave batteries unused for extended periods. Lithium-ion batteries self-discharge when not in use.
- Lagern Sie Batterien an einem kühlen, trockenen Ort ohne direkte Sonneneinstrahlung.
- Keep the battery at approximately 60% to 80% capacity before storing the product or the battery for long periods.
- Charge the battery to approximately 70% at least once every six months if stored.
- Do not leave the battery on charge for extended periods after it is done charging.
- Dropping your batteries can damage the circuitry inside and cause the battery to malfunction. Inspect the battery carefully before use if dropped.
- Recommended storage temperature for the battery is between 41°F and 77°F (5°C and 25°C).
Reifenpflege
- Regularly check the tire pressure of the 10-inch pneumatic tires. Maintain recommended pressure for optimal performance and safety.
- Überprüfen Sie die Reifen vor jeder Fahrt auf Anzeichen von Verschleiß, Einstichen oder Beschädigungen.
Allgemeine Pflege
- Halten Sie den Roller sauber, indem Sie ihn mit einem Tuch abwischen.amp Tuch. Vermeiden Sie die Verwendung aggressiver Chemikalien oder Scheuermittel.
- Regularly check all bolts and fasteners to ensure they are tight and secure.
- Store the scooter in a dry, protected area when not in use.
Fehlerbehebung
This section addresses common issues you might encounter with your Hover-1 Renegade Electric Scooter. For problems not listed here, please contact customer support.
| Problem | Mögliche Ursache | Lösung |
|---|---|---|
| Der Roller lässt sich nicht einschalten. | Niedriger Batteriestand; lose Verbindungen; Fehlfunktion des Ein-/Ausschalters. | Charge the battery fully. Ensure all cables are securely connected. If issue persists, contact support. |
| Reduzierte Reichweite oder Leistung. | Under-inflated tires; low battery charge; riding conditions (e.g., inclines, heavy load). | Check and inflate tires to recommended pressure. Fully charge the battery. Adjust riding style for optimal efficiency. |
| Die Bremsen fühlen sich schwach oder nicht reagierend an. | Bremsseileinstellung erforderlich; Bremsbeläge abgenutzt. | Inspect brake cables and adjust tension. Check brake pads for wear and replace if necessary. Consult a professional if unsure. |
| Handlebar wobbles. | Loose bolts in the stem or folding mechanism. | Ensure all bolts in the handlebar stem and folding mechanism are securely tightened. |
Technische Daten

Image: A diagram showing the dimensions of the Hover-1 Renegade Electric Scooter: 47.5 inches in length, 20.47 inches in width, and 44.7 inches in height.
| Besonderheit | Detail |
|---|---|
| Marke | Schwebeflug-1 |
| Modellname | Abtrünnig |
| Modellnummer | H1-RENE-BLK |
| Motorleistung | Zwei bürstenlose 450-W-Motoren (insgesamt 900 W) |
| Maximalgeschwindigkeit | 18 km/h |
| Maximale Reichweite | Bis zu 33 Meilen |
| Batterie | 54V/10 Ah Lithium-ion |
| Ladezeit | 7 Stunden |
| Gewichtsbeschränkung | 264 Pfund |
| Reifengröße | 10 Zoll |
| Reifentyp | Pneumatisch |
| Bremsenausführung | Rear Disc Braking |
| Federungstyp | Doppelte Federung |
| Produktabmessungen (L x B x H) | 47.5" x 20.47" x 44.7" |
| Artikelgewicht | 46.3 Pfund |
| Rahmenmaterial | Aluminium |
| UPC | 888255235169 |
Garantie und Support
The Hover-1 Renegade Electric Scooter comes with a 1 Jahr eingeschränkte Garantie. For warranty claims or technical support, please refer to the contact information provided with your purchase documentation or visit the official Hover-1 webWebsite.
It is recommended to register your product to facilitate warranty service.


