1. Einleitung
Thank you for choosing the Diosmio 2 Cub Tall Digital Security Safe Box. This safe is designed to provide secure storage for your valuables, documents, and other important items. It features a digital keypad for easy access, a robust anti-pry door, and comes with a fireproof and waterproof money bag for enhanced protection. Please read this manual thoroughly before operating your safe to ensure proper use and maintenance.
2. Sicherheitshinweise
- Always keep the emergency keys in a secure location away from the safe. Do not store them inside the safe.
- Ensure the safe is placed on a stable, level surface or securely mounted to a wall/floor to prevent tipping.
- Setzen Sie den Tresor keinen extremen Temperaturen oder hoher Luftfeuchtigkeit aus.
- Keep children away from the safe and do not allow them to play with the keypad or keys.
- Regularly check the battery level and replace batteries when indicated by the low battery reminder.
3. Packungsinhalt
Carefully unpack your safe and verify that all items listed below are included. If any items are missing or damaged, please contact customer support.

Abbildung 3.1: Produktabmessungen und Packliste
- Diosmio Digital Security Safe Box
- Master Keys (2 sets)
- Notschlüssel (2)
- Expansion Screws (for mounting)
- External Power Supply Box
- Fireproof and Waterproof Money Bag
- Benutzerhandbuch (dieses Dokument)
4. Produktüberschreitungview
The Diosmio safe is constructed with durable steel and features an advanced digital keypad for secure access. Its anti-pry door design enhances security against forced entry.

Figure 4.1: LCD Safe Box with Fireproof Bag
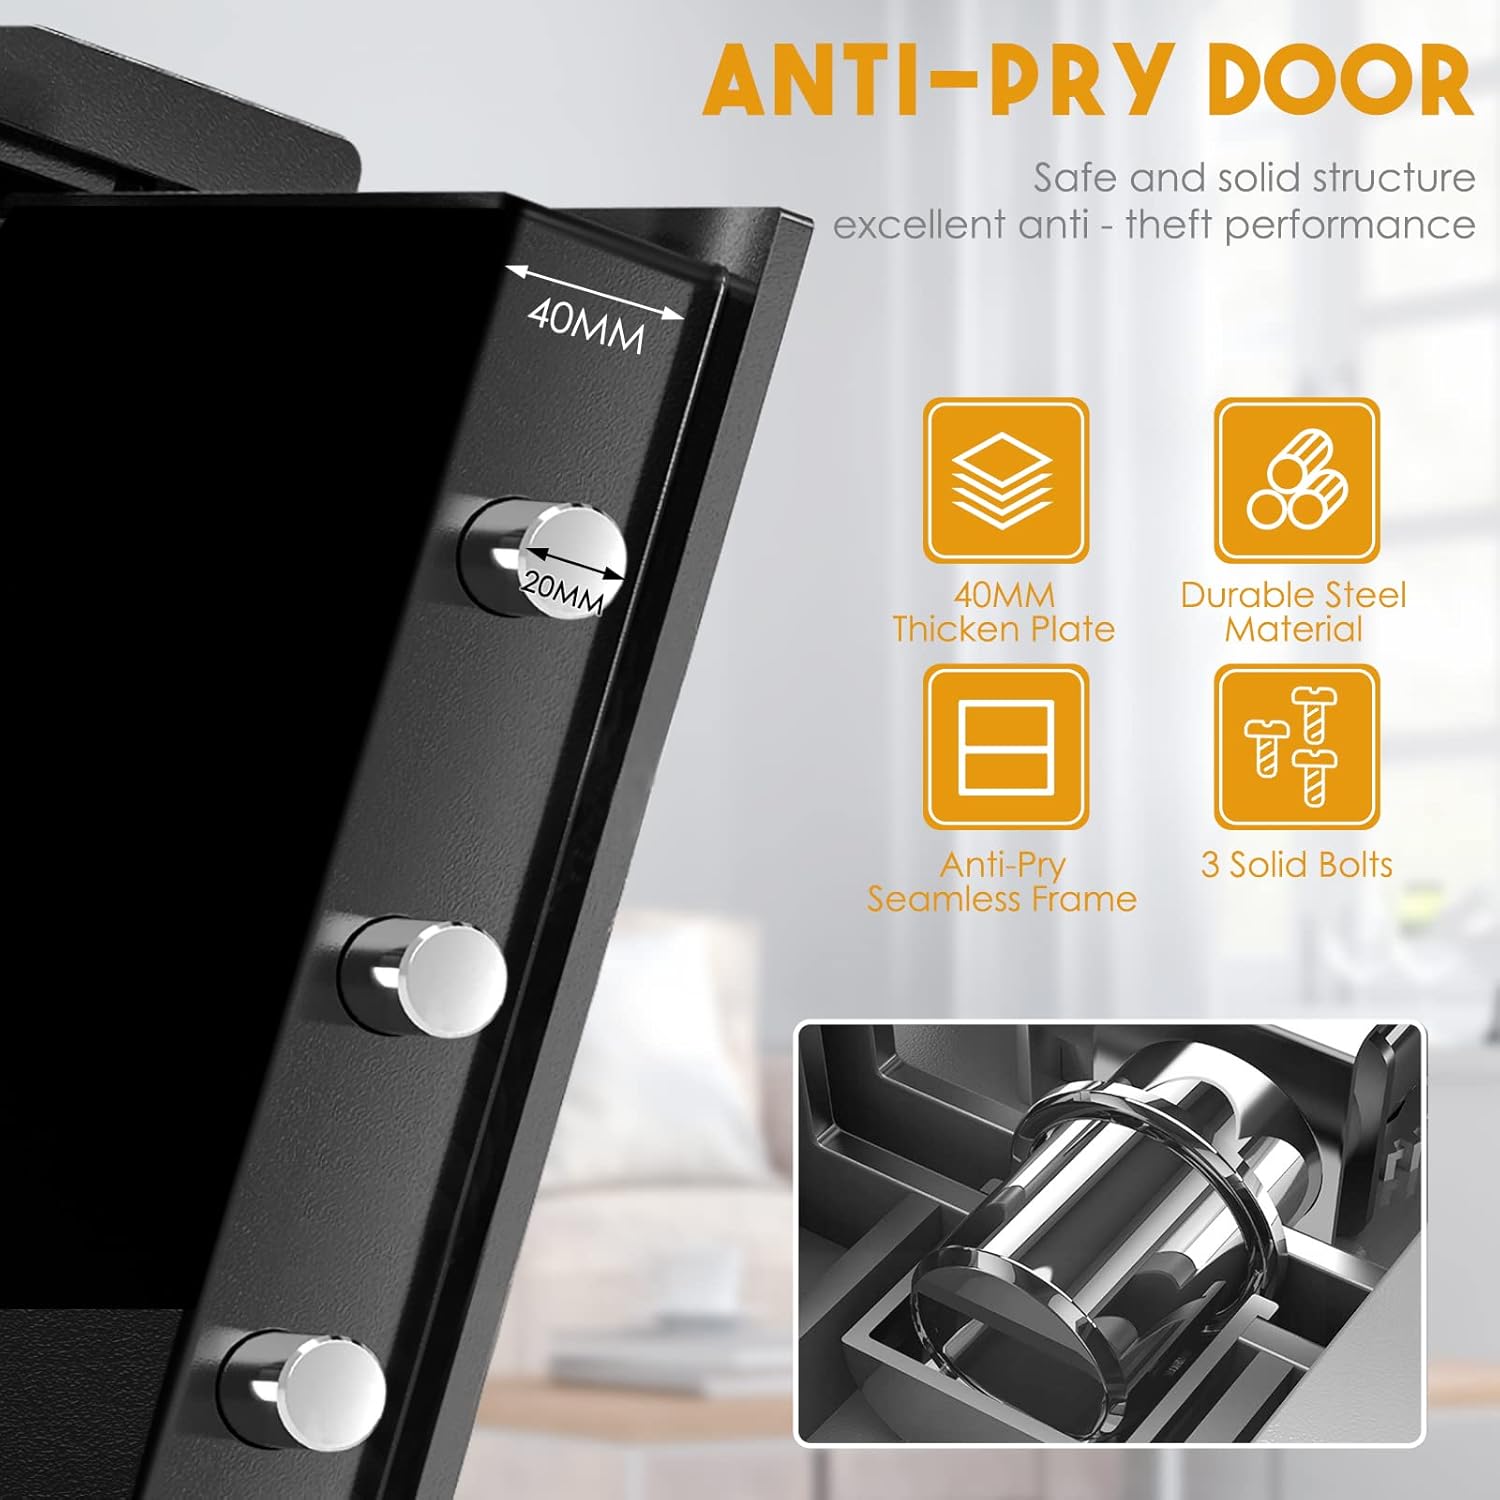
Figure 4.2: Anti-Pry Door Features
Hauptmerkmale:
- Digital Keypad with LCD Display
- Master Key and Emergency Backup Key Access
- Erinnerung bei niedrigem Batteriestand
- 40mm Thickened Steel Plate Door
- Anti-Pry Seamless Frame
- Three Solid Locking Bolts
- Removable and Height-Adjustable Internal Divider
- Pre-drilled Mounting Holes

Figure 4.3: Removable Divider Options
5. Einrichtung
5.1 Einlegen der Batterie
The safe requires 4 AA batteries (not included) to power the digital keypad. Open the battery compartment located on the inside of the safe door and insert the batteries, ensuring correct polarity. The LCD display will light up once batteries are correctly installed.
5.2 Initialisierung des Codes
Upon first use, or after battery replacement, you will need to set your personal access code.
- Bei geöffneter Tresortür drücken Sie den roten Reset-Knopf an der Innenseite der Tür (normalerweise in der Nähe des Scharniers).
- The keypad will beep, and the display will show "SET".
- Enter a new 3-8 digit code of your choice, then press the "#" key to confirm.
- The display will show "GOOD" indicating the code has been successfully set.
- Test the new code with the door open to ensure it works before closing the safe.
5.3 Montage des Tresors
The safe can be securely mounted to a wall or floor using the pre-drilled holes and included expansion screws.

Abbildung 5.1: Montageanleitung
- Wählen Sie einen geeigneten Montageort.
- Place the safe in the desired position and mark the drilling points through the pre-drilled holes on the back or bottom of the safe.
- Bohren Sie mit einem geeigneten Bohrer Löcher in die Wand oder den Boden.
- Setzen Sie die Dehnschrauben in die Bohrlöcher ein.
- Align the safe's holes with the screws and secure the safe tightly.
6. Bedienungsanleitung
6.1 Öffnen des Safes
There are three primary methods to open your Diosmio safe:

Figure 6.1: Three Ways to Open the Safe
- Using Master Key + Backup Key: Insert the master key into the master keyhole and the backup key into the backup keyhole. Turn both keys simultaneously to open the safe.
- Using Code + Master Key: Insert the master key into the master keyhole. Enter your personal 3-8 digit code on the keypad, then press "#". Turn the master key to open the safe.
- Using Master Keyhole in Horizontal Status + Code: Insert the master key into the master keyhole and turn it to the horizontal position. Enter your personal 3-8 digit code on the keypad, then press "#". The safe will unlock.
6.2 Schließen und Verriegeln des Tresors
Close the safe door firmly. The locking bolts will automatically engage. To ensure it is locked, you can try to turn the handle or gently pull the door.
6.3 Ändern des Benutzercodes
- Öffnen Sie die Tresortür.
- Drücken Sie den roten Reset-Knopf an der Innenseite der Tür.
- The display will show "SET".
- Enter your new 3-8 digit code, then press "#".
- The display will show "GOOD". Your new code is now active.
6.4 Warnung bei niedrigem Batteriestand
When the battery power is low, the LCD display will show a battery reminder icon. Replace the batteries promptly to ensure continued operation. If batteries completely drain, you can use the emergency keys or external power supply box to open the safe.
7. Wartung
- Reinigung: Wischen Sie die Außenseite des Tresors mit einem weichen, fusselfreien Tuch ab.amp Tuch. Keine Scheuer- oder Lösungsmittel verwenden.
- Batteriewechsel: Replace all four AA batteries when the low battery indicator appears. Use high-quality alkaline batteries for best performance.
- Schlüsselwartung: Keep keys clean and dry. Do not force keys into the lock.
8. Fehlerbehebung
| Problem | Mögliche Ursache | Lösung |
|---|---|---|
| Der Tresor lässt sich nicht mit dem Code öffnen. | Incorrect code entered; Low batteries; Keypad malfunction. | Re-enter code carefully; Replace batteries; Use emergency key. |
| Die Tastatur reagiert nicht. | Leere Batterien; Wackelkontakt der Batterie. | Replace batteries; Ensure batteries are correctly inserted. |
| Door will not close properly. | Hindernis im Türrahmen; Riegel nicht vollständig zurückgezogen. | Check for obstructions; Ensure handle is fully turned to retract bolts. |
| Forgotten code. | Code vergessen. | Use the emergency keys to open the safe, then reset the code. |
9. Spezifikationen
| Besonderheit | Detail |
|---|---|
| Modell | 2 Cub Tall Digital Security Safe Box |
| Marke | Diosmio |
| Außenabmessungen (H x B x T) | 45 cm x 37.8 cm x 31 cm (17.71 Zoll x 14.90 Zoll x 12.20 Zoll) |
| Innenmaße (H x B x T) | Ca. 43 cm x 35 cm x 25.5 cm (16.93 Zoll x 13.78 Zoll x 10.04 Zoll) |
| Gewicht | Ca. 15.2 kg |
| Sperrtyp | Electronic Keypad, Key Lock |
| Material | Massiver Stahl |
| Besondere Merkmale | Fireproof (with included bag), Wall Mountable, Removable Divider |
| Stromquelle | 4 x AA-Batterien (nicht im Lieferumfang enthalten) |
10. Garantie und Support
Diosmio products are manufactured to high-quality standards. For any questions, technical support, or warranty claims, please contact your retailer or the manufacturer directly. Please have your product model and purchase information ready when contacting support.


